
random user submitted photo
Cowling problem
30 posts
• Page 2 of 3 • 1, 2, 3
Re: Cowling problem
I have southcos. I quit using the springs and retaining rings. When I remove the cowl, I just remove them and put them in my pocket. It makes removing and installing the horizontal split easier. My only complaint is I need the longest ones which are only flat headed. That means putting any pressure twisting them on risks slipping with the screw driver and scratching the cowl.
John Gillis
SEL Private, Comm Glider, Tow pilot (Pawnee Driver)
Waiex N116YX, Jabiru 3300, Tail dragger,
First flight, 3/16/2013. 403 hours and climbing.
Home: CO15. KOSH x 5
Flying a B-Model Conversion (Super Bee Baby!)
-

fastj22 - Posts: 1594
- Joined: Sun Aug 21, 2011 5:56 pm
- Location: Mile High
Re: Cowling problem
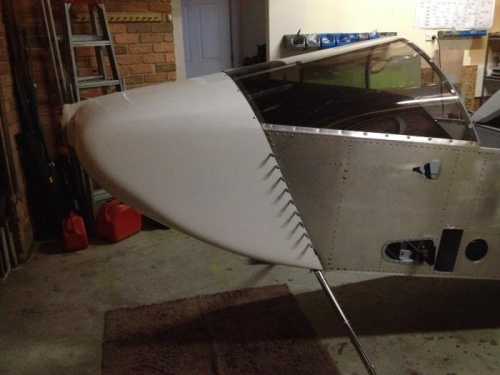
I finished rough fitting the LH cowling. The hinges are installed and southco's in place.
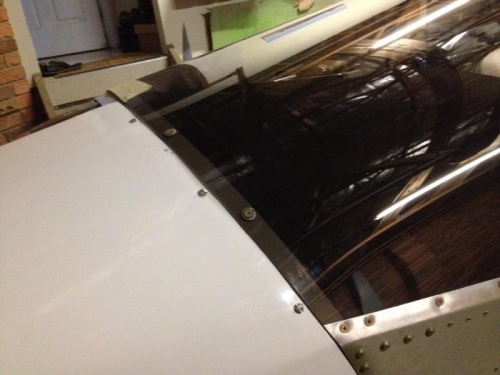
There is still a small gap on the top center between the cowling and windscreen edges, I did not want to trim the bottom and side any further so this will need to be fixed with a tiny amount of fiberglass extension.
Also, I trimmed the top center line before I had the southco's on (just clamped it in place), now with them in place it looks like I might have to trim a bit more. The cowl goes slightly over the center line.
The bottom hinge was not easy to install, in the end I just installed it on the other hinge half, installed the cowling, clamped it to the hinge and marked the hinge outline, then took the cowl back off and installed the hinge.
All-in-all, this was not as difficult as it initially was looking like it was going to be. Hopefully the RH cowl goes on just as easily and they mate without issues afterwards.
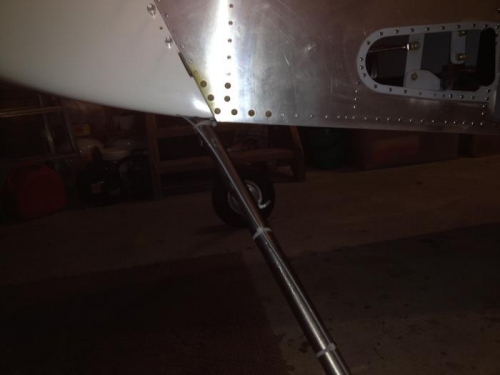


Michael
Sonex #145 from scratch (mostly)
Taildragger, 2.4L VW engine, AeroInjector, Prince 54x48 P-Tip
VH-MND, CofA issued 2nd of November 2015
First flight 7th of November 2015
Phase I Completed, 11th of February 2016
http://www.mykitlog.com/rizzz/
Sonex #145 from scratch (mostly)
Taildragger, 2.4L VW engine, AeroInjector, Prince 54x48 P-Tip
VH-MND, CofA issued 2nd of November 2015
First flight 7th of November 2015
Phase I Completed, 11th of February 2016
http://www.mykitlog.com/rizzz/
- rizzz
- Posts: 869
- Joined: Tue Jun 21, 2011 2:07 am
- Location: Wollongong, NSW, Australia
Re: Cowling problem
Let's face it, the Sonex cowling is the work of the devil! Merit badge? Fitting the cowling and canopy alone should be enough to meet the 51% rule, just as RV12 builders, having clecoed a few panels together and inserted some rivets have to meet the 51% rule by fashioning a windscreen surround out of chewing gum and string. I spent hours on the cowling before I finally discovered that it did not clear the exhaust. Once I had cut a hole to clear the exhaust (which later had to be filled with a specially molded blister) it all went fairly smoothly, except I was never able to buy Southco fasteners long enough to work. I eventually gave up on Southco and fitted 10-32 nutplates. I use countersunk-head Unbrakos with dimpled washers and bought a 1/8 hex-key T-bar wrench to fit them, which speeds up removal but 1/4 turn fasteners would be nice.
Peter
Peter
- peter anson
- Posts: 558
- Joined: Thu Jul 31, 2014 2:34 am
- Location: Mount Macedon, Australia
Re: Cowling problem
Just an update on my cowling “problem” which turned out to be a non-issue in the end. Just takes a lot of time, effort, and determination.
As mentioned before I am still left with a 1/8” gap on the top aft side between the cowl and windscreen edges but that will be an easy fix. The cowling sits a bit lower there than the windscreen anyway so I am going to add a layer of fibreglass below the southco’s to raise it slightly to get a smoother transition between the cowl & windscreen when doing so I can extend the cowl 1/8” to get the edge closer to the windscreen edge.
First thing I needed to do was make a cut-out for the gascolator and fuel vent. It started out as a round hole but as I moved the cowl half further back more and more during trimming, it ended up becoming an oval shape. Still looks ok though:
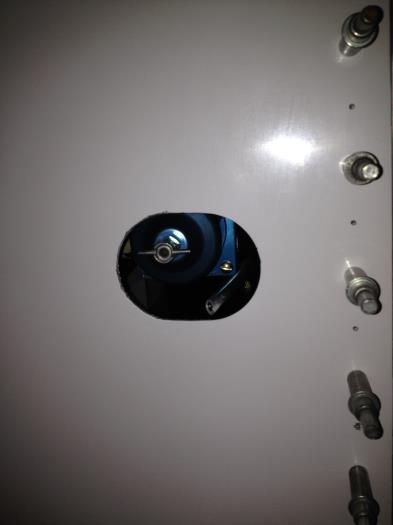
The side hinges were drilled from the inside initially, with one cowl half off to drill the other.
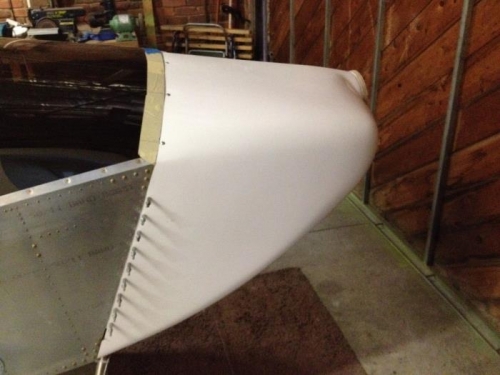
Trimming the cowl centrelines was very easy, there was about 3/8” to trim on the aft top side going to no trim at all on the forward top side.
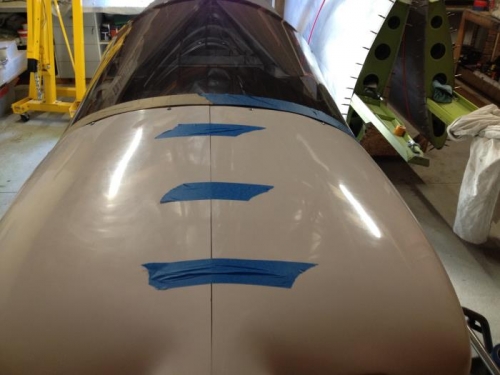
The bottom centreline required no trimming what so ever, just a bit of sanding to straighten the line but I pretty much had a perfect fit to start with.
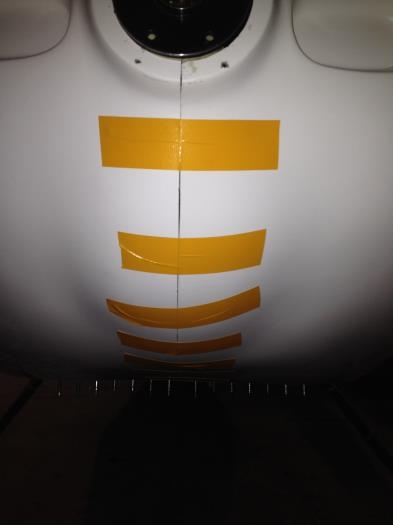
Installing the hinges was not too complicated as well. After cutting the fuel fill box opening, the top hinge was done with the cowl installed and the hinge taped in place on the outside. After installing the hinge on the inside the fit turned out to be perfect.
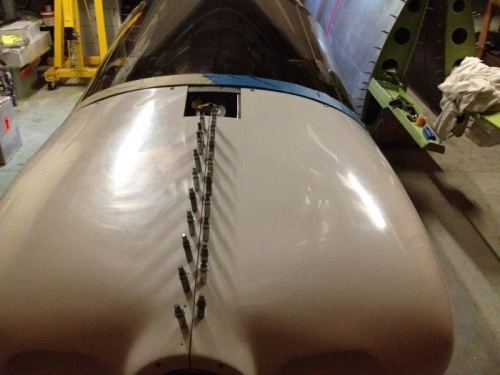
I took the cowling off again, pinned the top together with the hinge pin and taped the bottom together with duct tape. Then as before I started drilling the hinge from the outside first. This proved to work well for the rivet holes on the aft flat part of the cowling but when moving the hinge to the inside I noticed the forward holes on the curved part were out of alignment. Silly, I should have only drilled the aft holes on the flat part, then moved the hinge to the inside and then do the forward holes on the inside. Luckily with fibreglass this is not a big issue, I patched the holes up and redrilled them from the inside.
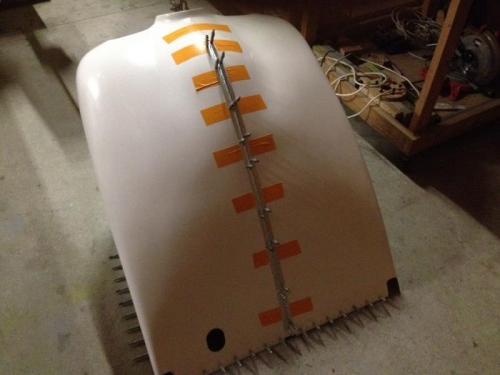
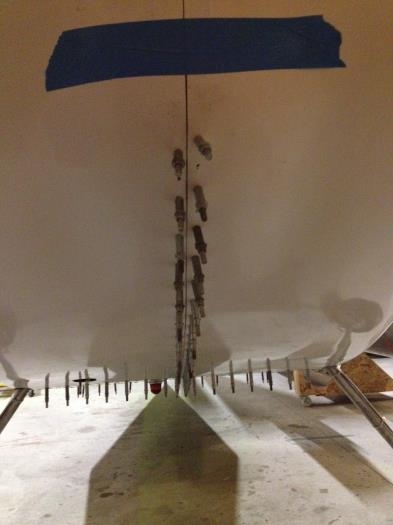
I’m installing my centre hinge pin from the aft side instead of going in from the forward side through the oil cooler inlet. This will ensure the hinge pin cannot slide into the prop as I’ve heard has happened before. To do this I made the hinge 1” shorter on the aft side and made a small cut-out to insert the hinge pin
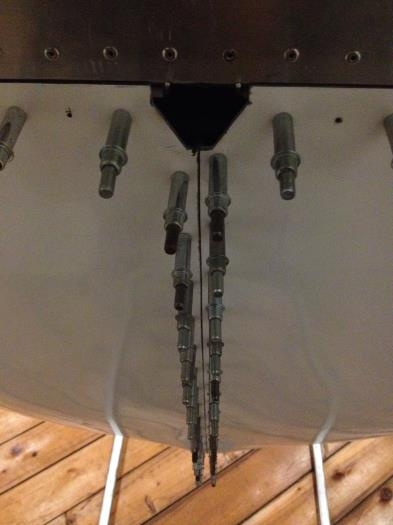
All hinges are now installed and I’m pretty happy with the final positioning of the cowl.
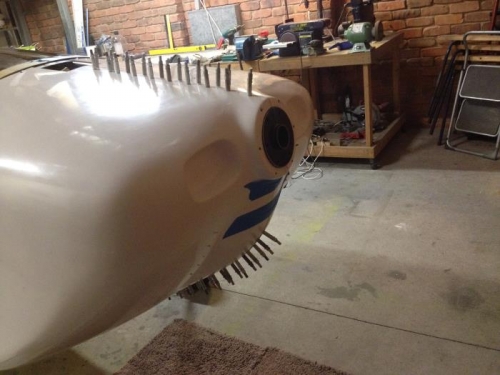
One issue I had with my 2.4l VW engine is that the valve covers were to interfering with the cowl side wall. My Hummel style engine is slightly wider than the AeroVee.
I feared I would have to make cut-outs/cheeks for the valve covers in my universal cowling side wall.
Till now, to be able to fit the cowling initially I had just removed the cover plates.
When I originally attempted to fit the cowling with the valve covers in place, I had a set of bolt-on valve covers on the engine, the same as the AeroVee covers. These covers are actually higher than the stock VW covers as they allow for high lift rockers to be installed (which we don’t on our airplane conversions).
I went back to using the stock clip on valve covers and it turns out these just fit under the cowl. The forward edge of the clip on the left side is just clear of the cowling side. No modification will be required here which I’m pretty happy about.
With all the hinges installed it’s now a matter of making the cut-outs for the exhausts and the cooling air inlets, riveting the hinges in place and then doing the final fibreglass finishing work.
It’s turned out to be a far bigger job than I had imagined, I can’t even begin to think about how many times I’ve taken off and put it back on, seriously, but in the end I’m quite happy with the result and that’s the main thing.
As mentioned before I am still left with a 1/8” gap on the top aft side between the cowl and windscreen edges but that will be an easy fix. The cowling sits a bit lower there than the windscreen anyway so I am going to add a layer of fibreglass below the southco’s to raise it slightly to get a smoother transition between the cowl & windscreen when doing so I can extend the cowl 1/8” to get the edge closer to the windscreen edge.
First thing I needed to do was make a cut-out for the gascolator and fuel vent. It started out as a round hole but as I moved the cowl half further back more and more during trimming, it ended up becoming an oval shape. Still looks ok though:

The side hinges were drilled from the inside initially, with one cowl half off to drill the other.

Trimming the cowl centrelines was very easy, there was about 3/8” to trim on the aft top side going to no trim at all on the forward top side.

The bottom centreline required no trimming what so ever, just a bit of sanding to straighten the line but I pretty much had a perfect fit to start with.

Installing the hinges was not too complicated as well. After cutting the fuel fill box opening, the top hinge was done with the cowl installed and the hinge taped in place on the outside. After installing the hinge on the inside the fit turned out to be perfect.

I took the cowling off again, pinned the top together with the hinge pin and taped the bottom together with duct tape. Then as before I started drilling the hinge from the outside first. This proved to work well for the rivet holes on the aft flat part of the cowling but when moving the hinge to the inside I noticed the forward holes on the curved part were out of alignment. Silly, I should have only drilled the aft holes on the flat part, then moved the hinge to the inside and then do the forward holes on the inside. Luckily with fibreglass this is not a big issue, I patched the holes up and redrilled them from the inside.


I’m installing my centre hinge pin from the aft side instead of going in from the forward side through the oil cooler inlet. This will ensure the hinge pin cannot slide into the prop as I’ve heard has happened before. To do this I made the hinge 1” shorter on the aft side and made a small cut-out to insert the hinge pin

All hinges are now installed and I’m pretty happy with the final positioning of the cowl.

One issue I had with my 2.4l VW engine is that the valve covers were to interfering with the cowl side wall. My Hummel style engine is slightly wider than the AeroVee.
I feared I would have to make cut-outs/cheeks for the valve covers in my universal cowling side wall.
Till now, to be able to fit the cowling initially I had just removed the cover plates.
When I originally attempted to fit the cowling with the valve covers in place, I had a set of bolt-on valve covers on the engine, the same as the AeroVee covers. These covers are actually higher than the stock VW covers as they allow for high lift rockers to be installed (which we don’t on our airplane conversions).
I went back to using the stock clip on valve covers and it turns out these just fit under the cowl. The forward edge of the clip on the left side is just clear of the cowling side. No modification will be required here which I’m pretty happy about.
With all the hinges installed it’s now a matter of making the cut-outs for the exhausts and the cooling air inlets, riveting the hinges in place and then doing the final fibreglass finishing work.
It’s turned out to be a far bigger job than I had imagined, I can’t even begin to think about how many times I’ve taken off and put it back on, seriously, but in the end I’m quite happy with the result and that’s the main thing.
Michael
Sonex #145 from scratch (mostly)
Taildragger, 2.4L VW engine, AeroInjector, Prince 54x48 P-Tip
VH-MND, CofA issued 2nd of November 2015
First flight 7th of November 2015
Phase I Completed, 11th of February 2016
http://www.mykitlog.com/rizzz/
Sonex #145 from scratch (mostly)
Taildragger, 2.4L VW engine, AeroInjector, Prince 54x48 P-Tip
VH-MND, CofA issued 2nd of November 2015
First flight 7th of November 2015
Phase I Completed, 11th of February 2016
http://www.mykitlog.com/rizzz/
- rizzz
- Posts: 869
- Joined: Tue Jun 21, 2011 2:07 am
- Location: Wollongong, NSW, Australia
Re: Cowling problem
Don't feel too happy with yourself.. you've got the filling, sanding, priming and painting stages to go through yet LOL
Just kidding, good job.. it was the one that I hated most!
Just kidding, good job.. it was the one that I hated most!
Sonex #813
First Flight... 4 Oct 14
298 hours having fun!
http://sonexaus.wikispaces.com/Tony+%28Richo%29+Richardson+Sonex+813
First Flight... 4 Oct 14
298 hours having fun!
http://sonexaus.wikispaces.com/Tony+%28Richo%29+Richardson+Sonex+813
-

tonyr - Posts: 200
- Joined: Thu Jun 27, 2013 12:50 am
Re: Cowling problem
Well,
After so many weeks working on the cowling I’ve pretty much had enough of it.
Fibreglass work is just a PITA.
Yes I’ve had a few frustrations before in project like when I stuffed up the wing rigging, but at least with something like that it’s clear: it’s either perfect or not good enough.
With this fibreglass work it’s not that simple, you can get it to a point where it’s good but it seems it always can be improved.
Anyway, here are some pictures of where I’m at now:
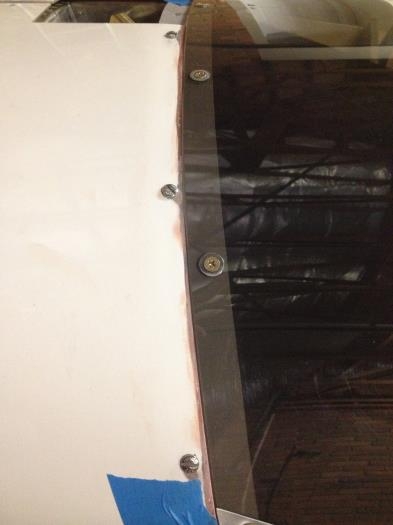
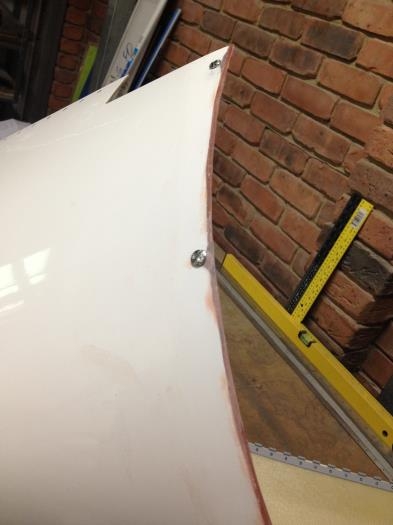
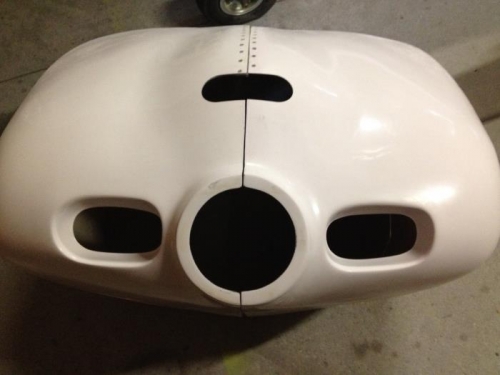
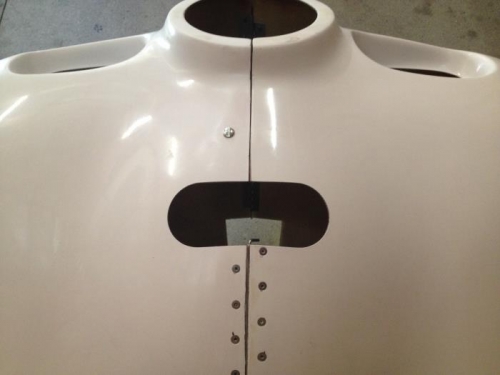
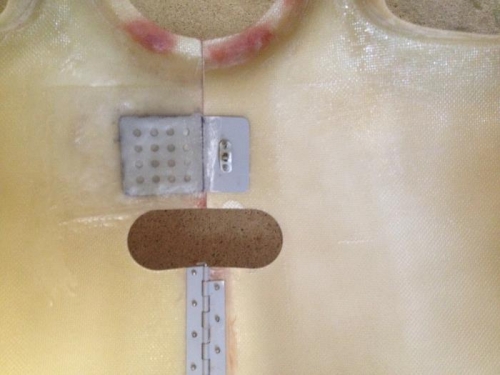
Only the exhaust tunnels and the fuel filler door remain, the rest looks good but still could be improved if I really wanted to, for now I’m leaving it at that.
The tunnels are a bit of an issue on their own.
I have a VW engine with the old 4 separate exhaust pipe system and the universal cowling.
This means I will have to fabricate my own exhaust tunnels as they were in the old VW cowling and similar to what’s in the current Jabiru cowlings as well.
The current drawings/instructions only show how to make the parts and install them for the new AeroVee 2-in-1 exhaust system which is different (the exhaust comes out at the rear end of the cowl, no real “tunnels” required).The tunnel parts I require would be very similar, if not identical to the parts included in the Jabiru baffle kit, P20-45 and P20-46.
I checked with Sonex to see if they had detailed drawings of these parts but it seems they don’t, I can order the parts separately themselves though.
Anyway, I’m going to have a go at making these from scratch myself first based on the limited pictures/diagrams available.
I’ve drawn something up in AutoCAD last night, this might still need to be refined, I’ll make one tonight and see if it matches what I want.

After so many weeks working on the cowling I’ve pretty much had enough of it.
Fibreglass work is just a PITA.
Yes I’ve had a few frustrations before in project like when I stuffed up the wing rigging, but at least with something like that it’s clear: it’s either perfect or not good enough.
With this fibreglass work it’s not that simple, you can get it to a point where it’s good but it seems it always can be improved.
Anyway, here are some pictures of where I’m at now:


Only the exhaust tunnels and the fuel filler door remain, the rest looks good but still could be improved if I really wanted to, for now I’m leaving it at that.
The tunnels are a bit of an issue on their own.
I have a VW engine with the old 4 separate exhaust pipe system and the universal cowling.
This means I will have to fabricate my own exhaust tunnels as they were in the old VW cowling and similar to what’s in the current Jabiru cowlings as well.
The current drawings/instructions only show how to make the parts and install them for the new AeroVee 2-in-1 exhaust system which is different (the exhaust comes out at the rear end of the cowl, no real “tunnels” required).The tunnel parts I require would be very similar, if not identical to the parts included in the Jabiru baffle kit, P20-45 and P20-46.
I checked with Sonex to see if they had detailed drawings of these parts but it seems they don’t, I can order the parts separately themselves though.
Anyway, I’m going to have a go at making these from scratch myself first based on the limited pictures/diagrams available.
I’ve drawn something up in AutoCAD last night, this might still need to be refined, I’ll make one tonight and see if it matches what I want.

Michael
Sonex #145 from scratch (mostly)
Taildragger, 2.4L VW engine, AeroInjector, Prince 54x48 P-Tip
VH-MND, CofA issued 2nd of November 2015
First flight 7th of November 2015
Phase I Completed, 11th of February 2016
http://www.mykitlog.com/rizzz/
Sonex #145 from scratch (mostly)
Taildragger, 2.4L VW engine, AeroInjector, Prince 54x48 P-Tip
VH-MND, CofA issued 2nd of November 2015
First flight 7th of November 2015
Phase I Completed, 11th of February 2016
http://www.mykitlog.com/rizzz/
- rizzz
- Posts: 869
- Joined: Tue Jun 21, 2011 2:07 am
- Location: Wollongong, NSW, Australia
Re: Cowling problem
The tunnel drawing looks about right.
When calculating the exit area, I added extra for the space the exhaust pipes take up. The single exhaust per tunnel was about 2sq ins.
From my build blog
"Sonex Jabiru engine installation manual recommends 47-50 Square inches.
If you take the standard dimensions and subtract the tailpipe area you end up with about 43 sq ins. (6.75x3.5x2-4=43.25)"
I made them 7" x 3.75" each.
PS. Don't forget to add an exit flange forward of the tunnel holes.
Cheers
Tony
Sonex #813
First Flight... 4 Oct 14
298 hours having fun!
http://sonexaus.wikispaces.com/Tony+%28Richo%29+Richardson+Sonex+813
First Flight... 4 Oct 14
298 hours having fun!
http://sonexaus.wikispaces.com/Tony+%28Richo%29+Richardson+Sonex+813
-

tonyr - Posts: 200
- Joined: Thu Jun 27, 2013 12:50 am
Re: Cowling problem
rizzz wrote:I went back to using the stock clip on valve covers and it turns out these just fit under the cowl. The forward edge of the clip on the left side is just clear of the cowling side. No modification will be required here which I’m pretty happy about.
No idea whether it is true or not but I've heard several times that the stock valve covers, painted black, will give better cooling than the aftermarket chrome bolt on ones.
Your cowling work looks great. Just remember that it only has to be "perfect enough" for you. When you do a 200 mph (OK 197) sheep clearing pass, hardly no one will see the small imperfections anyway ...
:lol:
Dale
N319WF
-

daleandee - Posts: 877
- Joined: Fri Feb 01, 2013 6:14 pm
Re: Cowling problem
tonyr wrote:The tunnel drawing looks about right.
When calculating the exit area, I added extra for the space the exhaust pipes take up. The single exhaust per tunnel was about 2sq ins.
From my build blog
"Sonex Jabiru engine installation manual recommends 47-50 Square inches.
If you take the standard dimensions and subtract the tailpipe area you end up with about 43 sq ins. (6.75x3.5x2-4=43.25)"
I made them 7" x 3.75" each.
PS. Don't forget to add an exit flange forward of the tunnel holes.
Cheers
Tony
I just printed out the drawing, cut out the shape and folded the bends to test fit the template.
It's pretty close if not spot on, I'll know for sure tonight when I make a real one (I did this quickly during my lunch break ;-) ).
I have the J2200 and J3300 installation manuals as well, my plans are really old and at the time it seems Sonex was shipping these with the plans.
Thanks for the reminder about the exit flange, haven't forgotten.
That part will be easier than this one to try and work out.
Michael
Sonex #145 from scratch (mostly)
Taildragger, 2.4L VW engine, AeroInjector, Prince 54x48 P-Tip
VH-MND, CofA issued 2nd of November 2015
First flight 7th of November 2015
Phase I Completed, 11th of February 2016
http://www.mykitlog.com/rizzz/
Sonex #145 from scratch (mostly)
Taildragger, 2.4L VW engine, AeroInjector, Prince 54x48 P-Tip
VH-MND, CofA issued 2nd of November 2015
First flight 7th of November 2015
Phase I Completed, 11th of February 2016
http://www.mykitlog.com/rizzz/
- rizzz
- Posts: 869
- Joined: Tue Jun 21, 2011 2:07 am
- Location: Wollongong, NSW, Australia
Re: Cowling problem
Ah ok.. was just about to send you the cowling pages
Cheers
T
Cheers
T
Sonex #813
First Flight... 4 Oct 14
298 hours having fun!
http://sonexaus.wikispaces.com/Tony+%28Richo%29+Richardson+Sonex+813
First Flight... 4 Oct 14
298 hours having fun!
http://sonexaus.wikispaces.com/Tony+%28Richo%29+Richardson+Sonex+813
-

tonyr - Posts: 200
- Joined: Thu Jun 27, 2013 12:50 am
30 posts
• Page 2 of 3 • 1, 2, 3
Who is online
Users browsing this forum: Bing [Bot] and 82 guests


