
random user submitted photo
Fitting the Canopy
10 posts
• Page 1 of 1
Fitting the Canopy
Hi all,
I finally got to a point where it was time to fit the canopy to the plane. AND... a warm enough day where I didn't have to worry about cracking it. OK.... I've watched all the vids I could find, including ones from the Vans people. I've seen a bunch of guys using Oscillating tools... but it looked slow, and the vibration could be bad. Then I watched guys using cut-off wheels. That was everything from a small Dremel tool, up to a 4" angle grinder. That group seems to think that the partial melting is better than leaving deep scratches, and may help prevent cracks. (don't know) I wasn't a fan of the band saw method that Sonex says to use.... but after consideration... I thought maybe it would be the best. The obvious downside is... you NEED a helper that can follow your lead. My only change to what Sonex tells us is that I used a less aggressive blade. Sonex says to use a 6-8tpi blade. I used a 14tpi. I did this because I saw one post saying the course blade was chipping if the Plexi came up off the table. The 14tpi didn't have that issue. And..... the band saw cuts like butter. It will go as fast, or as slow as you want.
Since my canopy has been sitting around, I tried to peel up the old tape, but it just made a mess. (Adhesive was sticky) Eventually, I was able to mark new lines, and I cut the front and back first. I followed up with a block sanding to take of any rough edges. A check fit was done... and a second set of tape markings was put on, and a Second cut was done.
At this point, I was close. I knew I wanted to "Sand" to get a final fit. I wound up using an angle grinder, with a warn flap disk on it. It would remove material quick, but with a light hand, it would leave a nice finish. FYI.... finishing with this method leaves no harsh edge lines... but it makes a mess, and all the dist is staticky. (Had to shower when I was done LOL) Oh... don't forget, you will need a little gap after it's installed. so don't make it too tight.
I would recommend using the Bandsaw, and an agressing sander... and getting a helper regardless of the method you use. Since you will be taking it on and off A LOT.... it's just easier that way. In the next few days, I'll get the frame and plexi drilled. (pictures are in reverse order for some reason. Sorry)
- Attachments
Corvair powered Waiex (under construction)
N3848D
W0181
N3848D
W0181
- Tony4aro
- Posts: 60
- Joined: Fri Jan 28, 2022 7:07 am
- Location: 5G8
Re: Fitting the Canopy
Looking good Tony!
We did the 2 person bandsaw method. Worked great.
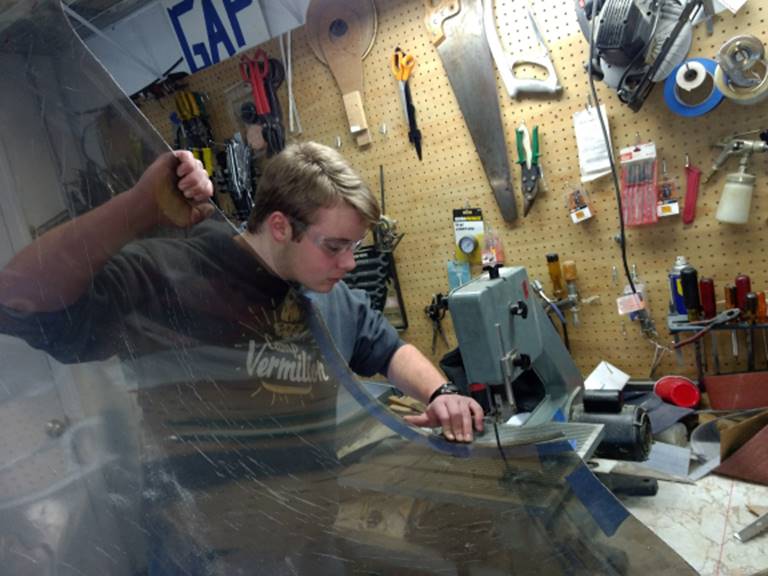
Afterwards we used a belt sander.
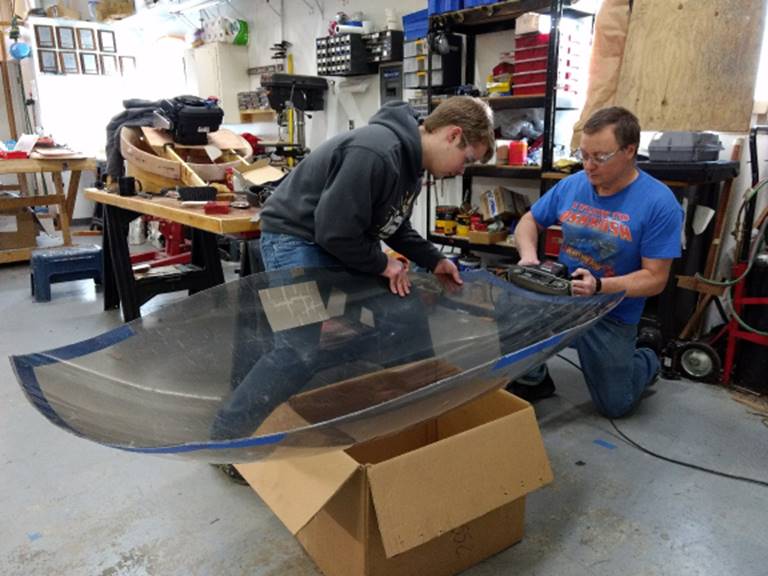
Canopy latch slot was done by drilling the ends and cutting out with a dremel.
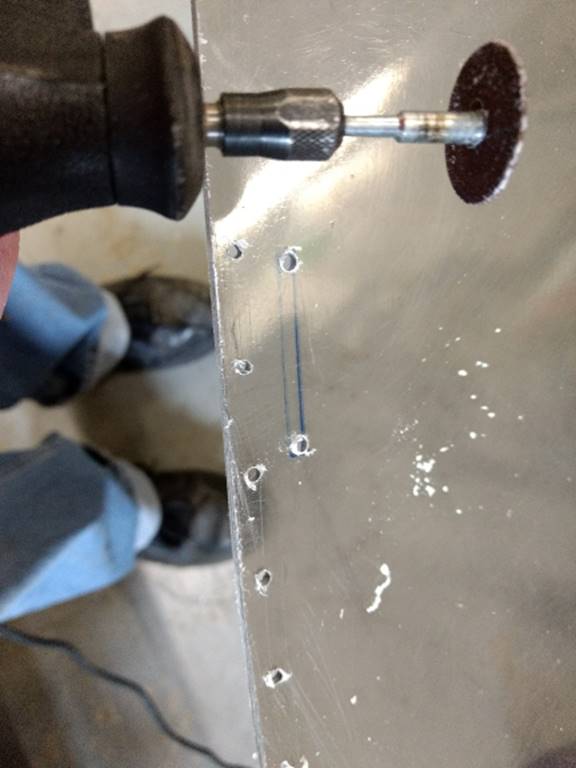
Sanded those edges later also.
We did the 2 person bandsaw method. Worked great.
Afterwards we used a belt sander.
Canopy latch slot was done by drilling the ends and cutting out with a dremel.
Sanded those edges later also.
Bryan Cotton
Poplar Grove, IL C77
Waiex 191 N191YX
Taildragger, Aerovee, acro ailerons
dual sticks with sport trainer controls
Prebuilt spars and machined angle kit
Year 2 flying and approaching 200 hours December 23
Poplar Grove, IL C77
Waiex 191 N191YX
Taildragger, Aerovee, acro ailerons
dual sticks with sport trainer controls
Prebuilt spars and machined angle kit
Year 2 flying and approaching 200 hours December 23
-

Bryan Cotton - Posts: 5489
- Joined: Mon Jul 01, 2013 9:54 pm
- Location: C77
Re: Fitting the Canopy
My mentor & I had a jig to set the canopy on whenever it was off of the aircraft during cutting & sanding. We used a dremel with a small cut-off wheel. Sanding was done after every cut with several grits of paper from course to extra fine to get a really smooth edge. We also used screws instead of rivets on the sides to fasten the canopy.
BTW ... I noticed that you have installed the correct engine for long term, low maintenance, reliable operation. Don't be surprised at how well it cools. 8~)
Dale
3.0 Corvair/Tailwheel
BTW ... I noticed that you have installed the correct engine for long term, low maintenance, reliable operation. Don't be surprised at how well it cools. 8~)
Dale
3.0 Corvair/Tailwheel
-

daleandee - Posts: 877
- Joined: Fri Feb 01, 2013 6:14 pm
Re: Fitting the Canopy
daleandee wrote:We also used screws instead of rivets on the sides to fasten the canopy.
THIS!!!!
Previous builders of my airplane used rivets; this is the result - http://eaabuilderslog.org/showmy.php?p= ... 211302.jpg
I filled the earlier relief holes with clear epoxy to cut down the whistling. But this canopy is ruined, and I will eventually have to replace it.
http://eaabuilderslog.org/?blprojentry& ... tcat=&sid=
The Sikaflex is starting to fail as well. Canopy 3.0 (the original builder also put one on, and it broke before I had any involvement with this project) wiil be TO THE PLANS, and use threaded fasteners in oversized holes.
- karmarepair
- Posts: 193
- Joined: Sun Oct 11, 2020 8:13 pm
Re: Fitting the Canopy
Bryan: Thanks for the tip on the slot. I'm still trying to figure out what I want to do with that. I just simply don't like that little slot and tab. I'm half tempted to put in a locking hatch door on the side of the plane so I can just reach in and unlatch it. But I guess I need to figure that one out quick. Do you have any thoughts on the "Factory" opening tab?
Dale: Yes.... I've asked you a few questions in the past. I think we chatted about the battery location. I know it's the "Forbidden" engine.... but it just seems like such a good combo. Nice power, and it's a proven experimental. Not to mention... with WW we have a bunch of good info. If we lived closer... I would come out to see yours up close. BUT... I think Billy is only a 3 hr drive from me.
Karmarepair: I'm way ahead of you. Was already planning screws. 1) It just doesn't make sense to use rivets. That would be a total pain when a replacement is needed. and 2) I've worked with plexi in the past (small personal projects) and any time pressure is held on it... it will crack. The first small box I made had screws. Looked nice. BUT... the next morning, all the screw holes were blown out. (They were small metal screws)
Corvair powered Waiex (under construction)
N3848D
W0181
N3848D
W0181
- Tony4aro
- Posts: 60
- Joined: Fri Jan 28, 2022 7:07 am
- Location: 5G8
Re: Fitting the Canopy
Tony4aro wrote:Bryan: Thanks for the tip on the slot. I'm still trying to figure out what I want to do with that. I just simply don't like that little slot and tab. I'm half tempted to put in a locking hatch door on the side of the plane so I can just reach in and unlatch it. But I guess I need to figure that one out quick. Do you have any thoughts on the "Factory" opening tab?
Tony, the factory opening tab or the Peter Anson setup look cool. But after over 27 months and 320 hours I'm happy with the stock latch. It works, and it's light.
Tony4aro wrote:Karmarepair: I'm way ahead of you. Was already planning screws. 1) It just doesn't make sense to use rivets. That would be a total pain when a replacement is needed. and 2) I've worked with plexi in the past (small personal projects) and any time pressure is held on it... it will crack. The first small box I made had screws. Looked nice. BUT... the next morning, all the screw holes were blown out. (They were small metal screws)
I used aluminum rivets as per the plans. See hours and months above, no cracks. If you had to replace the canopy I don't think it would be an issue with aluminum rivets.
Bryan Cotton
Poplar Grove, IL C77
Waiex 191 N191YX
Taildragger, Aerovee, acro ailerons
dual sticks with sport trainer controls
Prebuilt spars and machined angle kit
Year 2 flying and approaching 200 hours December 23
Poplar Grove, IL C77
Waiex 191 N191YX
Taildragger, Aerovee, acro ailerons
dual sticks with sport trainer controls
Prebuilt spars and machined angle kit
Year 2 flying and approaching 200 hours December 23
-

Bryan Cotton - Posts: 5489
- Joined: Mon Jul 01, 2013 9:54 pm
- Location: C77
Re: Fitting the Canopy
I think aluminum rivets with aluminum shanks with the holes in the canopy oversized would be fine..
And if you use the Peter Anson latch, you don't need that slot, but you do need a sizeable round hole, and it's a little tricky getting it in the right place.
And if you use the Peter Anson latch, you don't need that slot, but you do need a sizeable round hole, and it's a little tricky getting it in the right place.
- karmarepair
- Posts: 193
- Joined: Sun Oct 11, 2020 8:13 pm
Re: Fitting the Canopy
karmarepair wrote:I think aluminum rivets with aluminum shanks with the holes in the canopy oversized would be fine..
I must be very fortunate in that I used stainless steel rivets to attach the canopy over 20 years ago. Nary a crack all these years later. I did cheat, though, and used trim strips of aluminum to better distribute the load.
Art,,,,,,,,,,,,,,,,Sonex taildragger #95,,,,,,,,,,,,,,,Jabiru 3300 #261
- builderflyer
- Posts: 441
- Joined: Sat Jul 09, 2016 12:13 pm
Re: Fitting the Canopy
[quote="Tony4aro"]Bryan: Thanks for the tip on the slot. I'm still trying to figure out what I want to do with that. I just simply don't like that little slot and tab. I'm half tempted to put in a locking hatch door on the side of the plane so I can just reach in and unlatch it. But I guess I need to figure that one out quick. Do you have any thoughts on the "Factory" opening tab?
I did a slight modification of my latch that eliminated the slot in the plexiglass and the loose locking tab. It is with a bonded canopy, but would work with other fastening means. If interested, PM me with your direct email (cannot send attachments with PMs) and I can send some photos and drawings. It has been working well for 12 years now.
David A.
- DCASonex
- Posts: 935
- Joined: Mon Sep 12, 2011 8:04 pm
- Location: Western NY USA
Re: Fitting the Canopy
DCASonex wrote:
I did a slight modification of my latch that eliminated the slot in the plexiglass and the loose locking tab. It is with a bonded canopy, but would work with other fastening means. If interested, PM me with your direct email (cannot send attachments with PMs) and I can send some photos and drawings. It has been working well for 12 years now.
David A.
Thanks. PM sent.
Corvair powered Waiex (under construction)
N3848D
W0181
N3848D
W0181
- Tony4aro
- Posts: 60
- Joined: Fri Jan 28, 2022 7:07 am
- Location: 5G8
10 posts
• Page 1 of 1
Who is online
Users browsing this forum: No registered users and 0 guests


