

random user submitted photo
Onex 119 Update
9 posts
• Page 1 of 1
Onex 119 Update
Hi all!
I've been really quiet thus far. I purchased Onex #119 in August 2018, it was a "flying project". I'm based out of Tehachapi CA, I bought the airplane at Flabob and trailered the airplane home. In the past two years I've rebuilt the Aerovee, rewired the entire airplane, and I've done a few mods that should have been 'simple'. If all goes well, I'm a few weeks out from the first re-flight of the Onex.
Here's a few of the mods I've made:
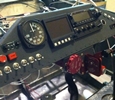
New Panel with Garmin G5, JPI EDM350, Trig TY91 Radio (I plan to add the TT22 Transponder soon)
Zenith Carb, Great Plains Intake runners
Remade throttle quadrant
Chris Higbee
Onex #119, Aerovee, Zenith, Prince 54/44
Tehachapi, CA
Onex #119, Aerovee, Zenith, Prince 54/44
Tehachapi, CA
- Chigbee
- Posts: 17
- Joined: Tue Aug 28, 2018 2:23 pm
- Location: Tehachapi CA (KTSP)
Re: Onex 119 Update
Hi! Nothing is "simple," is it!? We'll be looking forward to seeing your progress and your eventual first flight. Let us know your name, since that was missing from your post.
Mike Smith
Sonex N439M
Scratch built, AeroVee, Dual stick, Tail dragger
http://www.mykitlog.com/mikesmith
Sonex N439M
Scratch built, AeroVee, Dual stick, Tail dragger
http://www.mykitlog.com/mikesmith
- mike.smith
- Posts: 1430
- Joined: Tue Jan 29, 2013 8:45 pm
Re: Onex 119 Update
Here's some of the work from building the panel. It was really important to me that everything be easy to service, so I made the face of the panel removable. I own a 1953 Piper Tripacer and I have found whatever maintenance is difficult typically gets delayed or ignored. I really want to put a ton of hours on this airplane over a long period of time so I'm doing what I can to make it easy to maintain. I put all the wiring into and out of the panel on disconnects and made the face of the panel removable. In addition, each instrument is relatively easy to remove one at a time.
I designed the panel using Solidworks and had it waterjet cut. The panel is .020" aluminum bonded to an etchable plastic. I plan to (but haven't yet) laser etch all of the text on the panel. If I want to get really fancy down the road, I can also backlight the panel so the etching glows. Given how much work everything has been thus far, I don't think I'm going to do that.
I went with carling rocker switches on the panel because they felt really nice and because they could be custom etched and backlit. They're pretty big for a panel as small as the Onex but I was able to make them fit with out too much hassle. I really like having lit switches, for one it will tell me if I left something on unintentionally and flying at night will be easier also.
I was really intimidated to do the wiring on the airplane but I had some really good and patient mentors at work that showed me everything I needed to know. In the end, I found the wiring work to be very fulfilling and fun. I found that the most restrictive limitation for the Onex panel was not the panel size itself but the room behind the panel. it was hard to find instruments that would fit in such a shallow space. This is what drove me to the Trig radio, it was expensive but I'm happy with it so far. The Trig hardware is super nice and the install is really straight forward. I haven't flown with it yet but I'll report how it works once I have a few hours on it.
Chris Higbee
Onex #119, Aerovee, Zenith, Prince 54/44
Tehachapi, CA
Onex #119, Aerovee, Zenith, Prince 54/44
Tehachapi, CA
- Chigbee
- Posts: 17
- Joined: Tue Aug 28, 2018 2:23 pm
- Location: Tehachapi CA (KTSP)
Re: Onex 119 Update
Yesterday Onex #119 made it back to the airport after a little over two years in my garage! I'm super excited and almost beside myself with how much work has gone into an already "flying" airplane. I've had so much fun working on and growing to know and understand the airplane over the past few years of wrenching on the Onex and making it "mine". I still have a little work to do: install tip lights and run wires in the wing but otherwise it's down to having some trusted friends double check my work then we're off the the races. I've had so much fun thus far and I'm super thankful for the experience so far.
Chris Higbee
Onex #119, Aerovee, Zenith, Prince 54/44
Tehachapi, CA
Onex #119, Aerovee, Zenith, Prince 54/44
Tehachapi, CA
- Chigbee
- Posts: 17
- Joined: Tue Aug 28, 2018 2:23 pm
- Location: Tehachapi CA (KTSP)
Re: Onex 119 Update
Hi Chris,
Nice to see another Onex headed back to the skies. Question: Wasn't Onex #119 originally built with a RevMaster? What happened to that engine??
Wes
Nice to see another Onex headed back to the skies. Question: Wasn't Onex #119 originally built with a RevMaster? What happened to that engine??
Wes
Wes Ragle
Onex #89
Conventional Gear
Long Tips
Hummel 2400 w/Zenith Carb
Prince P Tip 54x50
First Flight 06/23/2020
42.8 Hrs. as of 10/30/21
Onex #89
Conventional Gear
Long Tips
Hummel 2400 w/Zenith Carb
Prince P Tip 54x50
First Flight 06/23/2020
42.8 Hrs. as of 10/30/21
- WesRagle
- Posts: 899
- Joined: Fri Jan 05, 2018 12:35 pm
- Location: Weatherford, Tx
Re: Onex 119 Update
I really like those rocker switches.
- pilotyoung
- Posts: 188
- Joined: Fri Jun 07, 2019 7:31 am
Re: Onex 119 Update
WesRagle wrote: Question: Wasn't Onex #119 originally built with a RevMaster? What happened to that engine??
I'm not entirely sure. I know it flew on that engine for the first half of phase 1 but there's no good explanation in the logs for the switch from RevMaster to Aervoee. The builder didn't say much about it other than it had "issues". I've only seen one up close and it looked like a well put together package; I don't think I'd hesitate to fly behind one. What are your thoughts on the RevMaster?
Chris Higbee
Onex #119, Aerovee, Zenith, Prince 54/44
Tehachapi, CA
Onex #119, Aerovee, Zenith, Prince 54/44
Tehachapi, CA
- Chigbee
- Posts: 17
- Joined: Tue Aug 28, 2018 2:23 pm
- Location: Tehachapi CA (KTSP)
Re: Onex 119 Update
Hi Chris,
I have a lot of thoughts, but none of them are based on personal experience. I have followed the experiences of others and it seems like the engine is very robust mechanically. If the engine has an "Achilles Heel", maybe it's the accessories.
While researching possible engines for my Onex I read this article: http://www.revmasteraviation.com/wp-content/uploads/2017/07/Revmaster-R-2300.pdf. Every thing sounded great until I saw the picture of the "The “brains” behind the brawn" on pg. 20. Doesn't look airworthy to me. The experience of others seem to confirm that impression.
Wes
Chigbee wrote:I don't think I'd hesitate to fly behind one. What are your thoughts on the RevMaster?
I have a lot of thoughts, but none of them are based on personal experience. I have followed the experiences of others and it seems like the engine is very robust mechanically. If the engine has an "Achilles Heel", maybe it's the accessories.
While researching possible engines for my Onex I read this article: http://www.revmasteraviation.com/wp-content/uploads/2017/07/Revmaster-R-2300.pdf. Every thing sounded great until I saw the picture of the "The “brains” behind the brawn" on pg. 20. Doesn't look airworthy to me. The experience of others seem to confirm that impression.
Wes
Wes Ragle
Onex #89
Conventional Gear
Long Tips
Hummel 2400 w/Zenith Carb
Prince P Tip 54x50
First Flight 06/23/2020
42.8 Hrs. as of 10/30/21
Onex #89
Conventional Gear
Long Tips
Hummel 2400 w/Zenith Carb
Prince P Tip 54x50
First Flight 06/23/2020
42.8 Hrs. as of 10/30/21
- WesRagle
- Posts: 899
- Joined: Fri Jan 05, 2018 12:35 pm
- Location: Weatherford, Tx
Re: Onex 119 Update
Chris and Wes,
I had the "brains" setup in my Revmaster for years. It never gave me trouble but the new board they have is a very professional piece and very well made with lots of improvements.
The new boards were selling for $185 until Joe at Revmaster locked up production for his use only....he gets $400. I missed the 185 price by two hours. UGH
GlenB
Dr. Glen Bradley
Pilot for Thatcher Aircraft Inc.
Owns a CX5, flies the CX7 and a ONEX (recently completed)
Pilot for Thatcher Aircraft Inc.
Owns a CX5, flies the CX7 and a ONEX (recently completed)
- flyingbear
- Posts: 54
- Joined: Wed Nov 27, 2019 10:19 pm
9 posts
• Page 1 of 1
Who is online
Users browsing this forum: No registered users and 25 guests


