

random user submitted photo
When in the build to mount the engine
13 posts
• Page 1 of 2 • 1, 2
When in the build to mount the engine
I just got my case closed up last night and now I'm looking ahead to what to work on next. The manual has you install the cylinders, heads, and many other things before finally mounting the nearly complete engine to the plane.
I'm working by myself and I'm not looking forward to trying to lift the entire engine onto the engine mount. Would I run into any issues if I mount it now and do all the cylinders and everything else on the top/bottom/front/sides after it's on the plane?
I'm trying to find any gotchas in the manual that could bit me later if I do this but I haven't seen any yet. I still need to do the rear oil seal and flywheel, but the next step after that is the accessory plate and I don't really see a reason not to just bolt it to the plane at that point.
What am I missing?
Thanks!
-

Spaceman - Posts: 330
- Joined: Sat Jan 21, 2012 5:52 pm
- Location: Roseville, CA
Re: When in the build to mount the engine
If you are building the engine on an engine stand that rotates, put the cylinders and heads on before attaching to the plane. Much easier. Gravity is your friend. You can always rent (or buy) an engine hoist to install the engine if your friends are tired of pizza.
An acquaintance is in the process of replacing cylinders and a head on his Xenos. It would be a lot more fun if the plane could be rolled over on it's side.
An acquaintance is in the process of replacing cylinders and a head on his Xenos. It would be a lot more fun if the plane could be rolled over on it's side.
- Area 51%
- Posts: 804
- Joined: Thu Feb 18, 2016 7:57 am
Re: When in the build to mount the engine
A rotatable stand would definitely be the best I guess. But between working on the front of the plane or on a workbench, seems to me the plane would be easier with more access to the underside. If all goes well is there any reason to pull the whole engine back off again in the near future?
-

Spaceman - Posts: 330
- Joined: Sat Jan 21, 2012 5:52 pm
- Location: Roseville, CA
Re: When in the build to mount the engine
Have you layed out your firewall yet? I (and many other I think) found it helpful to mount the engine once, mark off/layout the firewall, then remove the engine to make all the firewall installations much easier.
As for getting the engine on the plane, I set the engine on a table on a little wooden stand that let me basically "plug" the airplane into the engine. No lifting necessary (other than getting the engine on the table.) http://www.rynoth.com/wordpress/waiex/2 ... -manifold/
As for getting the engine on the plane, I set the engine on a table on a little wooden stand that let me basically "plug" the airplane into the engine. No lifting necessary (other than getting the engine on the table.) http://www.rynoth.com/wordpress/waiex/2 ... -manifold/
Ryan Roth
N197RR - Waiex #197 (Turbo Aerovee Taildragger)
Knoxville, TN (Hangar at KRKW)
My project blog: http://www.rynoth.com/wordpress/waiex/
Time-lapse video of my build: https://www.youtube.com/watch?v=Q8QTd2HoyAM
N197RR - Waiex #197 (Turbo Aerovee Taildragger)
Knoxville, TN (Hangar at KRKW)
My project blog: http://www.rynoth.com/wordpress/waiex/
Time-lapse video of my build: https://www.youtube.com/watch?v=Q8QTd2HoyAM
-

Rynoth - Posts: 1308
- Joined: Fri Jul 26, 2013 1:32 pm
- Location: Knoxville, TN
Re: When in the build to mount the engine
It's mostly layed out but I haven't drilled any holes yet. I actually kind of feel like I should get the engine on before I fully commit to my firewall layout, that way I don't risk placing something that'll interfere with part of the intake/exhaust or whatever.
Now that I'm looking at it more I'm actually mostly concerned about checking that the trust line is aligned with the fuselage before I get too much farther. I'm not really sure yet how to measure that but I should try to figure it out before the engine gets too heavy!
Ryan I really like how you attached your plane to the engine. I have some weird space constraints in my garage but maybe I can get that to work.
-

Spaceman - Posts: 330
- Joined: Sat Jan 21, 2012 5:52 pm
- Location: Roseville, CA
Re: When in the build to mount the engine
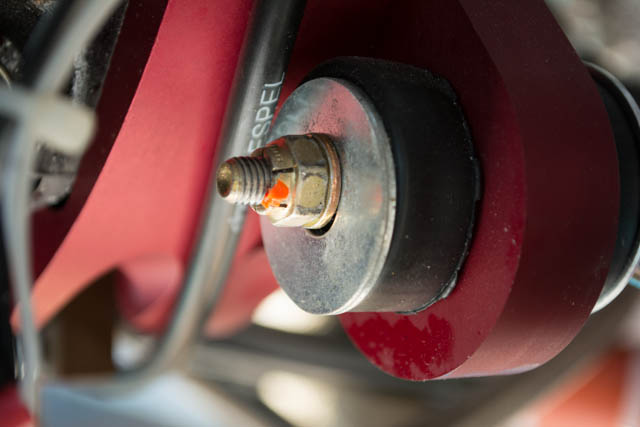
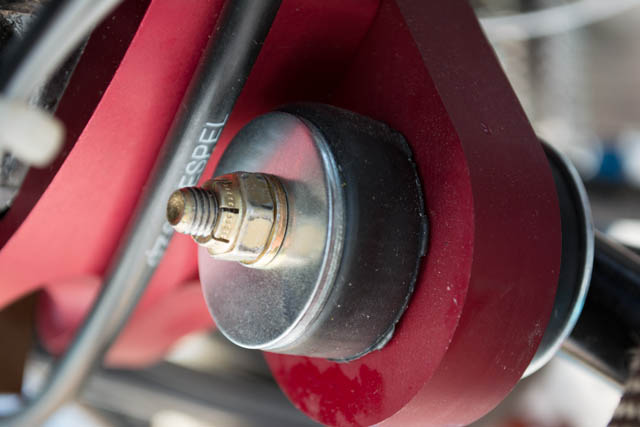
Since you're entering the engine mounting phase, I'll add a tip that has been pretty well proven at this point. Include a large washer on the outside of the engine mount bushings, regardless of how the alignment is (add additional washers as necessary for proper alignment.) The bushings WILL start to compress/extrude over time, and the more support they have behind them the better.
http://www.rynoth.com/wordpress/waiex/2 ... ng-issues/
It's a lot easier to add backing washers to the bushings the first time since adding them later either means using a slotted washer or removing the engine entirely to add washers.
http://www.rynoth.com/wordpress/waiex/2 ... ng-issues/
It's a lot easier to add backing washers to the bushings the first time since adding them later either means using a slotted washer or removing the engine entirely to add washers.
Ryan Roth
N197RR - Waiex #197 (Turbo Aerovee Taildragger)
Knoxville, TN (Hangar at KRKW)
My project blog: http://www.rynoth.com/wordpress/waiex/
Time-lapse video of my build: https://www.youtube.com/watch?v=Q8QTd2HoyAM
N197RR - Waiex #197 (Turbo Aerovee Taildragger)
Knoxville, TN (Hangar at KRKW)
My project blog: http://www.rynoth.com/wordpress/waiex/
Time-lapse video of my build: https://www.youtube.com/watch?v=Q8QTd2HoyAM
-

Rynoth - Posts: 1308
- Joined: Fri Jul 26, 2013 1:32 pm
- Location: Knoxville, TN
Re: When in the build to mount the engine
Rynoth wrote:Since you're entering the engine mounting phase, I'll add a tip that has been pretty well proven at this point. Include a large washer on the outside of the engine mount bushings, regardless of how the alignment is (add additional washers as necessary for proper alignment.) The bushings WILL start to compress/extrude over time, and the more support they have behind them the better.
http://www.rynoth.com/wordpress/waiex/2 ... ng-issues/
It's a lot easier to add backing washers to the bushings the first time since adding them later either means using a slotted washer or removing the engine entirely to add washers.
Haha! Dangit, when I saw your post I had just walked in the house after bolting up the engine. I used your method and it worked great. Good tip though, I went back out after dinner and re-did it; it only took like a half hour to set the engine back down and mount it again. Thanks!
Good idea too on the slotted washers. If I need to make alignment changes later I'll just do that; way easier than removing the whole engine again.
-

Spaceman - Posts: 330
- Joined: Sat Jan 21, 2012 5:52 pm
- Location: Roseville, CA
Re: When in the build to mount the engine
After looking closely at your photo I noticed another issue that bothered me with my install (and I talked about in my same blog post about the bushing that I linked above.) In the lower-right bushing in your photo (pilot's side bottom) I can see that patch of no-contact between the small washer under the nut and the large washer at the bushing.

This bothered me, and I ended up replacing that first large washer with one with a smaller ID.

I understand why they include the larger ID washers in the kit to fit over the engine mount on the firewall side, but don't understand why they don't include washers to properly fit under the AN4 bolts/nut/washer that hold all of your thrust.

This bothered me, and I ended up replacing that first large washer with one with a smaller ID.

I understand why they include the larger ID washers in the kit to fit over the engine mount on the firewall side, but don't understand why they don't include washers to properly fit under the AN4 bolts/nut/washer that hold all of your thrust.
Ryan Roth
N197RR - Waiex #197 (Turbo Aerovee Taildragger)
Knoxville, TN (Hangar at KRKW)
My project blog: http://www.rynoth.com/wordpress/waiex/
Time-lapse video of my build: https://www.youtube.com/watch?v=Q8QTd2HoyAM
N197RR - Waiex #197 (Turbo Aerovee Taildragger)
Knoxville, TN (Hangar at KRKW)
My project blog: http://www.rynoth.com/wordpress/waiex/
Time-lapse video of my build: https://www.youtube.com/watch?v=Q8QTd2HoyAM
-

Rynoth - Posts: 1308
- Joined: Fri Jul 26, 2013 1:32 pm
- Location: Knoxville, TN
Re: When in the build to mount the engine
Yes! I noticed that too. I'll go pick up some new washers next time I get hardware. At least those ones are on the outside though so I can just replace one at a time without yanking the whole engine again.
How tight are you supposed to tighten the mounting bolts? I just snugged them up for now but I was a little unclear on exactly on how tight they should be.
How tight are you supposed to tighten the mounting bolts? I just snugged them up for now but I was a little unclear on exactly on how tight they should be.
-

Spaceman - Posts: 330
- Joined: Sat Jan 21, 2012 5:52 pm
- Location: Roseville, CA
Re: When in the build to mount the engine
If you use the plans prescribed bolts, the nuts will probably bottom on the bolt shank before the bushings compress. Because the bolt will turn with little effort after the nut bottoms, it can give the impression of a "snug" fit. Look for a widening gap between the mounting plate and the bushings in the top aft and bottom front areas after the engine hangs for a couple of days.
You could remove a bolt and screw the nut on till it stops, then measure the distance (count the threads) from the end of the bolt to the nut to determine if the nut has come to the end of it's rope when installed on the plane.
Be sure to let the engine rest on the mount for a while before fitting the cowl. If you fit the cowl when the bushings are fresh, the engine will sag and you'll wonder where you went wrong.
I'm sure urethane bushings would cure most of the sag that we get with the rubber units, but I haven't found any that are dimensionally correct yet. The hole size of the mounting plate is 1", and all I can find is a step-down to 7/8". If I was rich, instead of so darned good looking, I'd have custom bushings made.
- Area 51%
- Posts: 804
- Joined: Thu Feb 18, 2016 7:57 am
13 posts
• Page 1 of 2 • 1, 2
Who is online
Users browsing this forum: No registered users and 20 guests


