

random user submitted photo
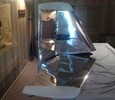
Canopy Side Bulge
3 posts
• Page 1 of 1
Canopy Side Bulge
Working on canopy #2 (ugh) for my Waiex Legacy model... and Kerry swears to me that it is the same mold as the original from 2008/09... but unlike the original (which shattered when I tried to move once early), this one has a serious bubble coming out the sides. It is now fit forward and aft, but I have left it with an extra 3/8" overhang on the sides at the moment... since it is going to be very tough to mark the cut lines since the canopy bulges out so much. (sits 1" away from the middle of the side sections minimum when taped into place).
Has anyone experienced this issue? Is it really possible to get out this bulge, and manage to rivet it into the flat side panels?
If so, is it best to add some gentle heat to it so it will be softer and more "willing" to mush inwards? After breaking one, I hesitant to want to force it, but I see no other solution.
Any thoughts, or commiseration welcome!
John
Waiex 133
Heber City, Utah
- farragt
- Posts: 6
- Joined: Thu May 25, 2017 3:53 pm
- Location: Heber City, Utah
Re: Canopy Side Bulge
Hi John, the bulge on the side is pretty much my experience with two canopies and on my first canopy, flattening that bulge did cause problems. It didn't crack when I first fitted the canopy but over the next couple of years, before I even flew the Sonex, it grew so many cracks on one side that I didn't even bother to count them.You will also find that as you flatten the sides you will need to trim more off the front and back.
I have recently made a new canopy with no cracks, well so far anyway. I used much wider side rails so the fastener holes are further from the edge of the plastic and they were drilled to 3/8" using a step drill to give large clearance over the screws. I also polished the holes using P600 abrasive wrapped around a dowel fitted to a drill. The side rails are tapped for 5 screws and the screws were only tightened enough to flatten the very bottom edge of the canopy bubble. I filled the gap with Sikaflex and also glued the bubble to the canopy hoops with Sikaflex.
I think a few builders have used an arrangement where there are no holes drilled along the sides at all. Somebody on this forum should be able to point you in the right direction for that method.
I guess the fact that Sonex now sell the B model means they'll never improve the original canopy mold.
Peter
- peter anson
- Posts: 558
- Joined: Thu Jul 31, 2014 2:34 am
- Location: Mount Macedon, Australia
Re: Canopy Side Bulge
Eighteen years ago I purchased one of the very first canopies produced by Sonex. It did not have the "side bulge" which was added shortly thereafter to satisfy potential customers request for a bit more cockpit space. Unfortunately, the bulge seemed to have made it just that much easier to crack the canopy during installation or thereafter and I'll bet a whole lot of you would have rather foregone the small amount of additional room for a canopy less prone to "cracking".
In installing my canopy, I was careful to oversize the holes with a unibit as Peter has stated. I also slightly champhered each hole to avoid any sharp edges and I polished the perimeter edges of the canopy as well to avoid any place for a crack to begin. But the amazing thing to me as to how one could abuse one of the original canopies and still not have it crack. I RIVETED the canopy to the framework all the way around using STAINLESS STEEL CHERRY N RIVETS (using a companion aluminum trim strip) and here we are sixteen years later and not one crack (yet)!
I feel for all of you who have barely touched your canopy only to have it crack before your eyes.
Art,,,,,,,,,,,,,,,,Sonex taildragger #95
- builderflyer
- Posts: 441
- Joined: Sat Jul 09, 2016 12:13 pm
3 posts
• Page 1 of 1
Who is online
Users browsing this forum: No registered users and 22 guests


