

random user submitted photo
Actual Flying Rotax Installs
Re: Actual Flying Rotax Installs
I really appreciate your insight into the engine mount issue you are having. I hope you are able to get it figured out quickly and safely! I think I will go ahead and install polyurethane bushings and outside washers on the attach bar to engine mount initially before my first flight as a possible preventative measure. I hope this does not become a show stopper in using the Sonex Rotax mount without major modifications to the engine mount. I am wondering if the long term solution would be to modify the mount to allow use of Lord mounting bushings, although that would likely require a major change to the engine mount.
Thanks!
Jake
Thanks!
Jake
Sonex Tri Gear, Rotax 912 ULS, Sensenich 3 Blade Ground Adjustable Propeller
MGL Velocity EMS, Garmin GTR 200 Comm, GTX 335 ADS B Out Transponder
ILevil AW AHRS & ADS-B In, UAvionix AV20S
200+ hours previously with Aerovee engine
Sarasota, Florida
MGL Velocity EMS, Garmin GTR 200 Comm, GTX 335 ADS B Out Transponder
ILevil AW AHRS & ADS-B In, UAvionix AV20S
200+ hours previously with Aerovee engine
Sarasota, Florida
-

SonexN76ET - Posts: 494
- Joined: Tue Aug 27, 2013 2:39 pm
- Location: Atlanta
Re: Actual Flying Rotax Installs
One thing I thought was odd about the Sonex Rotax mount is that they used the same bushings, but changed the orientation. To me (not a mechanical engineer), it appears they were primarily loaded in the axial direction for the Aerovee, but for the Rotax they're loaded nearly 100% in the radial direction. I have a Barry's data sheet for similar type mounts, and the radial load limit on those is always far less than the axial limit, so I wonder if that isn't the main problem here. I don't really see an easy way to convert this back to axial loading though.
Rusty
Rusty
Rusty
Onex- Rotax 912 (160 hours and counting)
Fixed wing, gyroplane, A&P
Onex- Rotax 912 (160 hours and counting)
Fixed wing, gyroplane, A&P
- 13brv3
- Posts: 467
- Joined: Fri Sep 25, 2015 11:59 am
- Location: Tellico Plains, TN
Re: Actual Flying Rotax Installs
Herraripower wrote:I have a 64” 3 blade warp drive
Do you have 9" of clearance at level attitude? I'm just about to place an order for a propeller and I was going to go with 62" to be safe. I have a calculated total height to centerline of 40.7", which gives a maximum 63.4" propeller diameter. I calculated total height to centerline by measuring actual to the fuselage (the main legs were installed flush, which was an additional 0.45" long) and measured from the plans to the centerline (22.8438" + 17.856" = 40.6998). My Rotax should be here soon and I'll have an actual total height.
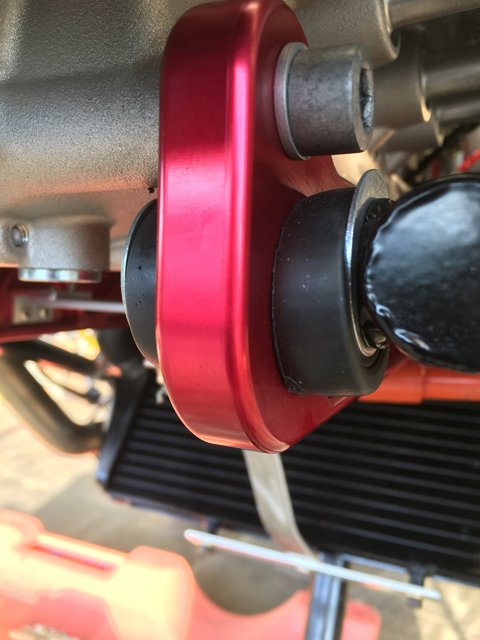
Herraripower wrote:So I had an epiphany, my mounts. So i took the bolts/pins out and inspected my mounting surfaces. My front attach points on the attach bars, were resting on my mount bolts. The bushings had shifted and deformed allowing this to happen.
...
So upon recommendation by Mark at Sonex, I shimmed the outside bushings with more washers, and in this case, I used washers that were dished to encapsulate the bushings, and push them in tighter against the attach bars. I also noticed the front attach points (the engine mount) flex outward and inward slightly, about 1/8 of an inch, which can equate to a lot of movement at the engine. I flew it for 3 more hours and no luck in solving the problem.
This was great information, thank you. I have my Rotax on order and it should be here soon. I'd hate to have to engineer a different mount, but now would be the time for me. I'm working with Mike from STOL Creek to do the engine install. He's a Rotax dealer and Edge Performance dealer for the US. He's recommending using the stock ring mount, but I don't know where to turn to have someone engineer a Sonex Rotax mount from scratch or who can adapt the existing Sonex provided mount I have. Is Sonex actively working with you on a solution, or are you on your own? Here is my post about the mount solution I came up with. Just to be clear, is the attach bar (red) displacing the rubber bushings and resting on the steel bushing the bolt travels through?
viewtopic.php?f=60&t=5612
- Zack
- Posts: 75
- Joined: Fri Nov 24, 2017 11:45 am
Re: Actual Flying Rotax Installs
I am questioning why Sonex did not have the pins from the outboard side of the engine mount the bolts go through not carry over to the inboard side for the bushings to slide onto as they do with the AeroVee mount? I am also wondering if Zach’s solution to put a 4130 spacer over the bolt between the inside of the bushing would be a good solution or if that should be welded to the mount like on the AeroVee mount?
Zach - I am referring to your earlier post and pictures.
http://www.sonexbuilders.net/viewtopic.php?f=60&t=5612
Jake
Zach - I am referring to your earlier post and pictures.
http://www.sonexbuilders.net/viewtopic.php?f=60&t=5612
Jake
Sonex Tri Gear, Rotax 912 ULS, Sensenich 3 Blade Ground Adjustable Propeller
MGL Velocity EMS, Garmin GTR 200 Comm, GTX 335 ADS B Out Transponder
ILevil AW AHRS & ADS-B In, UAvionix AV20S
200+ hours previously with Aerovee engine
Sarasota, Florida
MGL Velocity EMS, Garmin GTR 200 Comm, GTX 335 ADS B Out Transponder
ILevil AW AHRS & ADS-B In, UAvionix AV20S
200+ hours previously with Aerovee engine
Sarasota, Florida
-

SonexN76ET - Posts: 494
- Joined: Tue Aug 27, 2013 2:39 pm
- Location: Atlanta
Re: Actual Flying Rotax Installs
SonexN76ET wrote:I am questioning why Sonex did not have the pins from the outboard side of the engine mount the bolts go through not carry over to the inboard side for the bushings to slide onto as they do with the AeroVee mount? I am also wondering if Zach’s solution to put a 4130 spacer over the bolt between the inside of the bushing would be a good solution or if that should be welded to the mount like on the AeroVee mount?
Zach - I am referring to your earlier post and pictures.
http://www.sonexbuilders.net/viewtopic.php?f=60&t=5612
Jake
Jake, I would have felt more comfortable with the pin carrying through the mount like the AeroVee mount pin specifications http://www.aeroconversions.com/images/p ... nt_Pin.pdf. I was concerned about the shear loads on the AN4 bolt with a two part solution. https://www.youtube.com/watch?v=i9SJbCCoACg I reached out the Sonex and here's what they said:
Hi Zack,
Our original assembly did use an AN4 bolt to support the engine and that is fine. We have a newer design that changed the wall thickness of the tubes that accept the bolts and now use AN5 bolts.
What you have done conforms to a proper adaption of the AN4 bolt installation.
Blue Skies….
Kerry
I'd like to know why they moved to an AN5 bolt, and what kind of safety margin the AN4 vs AN5 bolt has. I don't see how you can mount the engine without a pin. The holes in the bushings are greater than either an AN4 or AN5 bolt, so you would have a lot of movement vertically. I used some some 4130 steel for the spacer and these washers, all from McMaster Carr: https://www.mcmaster.com/98032A492/
It looks like our AeroVee friends have similar issues with the bushings sagging (http://www.rynoth.com/wordpress/waiex/2 ... ng-issues/ - thanks Ryan!). Would the extra torque from the Rotax gearbox and larger propeller really exacerbate this issue?
- Zack
- Posts: 75
- Joined: Fri Nov 24, 2017 11:45 am
Re: Actual Flying Rotax Installs
Zach,
I do have clearance! When building my plane I went to some Air Trac 5.00x5 tires which also helped with some ground clearance. They also still fit within my standard wheel pants from Sonex. A 64” swings great and I operate off of dirt. (Smooth dirt). But yes, the red bars have worked apart and torn up the rubber allowing them to rest on the steel sleeves on the an5 carry through bolts.
Jake,
One of the first things I did was machine a sleeve to go over the bolt. Like in my long run on story, it helped with my engine movement, but in the end did not solve my problem.
I agree with you guys in all aspects. Like I had mentioned in previous posts, upon receiving my mount I had some issues with my water pump fittings but those were easily solved. But In working though that, I was told by Sonex that they produce the mount for the urge in customers to produce one, BUT, they have not actually tested it. I don’t know if I’m the first person to test it, but this is just my experience.
Sonex went radio silent about a week ago on the issue, so I wouldn’t say they’re not working on it, I just haven’t heard back.
But I have designed and machined a new attach bar system this last weekend which turns the mount into a bed mount. The engine rests on a series of 6 sets of Barry mounts, each using a 3/8’s bolt. If there isn’t a solution in the near future I might just try my mounts out. I want to fly my plane! And I had mentioned previously I really wanted to work with Sonex to try and get this handled by helping them, myself, and anyone else using them so they can fly safely and have a seamless install. Plus it’s always better, in my opinion, to use factory parts if possible.
N7777X
Tailwheel
Rotax 912
3 blade Warp Drive
Tailwheel
Rotax 912
3 blade Warp Drive
- CaseyCooper
- Posts: 56
- Joined: Sat Aug 01, 2020 6:49 pm
- Location: Tucson, Az
Re: Actual Flying Rotax Installs
Herraripower wrote:Zach,
But yes, the red bars have worked apart and torn up the rubber allowing them to rest on the steel sleeves on the an5 carry through bolts.
That's bad, I don't see how we can use the current design and rubber bushings.
- Zack
- Posts: 75
- Joined: Fri Nov 24, 2017 11:45 am
Re: Actual Flying Rotax Installs
SonexN76ET wrote: install polyurethane bushings
Jake, where would you find polyurethane replacement bushings?
- Zack
- Posts: 75
- Joined: Fri Nov 24, 2017 11:45 am
Re: Actual Flying Rotax Installs

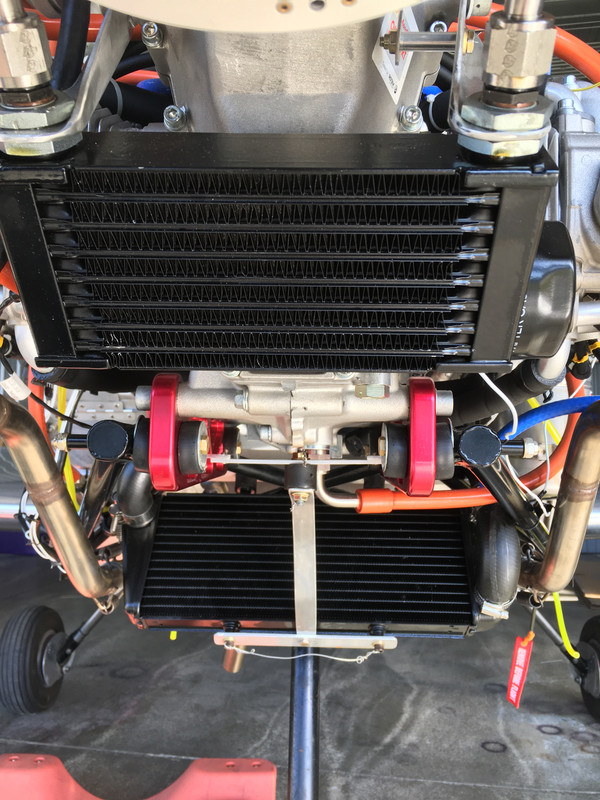
Here is a picture of my engine sagging on the mounting bars with the AeroVee bushings.
Zack, I am concerned that the polyurethane bushings may be way too hard. I just got a set and they feel like hard plastic, so I am hesitant to use or recommend them on the engine mount.
I am wondering if a Lord engine mount bushing could somehow be fitted to the Sonex Rotax mount?
I previously had not given much thought to the design of this engine mount but I am very concerned now that I look at mine and see the engine sagging on the mount after only being run twice on the ground. More significantly I can also see the dangerous situation Herraripower has encountered with the engine mount bushings splitting and having metal to metal contact with the mounting bars. Finally, I am alarmed with AN4 bolts being unsupported as they hold up the mounting bars after they penetrate the mount. There has got to be a better way!
As a side note, I never had the sagging issue with my AeroVee engine. This appears way more serious in my opinion. This is evidenced by Harriripower’s experience and the excessive sagging I see so early in the installation.
Jake
Sonex Tri Gear, Rotax 912 ULS, Sensenich 3 Blade Ground Adjustable Propeller
MGL Velocity EMS, Garmin GTR 200 Comm, GTX 335 ADS B Out Transponder
ILevil AW AHRS & ADS-B In, UAvionix AV20S
200+ hours previously with Aerovee engine
Sarasota, Florida
MGL Velocity EMS, Garmin GTR 200 Comm, GTX 335 ADS B Out Transponder
ILevil AW AHRS & ADS-B In, UAvionix AV20S
200+ hours previously with Aerovee engine
Sarasota, Florida
-

SonexN76ET - Posts: 494
- Joined: Tue Aug 27, 2013 2:39 pm
- Location: Atlanta
Re: Actual Flying Rotax Installs

An idea I may speak to Sonex about is to use three bushings at each mounting point instead of two. My observation is that there is a void between the two AeroVee bushings in the mounting bar because the AeroVee bushings are primarily on the outside of the bar and only penetrate it slightly. Perhaps a small polyurethane bushing would work pressed into the mounting bar and then the AeroVee bushings sandwich it from both sides thus eliminating the void? So the only change to the design would be to indicate to use the spacer over the AN4 or AN5 bolts to fit the bushings as Sonex mentioned in their email you shared and to press a bushing into the mounting bar to eliminate the void. Possibly a fitted polyurethane bushing of some type due to the relatively small size.
What do you guys think?
Jake
Sonex Tri Gear, Rotax 912 ULS, Sensenich 3 Blade Ground Adjustable Propeller
MGL Velocity EMS, Garmin GTR 200 Comm, GTX 335 ADS B Out Transponder
ILevil AW AHRS & ADS-B In, UAvionix AV20S
200+ hours previously with Aerovee engine
Sarasota, Florida
MGL Velocity EMS, Garmin GTR 200 Comm, GTX 335 ADS B Out Transponder
ILevil AW AHRS & ADS-B In, UAvionix AV20S
200+ hours previously with Aerovee engine
Sarasota, Florida
-

SonexN76ET - Posts: 494
- Joined: Tue Aug 27, 2013 2:39 pm
- Location: Atlanta
Who is online
Users browsing this forum: No registered users and 3 guests


