Page 1 of 5
Panel Images

Posted:
Sat Nov 19, 2011 7:31 pmby chris
Post images of your completed or under construction panel here.
Re: Panel Images

Posted:
Sat Nov 19, 2011 8:20 pmby MichaelFarley56
Here's my basic panel

Stratomaster Ultra XL, FlightCom FL-760 radio, Sigtronics intercom. Very simple and light!
Re: Panel Images

Posted:
Sun Nov 20, 2011 12:02 amby falvarez
Hi Mike,
I noticed that you put your Vents in the Panel...Dale just posted on Sonextalk with the same thing. Are the Vents that are installed below the panel that ineffective? I was planning on putting mine just below the panel, but heat is a major concern here in Florida. Does it make that big of a difference moving the vents up to the Panel?
Thanks,
Frank
Sonex Plans #800
Middleburg FL
Re: Panel Images

Posted:
Sun Nov 20, 2011 1:04 amby MichaelFarley56
Hi Frank,
I don't think the vents below the panel are ineffective, but the Vans adjustable vents do allow a little more air into the cabin. I chose them after watching Tony Spicers video when he mentioned lots of air through these vents, plus I like adjustable vents. I also put them in my panel simply so I don't lose any leg room. If you watch Tonys video another option is to use the Vans vents and mount them below the panel like he did.
Re: Panel Images

Posted:
Sun Nov 20, 2011 11:10 amby N111YX
Dynon D-180
Becker COMM and XPONDER
Garmin 495 with Air Gizmo dock
ACS ignition switch
Hobbs meter
circuit breaker switches for battery and avionics master
If I had to do it over again, I would install a panel-mounted intercom. The Becker COMM has a built-in "intercom" but it is not voice activated and the background noise becomes annoying over time.
Everything has worked great for 275 hours...!
Re: Panel Images

Posted:
Sun Dec 11, 2011 7:45 pmby fastj22
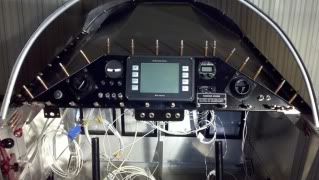
Finally, after weeks of tinkering, redoing, re-measuring, re-cussing, and re-assembly, the panel is finally done! Hooked up the battery and everything came alive! Radio check, intercom check, transponder check, EFIS check. Now just need to plumb the pitot/static and do some creative cable management. Then close the top for good!
Re: Panel Images

Posted:
Sun Dec 11, 2011 8:46 pmby MichaelFarley56
The panel looks great! Very impressive 8-)
Re: Panel Images

Posted:
Sun Dec 11, 2011 9:24 pmby fastj22
Thanks.
I went with solid rivets for a more finished look. Kept the stock sonex panel size with no removable panels. The Garmins slide into trays. the MGL xtreme lines up with the Garmin stack.
Because of the angle of the stock panel, you don't have much room on the bottom for switches and breakers. So I put the switches as far down as I could, but the breakers wouldn't line up, so just angled them with the fuel sight tube.
I wanted a center throttle quandrant but it would interfere with the Garmin xPonder if mounted high, so dropped it a bit which also allowed the mixture cable to clear the transponder.
The ASI is an afterthought. I had a space for a standard 3 inch steam guage there and decided I like to fly with an analog ASI, so found one on eBay for $10. We'll see if it still works. The VNE on it is way too slow for the waiex! If it doesn't, I'll buy a new one.
After all the drilling and cutting, I primed with self etching and put a Rustoleum black and white specked textured finish. I hope to use dry transfer labels to mark each switch.
Re: Panel Images

Posted:
Sat Feb 04, 2012 7:23 amby sonex892
This is a shot of my beer budget panel taken today
MGL singles
ASI steam gauge "enough space to remove ASI and replace with Dynon EFIS" its on the wish list
Micro air VHF transceiver with VOX intercom
G Meter / clock /timer /voltmeter / OAT combined
Vans manifold pressure gauge
Garmin 96C
No transponder yet
Steve
Sonex 892 VH-ZSX 3300 TD 87 hrs
home for annual inspection and a few minor mods.
Re: Panel Images

Posted:
Mon Sep 03, 2012 5:10 pmby RodgerC

- IMG-20120902-00094.jpg (112.69 KiB) Viewed 33225 times
My Budget Copy of Kip's panel is approaching completion. It's a great feeling when it all comes alive and there's no smoke.
