


random user submitted photo
Wes's Onex #89
Re: Wes's Onex #89
![]() by WesRagle » Sun Nov 24, 2019 10:55 pm
by WesRagle » Sun Nov 24, 2019 10:55 pm
dirkverdonck wrote:Hi Wes,
This looks very much like my bagage compartment, takes a while to cut and bend all the bits but the end result will be a large and solid storage area.
Hi Dirk,
It's only a cheap imitation, but suitable to its purpose. Now I'll have a Onnebego :-)
It's a bit flimsy using 0.016 but the weight of the aluminum is less than 3 lbs.
Wes
Wes Ragle
Onex #89
Conventional Gear
Long Tips
Hummel 2400 w/Zenith Carb
Prince P Tip 54x50
First Flight 06/23/2020
42.8 Hrs. as of 10/30/21
Onex #89
Conventional Gear
Long Tips
Hummel 2400 w/Zenith Carb
Prince P Tip 54x50
First Flight 06/23/2020
42.8 Hrs. as of 10/30/21
- WesRagle
- Posts: 847
- Joined: Fri Jan 05, 2018 12:35 pm
- Location: Weatherford, Tx
Re: Wes's Onex #89
![]() by WesRagle » Thu Nov 28, 2019 2:48 pm
by WesRagle » Thu Nov 28, 2019 2:48 pm
Hi Guys,
OK, the stupid expensive fasteners should be here tomorrow. And yes, it was hard to press the "Place Order" button.
While waiting (and trying to figure out what to order) I decided to build the flaps and ailerons so I could check the fit of the wing tips. Here is where things went south. I pulled out the aileron skins and for the first time really took a good look at them. They are so old that the protective plastic film has become one with the aluminum. I tried to remove the film with a heat gun and a hardwood scraper, no joy.
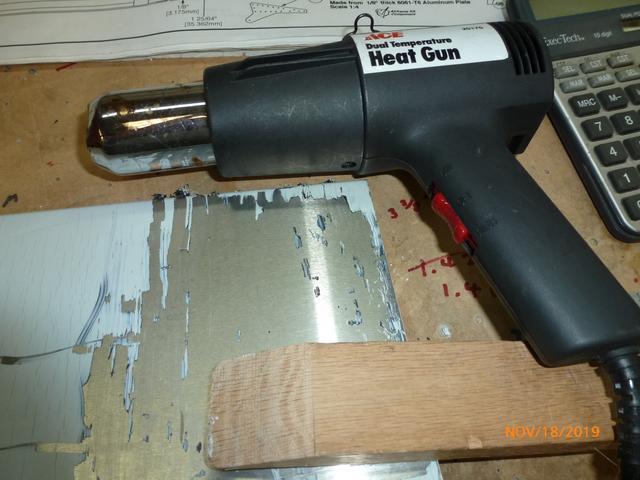
So, if you are planning on picking up an old kit, check the plastic covering to see if it will come off.
I quickly gave up and, in the words of my Dad, I "whipped it with cash". Incredibly enough, the new skins were on my doorstep in less than a week (Ref. https://www.kitplanes.com/this-puddle-we-play-in/).
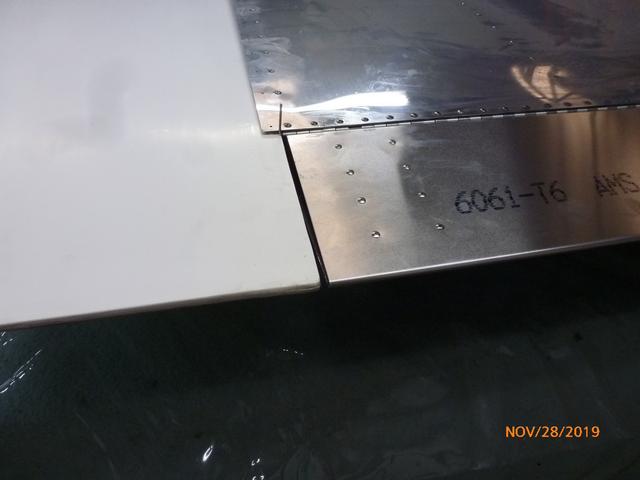
Anyway, the flaps and ailerons are now built. I pulled out the outer wing panels, attached the aileron, put the wingtip in place, and it looks like they will fit well. A lot of fiber glass hanging off the end of the wing.
Forever Forward,
Wes
OK, the stupid expensive fasteners should be here tomorrow. And yes, it was hard to press the "Place Order" button.
While waiting (and trying to figure out what to order) I decided to build the flaps and ailerons so I could check the fit of the wing tips. Here is where things went south. I pulled out the aileron skins and for the first time really took a good look at them. They are so old that the protective plastic film has become one with the aluminum. I tried to remove the film with a heat gun and a hardwood scraper, no joy.
So, if you are planning on picking up an old kit, check the plastic covering to see if it will come off.
I quickly gave up and, in the words of my Dad, I "whipped it with cash". Incredibly enough, the new skins were on my doorstep in less than a week (Ref. https://www.kitplanes.com/this-puddle-we-play-in/).
Anyway, the flaps and ailerons are now built. I pulled out the outer wing panels, attached the aileron, put the wingtip in place, and it looks like they will fit well. A lot of fiber glass hanging off the end of the wing.
Forever Forward,
Wes
Wes Ragle
Onex #89
Conventional Gear
Long Tips
Hummel 2400 w/Zenith Carb
Prince P Tip 54x50
First Flight 06/23/2020
42.8 Hrs. as of 10/30/21
Onex #89
Conventional Gear
Long Tips
Hummel 2400 w/Zenith Carb
Prince P Tip 54x50
First Flight 06/23/2020
42.8 Hrs. as of 10/30/21
- WesRagle
- Posts: 847
- Joined: Fri Jan 05, 2018 12:35 pm
- Location: Weatherford, Tx
Re: Wes's Onex #89 (SkyBolt Fasteners)
![]() by WesRagle » Tue Dec 03, 2019 6:41 pm
by WesRagle » Tue Dec 03, 2019 6:41 pm
Hi Guys,
Well, I got the SKYBOLT fasteners/receptacles/retainers and today was the day to try them out. Since there was quite a bit of confusion on my part as I researched these fasteners I thought I would post a little information about them.
Thanks to Robbie Culver, David Amsler, et.al for help clearing the fog. As David pointed out, the printed catalog is a much better reference than just poking around on the SkyBolt web site (Ref. http://skybolt.com/wp-content/uploads/2019/04/Skybolt-Catalog-v5.1_Print-aerospace-fasteners-1.pdf).
I chose to use one of the "CLoc 2000 Series Common Sets" (SK28S3-SET1). Here are the parts, less rivets, that make up the set.
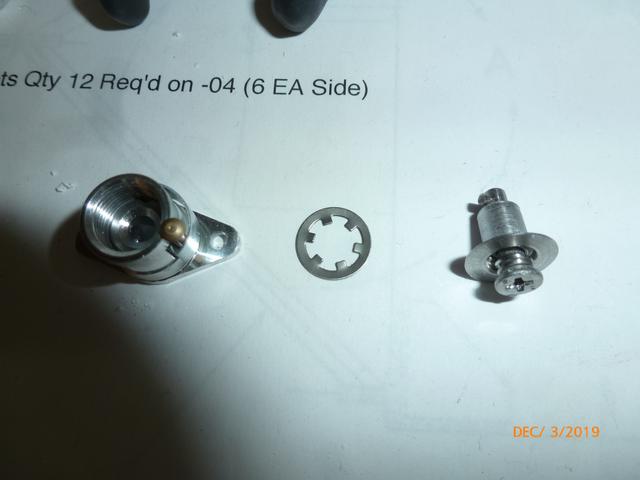
A stud, a retainer, and an adjustable receptacle.
Here are the tools to work with the set.
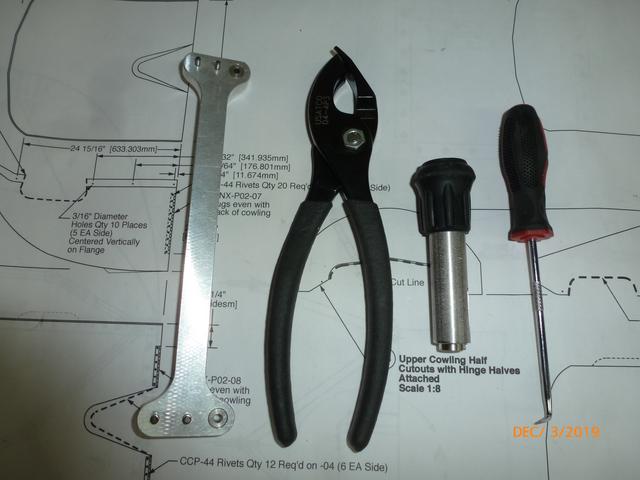
The pliers and the drill jig will be familiar to anyone who has worked with CamLoc fasteners. The pick is used to assist with adjusting the receptacle once the "tang" is removed or to re-insert the tang (Ref. http://skybolt.com/wp-content/uploads/2017/08/Instructions-SK213-SK215-SK245.pdf). The other tool is used to press the retaining washers onto the studs.
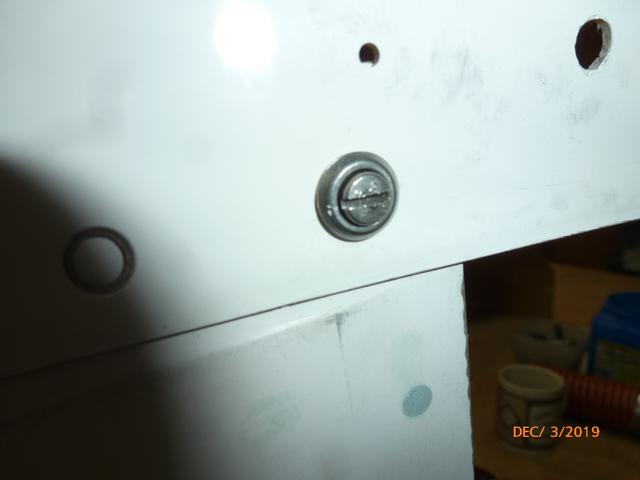
Here is a pic of one of the receptacles as I installed them.
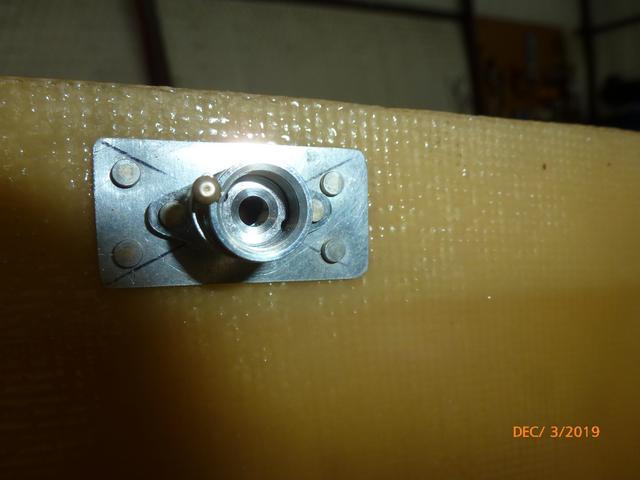
I used solid rivets so the tang had to be removed to squeeze the rivets. The tangs went back in place easily using the pick.
If you are used to working with standard receptacles the adjustable ones look a little clunky. But, on the up side, you won't end up with a box full of unused studs that have the wrong grip :-) That is unless you bought the wrong studs.
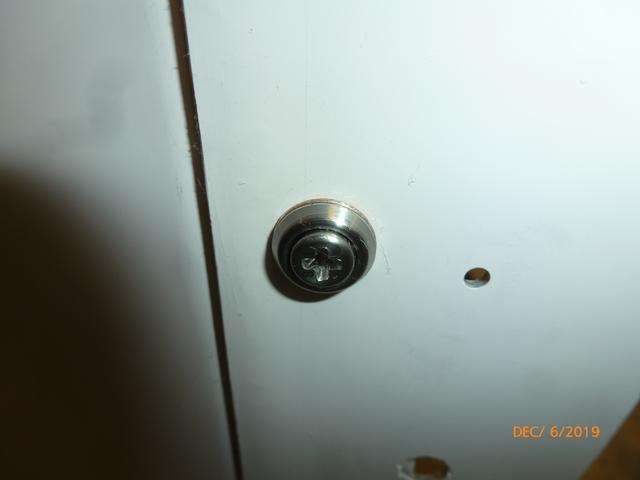
The set I chose includes the SK8S3-2S stud. Here is a pic of some scrap held in place with one of the studs.
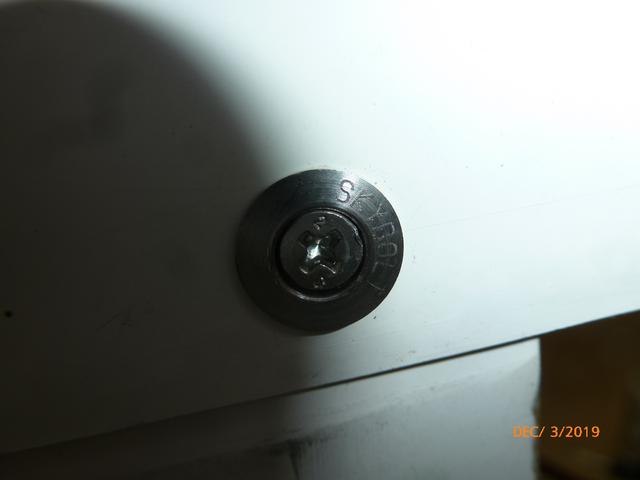
I like the look, but I don't really like the stud. The studs require a counter sink/dimple be applied to the 1/4" hole the stud fits in. And, as you may know, 1/4" fasteners are "self retaining", and floating, as long as the hole is no larger than 1/4". Since the cowl flanges aren't very thick, by the time the counter sink is deep enough for the stud to sit flush, the 1/4" hole has been enlarged. There goes the self retention. Even if the material is thick enough that the hole is not enlarged, the fiberglass around the edges of the hole will be so thin that it is guaranteed to enlarge over time.
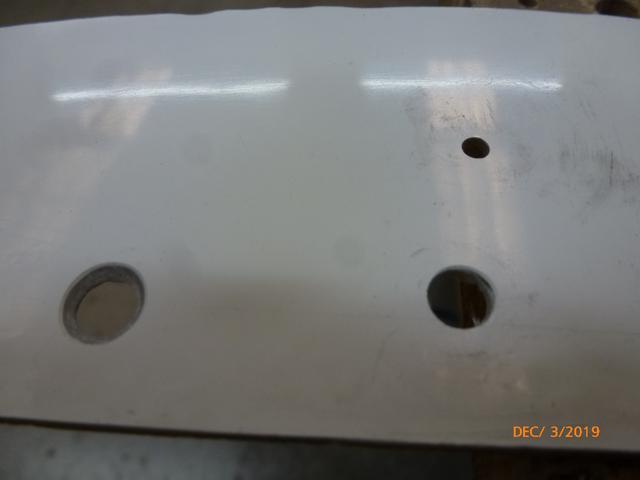
Pic of hole before and after counter sink is applied.
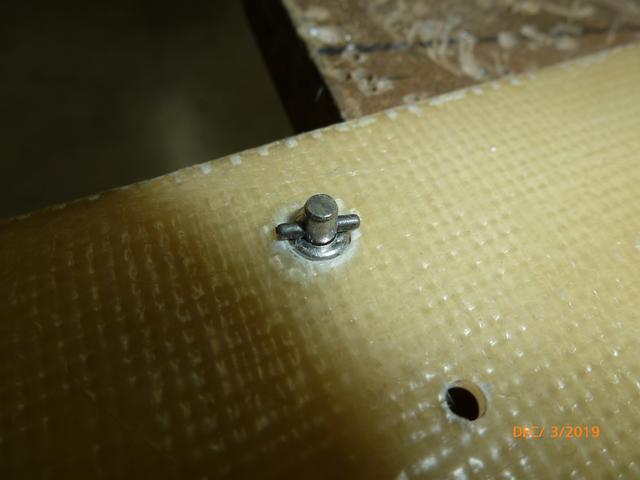
Pic of how the stud self retains.
So, I'm thinking about using one of the protruding head studs with a SS washer between the cowl and the stud. Kind of like this one only with a phillips head.
EDIT: That gives me an idea. Instead of using the supplied retaining washers I could use a thin 1/4" washer (AN960-416L) on the back side of the stud. Seems that would allow the stud to "float" and ensure stud retention even if the hole was slightly enlarged. Hmm... Also, I see that split ring retainers are available.
It won't look as good, but I think it would perform better.
I don't know. Still over thinking it.
Wes
Well, I got the SKYBOLT fasteners/receptacles/retainers and today was the day to try them out. Since there was quite a bit of confusion on my part as I researched these fasteners I thought I would post a little information about them.
Thanks to Robbie Culver, David Amsler, et.al for help clearing the fog. As David pointed out, the printed catalog is a much better reference than just poking around on the SkyBolt web site (Ref. http://skybolt.com/wp-content/uploads/2019/04/Skybolt-Catalog-v5.1_Print-aerospace-fasteners-1.pdf).
I chose to use one of the "CLoc 2000 Series Common Sets" (SK28S3-SET1). Here are the parts, less rivets, that make up the set.
A stud, a retainer, and an adjustable receptacle.
Here are the tools to work with the set.
The pliers and the drill jig will be familiar to anyone who has worked with CamLoc fasteners. The pick is used to assist with adjusting the receptacle once the "tang" is removed or to re-insert the tang (Ref. http://skybolt.com/wp-content/uploads/2017/08/Instructions-SK213-SK215-SK245.pdf). The other tool is used to press the retaining washers onto the studs.
Here is a pic of one of the receptacles as I installed them.
I used solid rivets so the tang had to be removed to squeeze the rivets. The tangs went back in place easily using the pick.
If you are used to working with standard receptacles the adjustable ones look a little clunky. But, on the up side, you won't end up with a box full of unused studs that have the wrong grip :-) That is unless you bought the wrong studs.
The set I chose includes the SK8S3-2S stud. Here is a pic of some scrap held in place with one of the studs.
I like the look, but I don't really like the stud. The studs require a counter sink/dimple be applied to the 1/4" hole the stud fits in. And, as you may know, 1/4" fasteners are "self retaining", and floating, as long as the hole is no larger than 1/4". Since the cowl flanges aren't very thick, by the time the counter sink is deep enough for the stud to sit flush, the 1/4" hole has been enlarged. There goes the self retention. Even if the material is thick enough that the hole is not enlarged, the fiberglass around the edges of the hole will be so thin that it is guaranteed to enlarge over time.
Pic of hole before and after counter sink is applied.
Pic of how the stud self retains.
So, I'm thinking about using one of the protruding head studs with a SS washer between the cowl and the stud. Kind of like this one only with a phillips head.
EDIT: That gives me an idea. Instead of using the supplied retaining washers I could use a thin 1/4" washer (AN960-416L) on the back side of the stud. Seems that would allow the stud to "float" and ensure stud retention even if the hole was slightly enlarged. Hmm... Also, I see that split ring retainers are available.
It won't look as good, but I think it would perform better.
I don't know. Still over thinking it.
Wes
Wes Ragle
Onex #89
Conventional Gear
Long Tips
Hummel 2400 w/Zenith Carb
Prince P Tip 54x50
First Flight 06/23/2020
42.8 Hrs. as of 10/30/21
Onex #89
Conventional Gear
Long Tips
Hummel 2400 w/Zenith Carb
Prince P Tip 54x50
First Flight 06/23/2020
42.8 Hrs. as of 10/30/21
- WesRagle
- Posts: 847
- Joined: Fri Jan 05, 2018 12:35 pm
- Location: Weatherford, Tx
Re: Wes's Onex #89
![]() by WesRagle » Sat Dec 07, 2019 2:26 am
by WesRagle » Sat Dec 07, 2019 2:26 am
Hi Guys,
Ok, hopefully this is the last of my SkyBolt posts :-)
From my previous post:
EDIT: That gives me an idea. Instead of using the supplied retaining washers I could use a thin 1/4" washer (AN960-416L) on the back side of the stud. Seems that would allow the stud to "float" and ensure stud retention even if the hole was slightly enlarged. Hmm... Also, I see that split ring retainers are available.
Since I seldom have a totally original idea, I started poking around and found a similar suggestion on the SkyBolt website (Ref. http://skybolt.com/wp-content/uploads/2017/08/Instructions-SK2600-SW-Retainer.pdf).
Here's where I am, and probably where I'll stay, with this encounter with quarter turn fasteners.
I decided to use protruding head fasteners since I wouldn't have to counter sink and weaken the fiberglass around the fastener stud hole.
One of the fasteners I will use installed:
If you look closely you can see a thin #10 washer behind the fastener. That's because the back side of the stud isn't flat as shown in this pic.
I don't want the stud eating into the fiberglass from the outside.
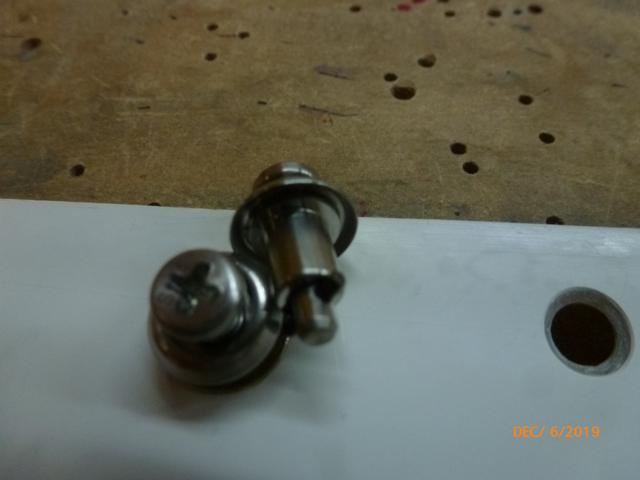
Here is a pic of the back side of the stud as installed.

The studs will have a #10 thin washer on the back side and a SK-2600-SW retainer keeping every thing in place. That is about as durable of a floating quarter turn fastener installation as I can come up with. Hopefully it will work well in service. We'll see.
Foot note:
The last pic also shows a SK-2600-SW retainer and a larger standard split ring retainer side by side. What ever alloy SS the SK-2600 is made of is very soft. I bent the one in the picture with my bare hands. There is no spring to the washer. The instructions SkyBolt supply even include a step to "bend back to flush-flat condition" after the retainer is installed. Kind of flimsy. The regular steel split retainers spring back after installation. They may provoke some profanity while installing them but they seem more substantial.
Wes
Ok, hopefully this is the last of my SkyBolt posts :-)
From my previous post:
EDIT: That gives me an idea. Instead of using the supplied retaining washers I could use a thin 1/4" washer (AN960-416L) on the back side of the stud. Seems that would allow the stud to "float" and ensure stud retention even if the hole was slightly enlarged. Hmm... Also, I see that split ring retainers are available.
Since I seldom have a totally original idea, I started poking around and found a similar suggestion on the SkyBolt website (Ref. http://skybolt.com/wp-content/uploads/2017/08/Instructions-SK2600-SW-Retainer.pdf).
Here's where I am, and probably where I'll stay, with this encounter with quarter turn fasteners.
I decided to use protruding head fasteners since I wouldn't have to counter sink and weaken the fiberglass around the fastener stud hole.
One of the fasteners I will use installed:
If you look closely you can see a thin #10 washer behind the fastener. That's because the back side of the stud isn't flat as shown in this pic.
I don't want the stud eating into the fiberglass from the outside.
Here is a pic of the back side of the stud as installed.
The studs will have a #10 thin washer on the back side and a SK-2600-SW retainer keeping every thing in place. That is about as durable of a floating quarter turn fastener installation as I can come up with. Hopefully it will work well in service. We'll see.
Foot note:
The last pic also shows a SK-2600-SW retainer and a larger standard split ring retainer side by side. What ever alloy SS the SK-2600 is made of is very soft. I bent the one in the picture with my bare hands. There is no spring to the washer. The instructions SkyBolt supply even include a step to "bend back to flush-flat condition" after the retainer is installed. Kind of flimsy. The regular steel split retainers spring back after installation. They may provoke some profanity while installing them but they seem more substantial.
Wes
Wes Ragle
Onex #89
Conventional Gear
Long Tips
Hummel 2400 w/Zenith Carb
Prince P Tip 54x50
First Flight 06/23/2020
42.8 Hrs. as of 10/30/21
Onex #89
Conventional Gear
Long Tips
Hummel 2400 w/Zenith Carb
Prince P Tip 54x50
First Flight 06/23/2020
42.8 Hrs. as of 10/30/21
- WesRagle
- Posts: 847
- Joined: Fri Jan 05, 2018 12:35 pm
- Location: Weatherford, Tx
Re: Wes's Onex #89
![]() by WesRagle » Tue Jan 14, 2020 5:23 pm
by WesRagle » Tue Jan 14, 2020 5:23 pm
Hi Guys,
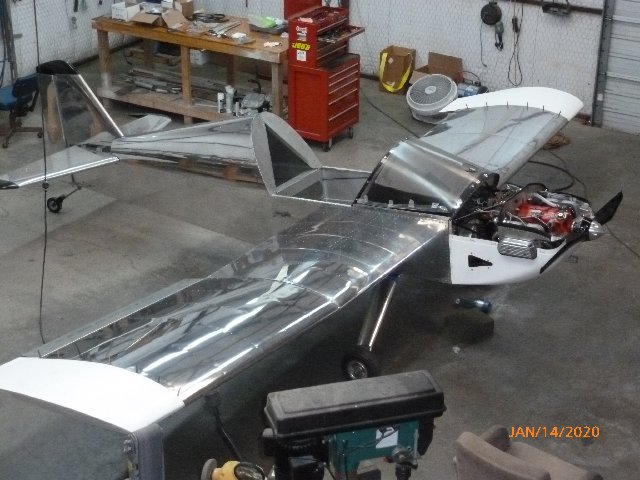
Well, I'm almost finished with the wings. But, I ran out of rivets and I need another set of hands to help drill the second wing stub skin in place. Hopefully I'll have both missing components soon and can wrap it up. In any event, the Onex is looking more and more like an airplane.
While waiting on finishing the wings I'm working on some details. One detail was the retention of the hing pins on the cowl bottom. I don't know how most folks do this but this is what I did.

It's easy and works well. Just a single hinge loop with a #4 washer between the loop and the skin. Apply lithium grease to all surfaces before riveting. The loop can be rotated by hand. It helps to bend the "handle" of the hinge pin a little to allow it to slip in the loop better. The loop has to be far enough from the hinge to allow the pin to flex so the handle can be inserted in the loop.
Forever Forward,
Wes
Well, I'm almost finished with the wings. But, I ran out of rivets and I need another set of hands to help drill the second wing stub skin in place. Hopefully I'll have both missing components soon and can wrap it up. In any event, the Onex is looking more and more like an airplane.
While waiting on finishing the wings I'm working on some details. One detail was the retention of the hing pins on the cowl bottom. I don't know how most folks do this but this is what I did.
It's easy and works well. Just a single hinge loop with a #4 washer between the loop and the skin. Apply lithium grease to all surfaces before riveting. The loop can be rotated by hand. It helps to bend the "handle" of the hinge pin a little to allow it to slip in the loop better. The loop has to be far enough from the hinge to allow the pin to flex so the handle can be inserted in the loop.
Forever Forward,
Wes
Wes Ragle
Onex #89
Conventional Gear
Long Tips
Hummel 2400 w/Zenith Carb
Prince P Tip 54x50
First Flight 06/23/2020
42.8 Hrs. as of 10/30/21
Onex #89
Conventional Gear
Long Tips
Hummel 2400 w/Zenith Carb
Prince P Tip 54x50
First Flight 06/23/2020
42.8 Hrs. as of 10/30/21
- WesRagle
- Posts: 847
- Joined: Fri Jan 05, 2018 12:35 pm
- Location: Weatherford, Tx
Re: Wes's Onex #89
![]() by Onex107 » Tue Jan 14, 2020 9:56 pm
by Onex107 » Tue Jan 14, 2020 9:56 pm
Wes, I went that way with the bottom cowl pins until I removed the cowl the first fifty times. Putting those bottom pins in was a pain. Then I drilled a small hole in the outside of the cowl and inserted the pins from the outside in with no locking clips. Sure the handles hang out but who cares. I'll never win trophies but it's much easier to work on. Much easier to install and now all the bottom cowl pins are the same length. No need to keep them separate, and the bottom pins, inserted from the outside, haven't moved in 285 hours.
OneX 107
N2107X
N2107X
- Onex107
- Posts: 495
- Joined: Mon Mar 24, 2014 6:44 pm
- Location: Peoria, IL
Re: Wes's Onex #89
![]() by WesRagle » Wed Jan 15, 2020 2:09 am
by WesRagle » Wed Jan 15, 2020 2:09 am
Hi Maurice,
I see your point. I've had the bottom cowl on and off 6 or 7 times today. It does get old lying on your back to insert those pins. I might try changing after I have the plane flying but right now it's "forever forward".
Wes
I see your point. I've had the bottom cowl on and off 6 or 7 times today. It does get old lying on your back to insert those pins. I might try changing after I have the plane flying but right now it's "forever forward".
Wes
Wes Ragle
Onex #89
Conventional Gear
Long Tips
Hummel 2400 w/Zenith Carb
Prince P Tip 54x50
First Flight 06/23/2020
42.8 Hrs. as of 10/30/21
Onex #89
Conventional Gear
Long Tips
Hummel 2400 w/Zenith Carb
Prince P Tip 54x50
First Flight 06/23/2020
42.8 Hrs. as of 10/30/21
- WesRagle
- Posts: 847
- Joined: Fri Jan 05, 2018 12:35 pm
- Location: Weatherford, Tx
Re: Wes's Onex #89
![]() by WesRagle » Wed Jan 22, 2020 10:55 pm
by WesRagle » Wed Jan 22, 2020 10:55 pm
Hi Guys,
My Daughter came to visit and agreed to work the "rib stick" so I was able to get the second wing stub skin drilled. Hope to finish the second wing in the next couple of days.
As first flight draws nearer I'm thinking more and more about pre-flight check list etc. Since I live in dirt dauber territory I need to make sure the fuel vent doesn't get clogged. I intend to use a pipe cleaner stuck in the fuel vent while hangared and remove it as part of pre-flight. Is there a better way? Is there a way to one way vent the fuel cap to eliminate this single point of failure? Keep in mind that the Onex has the fuel cap in the cockpit.
Wes
Wes Ragle
Onex #89
Conventional Gear
Long Tips
Hummel 2400 w/Zenith Carb
Prince P Tip 54x50
First Flight 06/23/2020
42.8 Hrs. as of 10/30/21
Onex #89
Conventional Gear
Long Tips
Hummel 2400 w/Zenith Carb
Prince P Tip 54x50
First Flight 06/23/2020
42.8 Hrs. as of 10/30/21
- WesRagle
- Posts: 847
- Joined: Fri Jan 05, 2018 12:35 pm
- Location: Weatherford, Tx
Re: Wes's Onex #89
![]() by Onex107 » Thu Jan 23, 2020 1:16 pm
by Onex107 » Thu Jan 23, 2020 1:16 pm
Wes, to reply to your vent concerns. I run my vent line into a catch jar and measure the blow by volume as a measure of cylinder health. It's a one pint mason jar with the regular two piece lid. The vent line goes through the center into the jar and is surrounded by six or eight vent holes to let the air out. The underside of the lid has a stainless steel scrubber attached to filter and condense the oil. The jar is calibrated in ounces and I keep a record of each 25 hour oil change. Works very well. You can loosen the outer ring of the lid, loosen the hose clamp the holds it to the firewall, and empty the jar. At 285 hours I typically see 7 to 10 ounces during 25 hours. The blow by volume and the oil added volume are nearly identical. The Cessna experts did not advocate running it back into the engine due to the acids generated by water and NOX gases. Of course my Cessna engine had a higher volume of blow by due to the normal usage of a quart of oil in 10 hours. I'm not used to an aircraft engine that uses so little oil.
OneX 107
N2107X
N2107X
- Onex107
- Posts: 495
- Joined: Mon Mar 24, 2014 6:44 pm
- Location: Peoria, IL
Re: Wes's Onex #89
![]() by inventor » Thu Jan 23, 2020 3:13 pm
by inventor » Thu Jan 23, 2020 3:13 pm
That is an interesting idea. I never thought of catching blow by oil and I can see why it is an indicator of engine health. I had a Chevy pickup with a 6 cylinder engine that suddenly started using huge amounts of oil. It turned out to be a clogged filler cap so the oil was discharged through the vent pipe.
Onex 150
- inventor
- Posts: 71
- Joined: Tue Jun 09, 2015 8:35 am
- Location: Oregon
Who is online
Users browsing this forum: No registered users and 8 guests


