


random user submitted photo
Wes's Onex #89
Re: Wes's Onex #89
![]() by Onex107 » Thu Nov 21, 2019 1:17 pm
by Onex107 » Thu Nov 21, 2019 1:17 pm
WesRagle wrote:Hi Guys,
I'm still moving along (at a glacial pace).
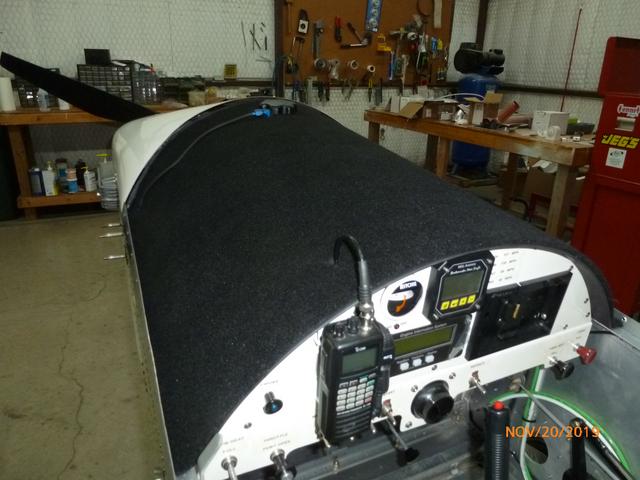
I covered and installed the glare shield and fuel vent. I may regret the covering the first time I spill fuel but I shall endeavor not to spill.
I also did some final trimming on the cowl. Since nobody would venture a guess as to the movement of the engine relative to the cowl, I made a guess. 1/4" top and sides and 1/3" on the bottom for a firm landing. I'll just have to keep an eye on it to see if that's adequate. I will attempt a jam seal (form the back) around the induction tube using a block of foam. If that doesn't work I'll come up with something else. Maybe try a more refined approach once the plane is flying and I need something to do.
I need to order fasteners. I prefer quarter turn fasteners. I'm thinking of these https://store.skybolt.com/phillips-sk28s3-series-c1207.aspx. Any advice appreciated.
BTW, UPS just delivered a sheet of 0.016. Now I have no excuse not to attack the baggage compartment.
Thanks,
Wes
Don't joke about spilling fuel. The smallest drop on your windshield will cause it to crack. Take every precaution to prevent spills. I have added a peel and stick black plastic cover around the hole to catch drips. I use car gas and have added a battery powered pump to transfer gas to have more control. I have a major crack next to the hole and the windshield needs to be replaced. If you spill enough to cause it to run down around the glare shield, it will cause many small cracks in the edge of the windshield. Nasty problem. This should be printed in red in the instructions.
OneX 107
N2107X
N2107X
- Onex107
- Posts: 495
- Joined: Mon Mar 24, 2014 6:44 pm
- Location: Peoria, IL
Re: Wes's Onex #89
![]() by WesRagle » Thu Nov 21, 2019 2:28 pm
by WesRagle » Thu Nov 21, 2019 2:28 pm
Hi Maurice,
I wasn't joking. I've already bought my first fuel transfer system. I knew I needed one and just went ahead and bought it to help with the fuel flow test and fuel level calibration. Gordon Baxter suggested it. Thanks Gord.
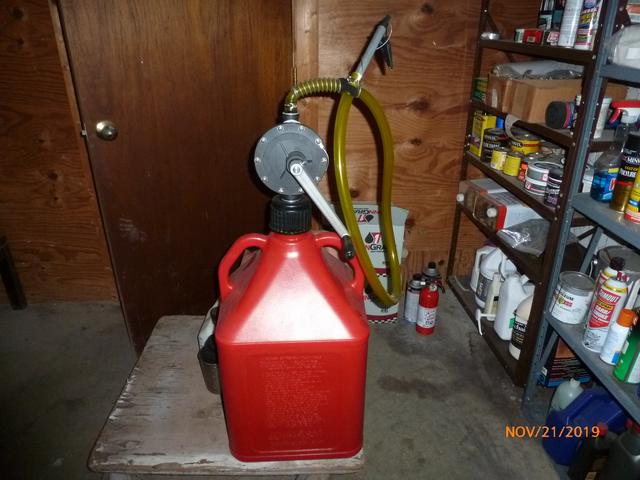
Future plans include a fuel transfer tank mounted in the back of my old pickup. That will require some thought to do it right :-)
I am curious if the crazing/cracking of lexan is related to how well the cut edges are polished out. I think I'll take a little more time and polish the hole and cut edges down to 2000 grit.
BTW, I read your article in Air Facts (Ref. https://airfactsjournal.com/2019/11/escape-from-the-jaws-of-imc/).
Excellent article. I admire folks who can write. I majored in engineering just because it required one less semester of English. Another indication that I don't always think things through all the way :-)
Thanks,
Wes
Onex107 wrote:Don't joke about spilling fuel.
I wasn't joking. I've already bought my first fuel transfer system. I knew I needed one and just went ahead and bought it to help with the fuel flow test and fuel level calibration. Gordon Baxter suggested it. Thanks Gord.
Future plans include a fuel transfer tank mounted in the back of my old pickup. That will require some thought to do it right :-)
I am curious if the crazing/cracking of lexan is related to how well the cut edges are polished out. I think I'll take a little more time and polish the hole and cut edges down to 2000 grit.
BTW, I read your article in Air Facts (Ref. https://airfactsjournal.com/2019/11/escape-from-the-jaws-of-imc/).
Excellent article. I admire folks who can write. I majored in engineering just because it required one less semester of English. Another indication that I don't always think things through all the way :-)
Thanks,
Wes
Wes Ragle
Onex #89
Conventional Gear
Long Tips
Hummel 2400 w/Zenith Carb
Prince P Tip 54x50
First Flight 06/23/2020
42.8 Hrs. as of 10/30/21
Onex #89
Conventional Gear
Long Tips
Hummel 2400 w/Zenith Carb
Prince P Tip 54x50
First Flight 06/23/2020
42.8 Hrs. as of 10/30/21
- WesRagle
- Posts: 847
- Joined: Fri Jan 05, 2018 12:35 pm
- Location: Weatherford, Tx
Re: Wes's Onex #89
![]() by WaiexN143NM » Thu Nov 21, 2019 4:47 pm
by WaiexN143NM » Thu Nov 21, 2019 4:47 pm
Hi wes,
The skybolt fasteners are great. dont forget the special tools you will need from them for install. inside alum backing plates inside really stiffen up the joint. I prefer to use pan head rivets on the cowl instead of countersunk. Also i used contego fire barrier(aircraft spruce) on the inside of cowl. looks and smells like white latex paint. with a fire barrier additive.
You’ve got a nice quality build. Keep plugging away!
WaiexN143NM
Michael
- WaiexN143NM
- Posts: 1159
- Joined: Mon Sep 15, 2014 1:04 am
- Location: SF CA, Tucson AZ, palm springs CA
Re: Wes's Onex #89
![]() by Sonex1517 » Thu Nov 21, 2019 5:20 pm
by Sonex1517 » Thu Nov 21, 2019 5:20 pm
Hello
Since I was quoted here, I will chime in.
I used the following parts:
SK213-2 Receptacle
ZG28S3-2 fastener
SK2600-LWS fancy washer (Bill is correct. Buy extras)
4P3-T26 Stupid expensive tool to push fancy expensive washers onto fasteners
SK245-PK silly expensive tools used to fuss with fancy expensive washers and receptacles
I am willing to LOAN them with the clear understanding they are to be returned.
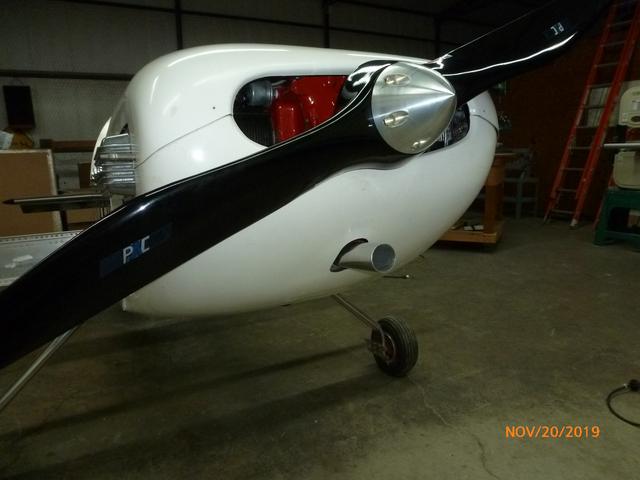
As far as what happened to my prop - no idea what actually happened, but it is likely a fastener popped a fancy expensive washer and flew out into the rear face of my prop. That or a rock on the runway.
Since I was quoted here, I will chime in.
I used the following parts:
SK213-2 Receptacle
ZG28S3-2 fastener
SK2600-LWS fancy washer (Bill is correct. Buy extras)
4P3-T26 Stupid expensive tool to push fancy expensive washers onto fasteners
SK245-PK silly expensive tools used to fuss with fancy expensive washers and receptacles
I am willing to LOAN them with the clear understanding they are to be returned.
As far as what happened to my prop - no idea what actually happened, but it is likely a fastener popped a fancy expensive washer and flew out into the rear face of my prop. That or a rock on the runway.
Robbie Culver
Sonex 1517
Aero Estates (T25)
First flight 10/10/2015
325+ hours
Jabiru 3300 Gen 4
Prince P Tip
Taildragger
N1517S
Sonex 1517
Aero Estates (T25)
First flight 10/10/2015
325+ hours
Jabiru 3300 Gen 4
Prince P Tip
Taildragger
N1517S
-

Sonex1517 - Posts: 1651
- Joined: Fri Jun 03, 2011 10:11 am
- Location: Chicagoland
Re: Wes's Onex #89
![]() by WesRagle » Thu Nov 21, 2019 9:35 pm
by WesRagle » Thu Nov 21, 2019 9:35 pm
WaiexN143NM wrote:Also i used contego fire barrier(aircraft spruce) on the inside of cowl. looks and smells like white latex paint. with a fire barrier additive.
You’ve got a nice quality build. Keep plugging away!
Hi Michael,
Thanks. I hope the build turns out good. I have already sealed the inside of the cowl with resin. I have the contego sitting on the shelf. I will wait until after the cowl is painted before applying it so I don't have to worry about over spray.
WaiexN143NM wrote:I used the following parts:
SK213-2 Receptacle
ZG28S3-2 fastener
SK2600-LWS fancy washer (Bill is correct. Buy extras)
4P3-T26 Stupid expensive tool to push fancy expensive washers onto fasteners
SK245-PK silly expensive tools used to fuss with fancy expensive washers and receptacles
I am willing to LOAN them with the clear understanding they are to be returned.
As far as what happened to my prop - no idea what actually happened, but it is likely a fastener popped a fancy expensive washer and flew out into the rear face of my prop. That or a rock on the runway.
Thanks Robbie. The part numbers are what I was looking for. I appreciate the generous offer but I already have SK245-PK silly expensive tools used to fuss with fancy expensive washers and receptacles. I can spring for 4P3-T26 Stupid expensive tool to push fancy expensive washers onto fasteners and SK245-PK silly expensive tools used to fuss with fancy expensive washers and receptacles.
I do wonder how the stud managed to depart the cowl if it had a fancy expensive washer pushed onto it?
With enough prodding I'll get this figured out.
Thanks Again,
Wes
Wes Ragle
Onex #89
Conventional Gear
Long Tips
Hummel 2400 w/Zenith Carb
Prince P Tip 54x50
First Flight 06/23/2020
42.8 Hrs. as of 10/30/21
Onex #89
Conventional Gear
Long Tips
Hummel 2400 w/Zenith Carb
Prince P Tip 54x50
First Flight 06/23/2020
42.8 Hrs. as of 10/30/21
- WesRagle
- Posts: 847
- Joined: Fri Jan 05, 2018 12:35 pm
- Location: Weatherford, Tx
Re: Wes's Onex #89
![]() by Sonex1517 » Thu Nov 21, 2019 10:35 pm
by Sonex1517 » Thu Nov 21, 2019 10:35 pm
Hi Wes
Glad to help.
I have wondered since the prop ding how it happened. I had less than two hours on the prop. That was really tough to stomach.
I have seen the fancy and frustrating expensive washers just work loose and allow the fastener to come out. Now I check them regularly. As Bill said, there is a pin in the base that is the locking part of the fastener. I have bent two, lost one, and in general found these things to be a necessary evil.
As far as why we need adjustment, just my thoughts. Each install is slightly unique and the adjustment allows for variances in the fit. In other words, since my work was far from perfect, it allowed me to finish the darned thing and eventually fly.
Robbie Culver
Sonex 1517
Aero Estates (T25)
First flight 10/10/2015
325+ hours
Jabiru 3300 Gen 4
Prince P Tip
Taildragger
N1517S
Sonex 1517
Aero Estates (T25)
First flight 10/10/2015
325+ hours
Jabiru 3300 Gen 4
Prince P Tip
Taildragger
N1517S
-
Sonex1517 - Posts: 1651
- Joined: Fri Jun 03, 2011 10:11 am
- Location: Chicagoland
Re: Wes's Onex #89
![]() by WesRagle » Fri Nov 22, 2019 12:03 am
by WesRagle » Fri Nov 22, 2019 12:03 am
Hi Guys,
OK, I think the fog is starting to clear.
Here are the things that were confusing me.
1) Every time I looked at a document that explained how to use the 4P3-T26 tool they started talking about installing studs into grommets.
As I now understand it, that does not apply to the Phillips SK28S3 Series fasteners. Correct?
2) I kept thinking that the the "split washer looking" retainers, the ones that allow the fastener to "float" would be a good answer for our application.
As I understand it now, those retainers do not apply to the SK28S3 Series fasteners either. With the SK28S3 series we use the SK2600-LW retaining rigs or nothing at all. Nothing at all might be the right answer where the upper cowl and lower cowl can't be flexed apart with the cowl in place. Correct?
3) I now know what the special tools required are.
4) The adjustable receptacles are causing failures.
My concerns about the failures that Robbie and Bill mentioned have nothing to do with the adjustable receptacles but the retaining rings and the retainers themselves.
5) Selecting the proper grip for the fasteners. I keep trying to find the table that correlated retainer grip to dash number. I know it's buried in there somewhere. I just haven't found it.
I think I'm getting close to placing an order.
Thanks,
Wes
Wes Ragle
Onex #89
Conventional Gear
Long Tips
Hummel 2400 w/Zenith Carb
Prince P Tip 54x50
First Flight 06/23/2020
42.8 Hrs. as of 10/30/21
Onex #89
Conventional Gear
Long Tips
Hummel 2400 w/Zenith Carb
Prince P Tip 54x50
First Flight 06/23/2020
42.8 Hrs. as of 10/30/21
- WesRagle
- Posts: 847
- Joined: Fri Jan 05, 2018 12:35 pm
- Location: Weatherford, Tx
Re: Wes's Onex #89
![]() by wlarson861 » Fri Nov 22, 2019 12:45 am
by wlarson861 » Fri Nov 22, 2019 12:45 am
I am curious if the crazing/cracking of lexan is related to how well the cut edges are polished out. I think I'll take a little more time and polish the hole and cut edges down to 2000 grit.
No matter how well you polish the edges of the Lexan, a few drops of auto fuel will cause it to crack, Take a scrap piece of Lexan(trimmings from the windshield) and bend it to a radius similar to the windshield and have someone pour a little auto gas on and watch it crack everywhere the fuel touches. Winter blend auto fuel is the worst because of all the extra solvents they add in the winter time.
Bill Larson
N861SX
Sonex, polished, tail wheel, Generation 4 Jabiru 3300
N861SX
Sonex, polished, tail wheel, Generation 4 Jabiru 3300
- wlarson861
- Posts: 497
- Joined: Wed Dec 05, 2012 11:41 pm
Re: Wes's Onex #89
![]() by WesRagle » Sat Nov 23, 2019 4:51 pm
by WesRagle » Sat Nov 23, 2019 4:51 pm
Hi Bill,
I'll just do my best not to spill. At some point I'll try it.
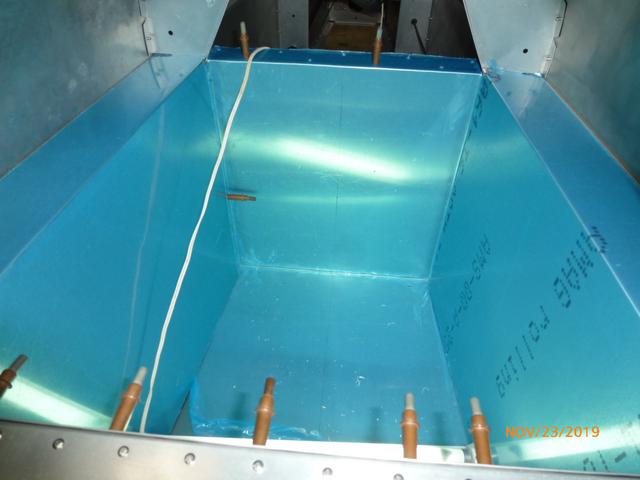
I've been working on my rendition of Dirk's baggage compartment. Getting used to working with 0.016 (tin foil). Just about have to pieces fitted. There are a lot of weird angles involved. I only made one unintended piece of scrap so far. I decided to use the inside of the formers as a dimension. Took it almost all the way to the floor. I'll velcro a thin piece of plywood to the floor to keep from "point loading" the tin foil. I'll also add a thin lexan access/inspection panel for the idler. I'm not sure this is worth the effort, but it's now or never.
Wes
wlarson861 wrote:Take a scrap piece of Lexan(trimmings from the windshield) and bend it to a radius similar to the windshield and have someone pour a little auto gas on and watch it crack everywhere the fuel touches.
I'll just do my best not to spill. At some point I'll try it.
I've been working on my rendition of Dirk's baggage compartment. Getting used to working with 0.016 (tin foil). Just about have to pieces fitted. There are a lot of weird angles involved. I only made one unintended piece of scrap so far. I decided to use the inside of the formers as a dimension. Took it almost all the way to the floor. I'll velcro a thin piece of plywood to the floor to keep from "point loading" the tin foil. I'll also add a thin lexan access/inspection panel for the idler. I'm not sure this is worth the effort, but it's now or never.
Wes
Wes Ragle
Onex #89
Conventional Gear
Long Tips
Hummel 2400 w/Zenith Carb
Prince P Tip 54x50
First Flight 06/23/2020
42.8 Hrs. as of 10/30/21
Onex #89
Conventional Gear
Long Tips
Hummel 2400 w/Zenith Carb
Prince P Tip 54x50
First Flight 06/23/2020
42.8 Hrs. as of 10/30/21
- WesRagle
- Posts: 847
- Joined: Fri Jan 05, 2018 12:35 pm
- Location: Weatherford, Tx
Re: Wes's Onex #89
![]() by dirkverdonck » Sun Nov 24, 2019 5:43 am
by dirkverdonck » Sun Nov 24, 2019 5:43 am
Hi Wes,
This looks very much like my bagage compartment, takes a while to cut and bend all the bits but the end result will be a large and solid storage area.
This looks very much like my bagage compartment, takes a while to cut and bend all the bits but the end result will be a large and solid storage area.
- Attachments
-
- bag2.JPG (65.01 KiB) Viewed 10953 times
-
- bag1.JPG (75.19 KiB) Viewed 10953 times
Dirk Verdonck
Leffinge, Belgium
Onex #117
Taildragger, Aerovee 2.1, MGL iEFIS, TRIG radio and Transponder, electric flaps, external elevator trim, shortened wingtips, hydraulic brakes, hightened seat pan, extra inspection panels, etc
Leffinge, Belgium
Onex #117
Taildragger, Aerovee 2.1, MGL iEFIS, TRIG radio and Transponder, electric flaps, external elevator trim, shortened wingtips, hydraulic brakes, hightened seat pan, extra inspection panels, etc
- dirkverdonck
- Posts: 88
- Joined: Sun Sep 21, 2014 9:01 am
- Location: Leffinge, Belgium
Who is online
Users browsing this forum: No registered users and 5 guests


