Page 1 of 1
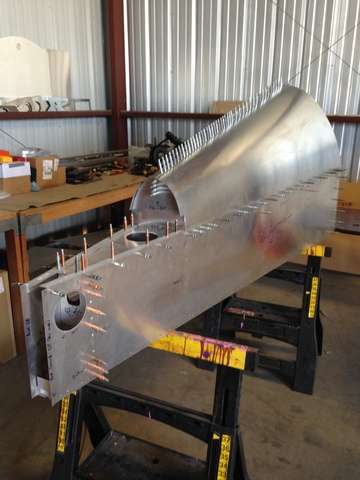
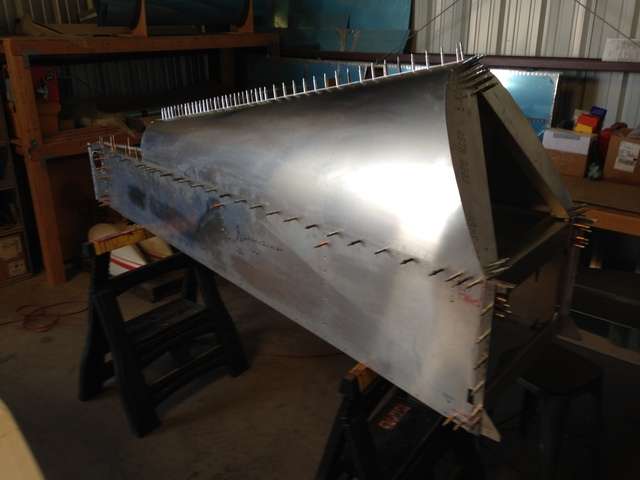
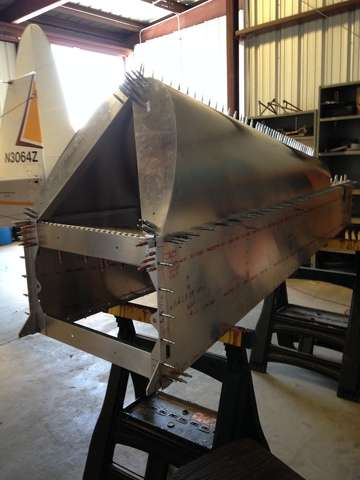
PULLING Former Flanges tight against the inside of the Turtl

Posted:
Sun Jul 31, 2016 12:38 amby dhogue
Hello Sonex Builders,
Onex plans page Onx-F15- 01 Detail K states: Push formers out tight against the Turtle-deck then use pilot holes in clips to drill to formers.
I am writing to ask you: What are good method(s) to pull the Former Flanges tight up against the inside of the Turtle-deck?
The flange surface are flat, for the most part, but the turtle deck is curved. Drilling the Turtle-deck pilot holes to the flanges with 3/32" and using 1/8" clecos do not pull the two surfaces tight (gaps still evident). That is why I ask
Thank you.
Don
Re: PULLING Former Flanges tight against the inside of the T
Posted:
Sun Jul 31, 2016 6:31 amby peter anson
Hi Don, This has come up before. See
http://www.sonexbuilders.net/viewtopic.php?f=5&t=2218&p=16512&hilit=turtledeck+formers#p16512The Sonex/Waiex formers fit well, but apparently the Xenos and Onex formers are not so good. It must be fixed or you'll end up with some horrible dents in the turtledeck when you rivet. A friend who is building a Xenos used packers made from 0.025" and 0.032" to fill in the gaps and the result was almost perfect. I think several Onex builders have used the same method.
Peter
Sonex 894
Re: PULLING Former Flanges tight against the inside of the T
Posted:
Sun Jul 31, 2016 9:09 amby dhogue
Thanks Peter. The spacers sound good.
Don
Re: PULLING Former Flanges tight against the inside of the T
Posted:
Thu Aug 18, 2016 4:16 pmby Don_P
In building Onex 0095, I finally gave up on the kit-provided formers being discussed here, since they were so far off from the contour of the turtle deck skin. My recommendation would be to make a cardboard pattern of the skin contour at the former (from the inside) and use that to fabricate a new set of formers (as I ended up doing). The difference in contour is about 3/8 inch at the widest part of the former.
Re: PULLING Former Flanges tight against the inside of the T
Posted:
Fri Aug 19, 2016 12:21 amby rk2436
Wow,how they can sell parts like that is unbelievable . I guess the old'just make it work' excuse comes to mind.
Re: PULLING Former Flanges tight against the inside of the T
Posted:
Fri Aug 19, 2016 1:21 amby wlarson861
When I built the Sonex there were a few rivets in the turtledeck that dished in. Several builders used the shim method to fill the gap before pulling the rivet. The other method (that I opted for) was to rivet the skin and then take the dimple out. To do this you get an old wooden broom handle and drill a hole in the end large enough to fit over the expanded shank end of the pulled rivet. I had my wife outside the plane while i got under the tail that still had the belly skin off. I put the offending rivet into the hole in the end of the broom handle and took a few taps at the end with a soft faced hammer. My wife would check the result and advise if it needed more persuasion. I managed to remove most of the puckers this way, we did miss a couple near the longeron that were not obvious until the polish was done. Certainly easier than cutting shims or remaking bulkheads.
Your milage may vary.
Re: PULLING Former Flanges tight against the inside of the T
Posted:
Sun Aug 21, 2016 10:28 amby dhogue
Very helpful and doable. Thanks gents for sharing those good methods.
I've viewed the processes to make formers from scratch on the EAA How To videos.
I will go with the Cardboard Cutout of the inside of the turtledeck and make formers from flat stock.
Re: PULLING Former Flanges tight against the inside of the T
Posted:
Mon Aug 22, 2016 9:22 amby Onex107
I'll add the "build it like it comes" comment. I did not take any action to "fix" the dimples and yes I have a few in the turtle deck. They are apparent, more so if you polish. Don't know how they would look under paint. I think the dimples in a golf ball make it fly faster, so maybe there is a plus side to dimples. I didn't build a trophy plane, and it was flying after 1000 hours of pleasure building it. I suppose if I wanted to "fix" them I could always take the belly skin loose in the back and use Bill's broom stick. Right now, at 130 hours of flying, it's not worth the time and effort. Beauty is in the eye of the beholder, and this beholder doesn't see them any more. The flying is pure pleasure and everything that goes with it, engine, AeroInjector, temperatures, air speeds, landings and take offs, are so much more to think about than a few dimples. Don't sweat the small stuff.
Re: PULLING Former Flanges tight against the inside of the T
Posted:
Mon Aug 29, 2016 9:02 amby dhogue
Update:
I was wrong.
I just did not think it through well enough. Yet - Another lesson learned. :mrgreen:
The formers that came with my kit are just right.
What worked for me:
I put tape around the jaws of a pair of pliers and a crescent wrench and took my time making small bends in the former tabs to add curve matching shape where the most curve shape was required and the result was a good and close fit with no gaps.
The above required several iterations of:
adjusting tabs
Putting the turtle deck skins on and checking where more tab reshaping was needed.
Removing the skins.
Reshape tabs.
repeat.
It is a good feeling to look at this section. It's beginning to look like a airplane.
Re: PULLING Former Flanges tight against the inside of the T
Posted:
Mon Aug 29, 2016 10:38 amby Bryan Cotton
You often have to spend a lot of time to make things go quickly.