


random user submitted photo
Control Horn Help
8 posts
• Page 1 of 1
Control Horn Help
![]() by Tyler » Sun Jan 20, 2019 12:24 am
by Tyler » Sun Jan 20, 2019 12:24 am
Hello!
I'm positive this is user error, and I think I'm reading the plans incorrectly. I am hoping someone can point out the error in my thinking so I can go on my merry way and keep building my Sonex :)
I'm making the Drive Horn from SNX-T13-03 Drive Horn. It calls out for 16 of the 19 holes to be drilled at 3/32". The remaining 3 pilot holes are to be drilled at 3/16". (Picture Below)
The plans then show that part being riveted to three other parts. The plans say to use CCP-44 rivets.
My tail kit came with CCP-44 rivets. But CCP-44 rivets don't fit into 3/16" holes. Sooo... at first I was thinking either the holes are supposed to be larger than 3/16" or I'm not actually supposed to use CCP-44 rivets. But then as I sit here... I'm sure I'm just reading the plans incorrectly. Am I supposed to match drill the 3 parts I'm going to rivet to the control horn?
Any help would be much appreciated! Thanks!
Best,
Tyler
- Tyler
- Posts: 14
- Joined: Wed Nov 28, 2018 12:19 pm
Re: Control Horn Help
![]() by wlarson861 » Sun Jan 20, 2019 12:47 am
by wlarson861 » Sun Jan 20, 2019 12:47 am
Two of the three 3/16 inch holes are where the rudder cable forks attach with AN-3 bolts(3/16). The third 3/16 is the drive for the tail wheel. The 3/32 holes are pilot holes at the rivet locations. when the rib parts are fitted and drilled to 3/32(#40) they are up-drilled together to 1/8 (#30) and riveted with the ccp-44 rivets. If you are using a kit part, the holes are already drilled with the laser. bring them to exact size and take any laser flash off.
Bill Larson
N861SX
Sonex, polished, tail wheel, Generation 4 Jabiru 3300
N861SX
Sonex, polished, tail wheel, Generation 4 Jabiru 3300
- wlarson861
- Posts: 497
- Joined: Wed Dec 05, 2012 11:41 pm
Re: Control Horn Help
![]() by WaiexN143NM » Sun Jan 20, 2019 1:10 am
by WaiexN143NM » Sun Jan 20, 2019 1:10 am
hi tyler,
dont forget to file the edges of the horn to remove manufacturing cutting marks. a scotch brite wheel on a bench grinder will become your favorite tool in the shop. even better if its on a tall stand.
check harbor freight. and aircraft spruce for the wheel. as you updrill everything you will disassemble,
dont forget to lightly remove the hole burrs. primer inside as you wish. scotch brite and wipe with acetone before primer. cleco all back together and rivet up. what are you using for a riveter?
welcome to the forums and the community.
also which b model are you building the sonex or waiex?
WaiexN143NM
Michael
- WaiexN143NM
- Posts: 1157
- Joined: Mon Sep 15, 2014 1:04 am
- Location: SF CA, Tucson AZ, palm springs CA
Re: Control Horn Help
![]() by Bryan Cotton » Sun Jan 20, 2019 9:12 am
by Bryan Cotton » Sun Jan 20, 2019 9:12 am
Bill answers your question well. Sometimes if I am confused I look on the lower right corner to what page the assembly is used next. You can use this feature to look forward in time for your build. Of course the questions are always welcome here too!
Bryan Cotton
Poplar Grove, IL C77
Waiex 191 N191YX
Taildragger, Aerovee, acro ailerons
dual sticks with sport trainer controls
Prebuilt spars and machined angle kit
Year 2 flying and approaching 200 hours December 23
Poplar Grove, IL C77
Waiex 191 N191YX
Taildragger, Aerovee, acro ailerons
dual sticks with sport trainer controls
Prebuilt spars and machined angle kit
Year 2 flying and approaching 200 hours December 23
-

Bryan Cotton - Posts: 5035
- Joined: Mon Jul 01, 2013 9:54 pm
- Location: C77
Re: Control Horn Help
![]() by Sonex1243 » Sun Jan 20, 2019 2:42 pm
by Sonex1243 » Sun Jan 20, 2019 2:42 pm
You should end up with an assembly like this. I have an "A" model, but, if you are building a "B" the tail should be the same.
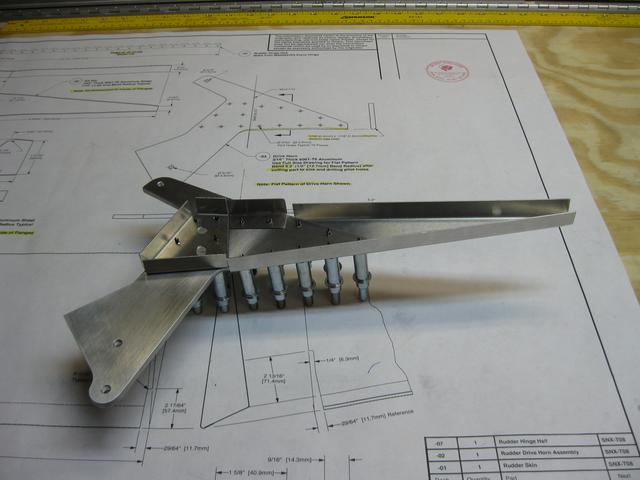
Piloted rudder drive horn assembly
Welcome to the group!
Piloted rudder drive horn assembly
Welcome to the group!
Ken S
SONEX #1243 N424SX (reserved)
Tail complete, wings done
Fuselage on gear
Jab 3300 received!
SONEX #1243 N424SX (reserved)
Tail complete, wings done
Fuselage on gear
Jab 3300 received!
- Sonex1243
- Posts: 310
- Joined: Thu Jan 08, 2015 4:59 pm
Re: Control Horn Help
![]() by dbdevkc » Mon Jan 21, 2019 11:36 am
by dbdevkc » Mon Jan 21, 2019 11:36 am
It calls out for 16 of the 19 holes to be drilled at 3/32".
It also helps to pay attention to the qty of rivets used in the assembly. In this case the plans call for "16 required", so you can verify you have the correct number of (correctly sized) rivet holes. Like others stated if in doubt, look ahead to see how the assembly is used in the plans up the plan tree.
[color=#800000]Kevin Conklin
Building Waiex #169
Building Waiex #169
- dbdevkc
- Posts: 193
- Joined: Sun Jun 26, 2011 9:18 am
- Location: Washingtonville, NY
Re: Control Horn Help
![]() by Tyler » Mon Jan 21, 2019 1:08 pm
by Tyler » Mon Jan 21, 2019 1:08 pm
First, I just have to say, this is an amazing online community. I asked a question, (a pretty stupid one) and within a couple of hours, there are two/three amazing responses.
@wlarson861 - Thank you so much for the clarification on the match drilling. I was pretty confident I was supposed to widen those holes up to a 1/8th inch, but I really didn't want to start drilling until I knew for sure. Really appreciate the help!
@WaiexN143NM - I've got a scotch bright wheel on the way! Thanks for the recommendation. Seems to be a pretty invaluable tool for the Sonex homebuilder. To answer your two questions: 1. I'm just using a hand rivet gun at the moment. I have a compressed air rivet gun as well (I'd have to look up the model number/brand) I haven't used it quite yet as I'm waiting on a 30-gallon air compressor. 2. Building the Sonex B. Waiex is really cool... gotta love that Y-tail. But for me, I prefer the "conventional" tail.
- Tyler
- Posts: 14
- Joined: Wed Nov 28, 2018 12:19 pm
Re: Control Horn Help
![]() by jrs » Mon Jan 21, 2019 2:03 pm
by jrs » Mon Jan 21, 2019 2:03 pm
Amen to the great community comment.
For us newbees out here having the opportunity to chat with people who have been there and done that is priceless. Makes the build process much more doable. Lots of dumb questions when you are getting your feet wet. At least that is my experience.
For us newbees out here having the opportunity to chat with people who have been there and done that is priceless. Makes the build process much more doable. Lots of dumb questions when you are getting your feet wet. At least that is my experience.
- jrs
- Posts: 53
- Joined: Sun Dec 09, 2018 9:45 pm
8 posts
• Page 1 of 1
Who is online
Users browsing this forum: No registered users and 9 guests


