


random user submitted photo
Waiex-B 0022
31 posts
• Page 3 of 4 • 1, 2, 3, 4
Re: Waiex-B 0022
![]() by WaiexB22 » Sun Jan 21, 2024 7:57 pm
by WaiexB22 » Sun Jan 21, 2024 7:57 pm
I mounted the cowl this weekend. First I made the ring per the plans:
Then I made a centerline and worked from there to mount the canopy. I have skybolts that I will be using at the windscreen and the joint of the two halves. I will be using piano hinge to mate the lower cowl sides and bottom.
I had to cut the top of the cowl slightly to clear the throttle body. After looking further, I am leaning towards running a larger diameter spinner to make the cowl lines a little better.
Robert
Waiex-B 0022
Yamaha Apex
Building
Waiex-B 0022
Yamaha Apex
Building
- WaiexB22
- Posts: 56
- Joined: Thu Jun 08, 2023 1:56 pm
Re: Waiex-B 0022
![]() by WaiexB22 » Sat Mar 02, 2024 12:32 am
by WaiexB22 » Sat Mar 02, 2024 12:32 am
I have been busy working and I think its time for an update.
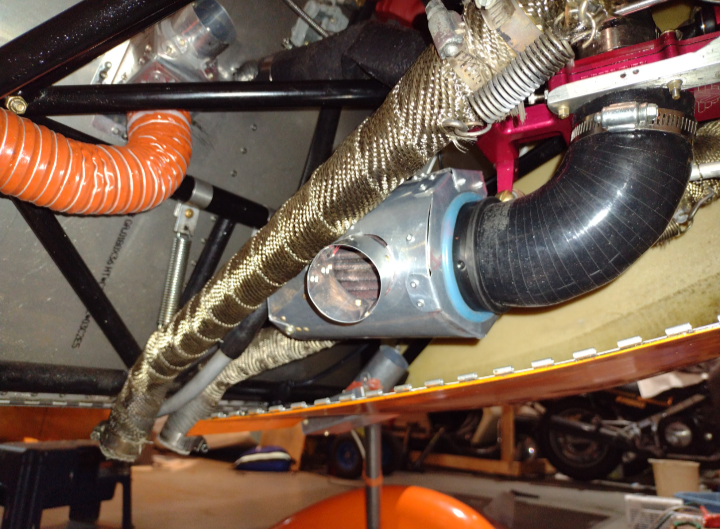
I have finished the exhaust welding. I need to repack the muffler and rivet the back in and that will be complete. I will probably knock that out this weekend. I will need a heat shield or two as well. There is a npt port for a smoke nozzle right at the outlet of the muffler. I have compression fitting in there and I plan to make a nozzle that will insert through the compression fitting.
The air box is on and it fits under the cowl, but there is very little room for a cone filter unless I put a blister in the cowl, which I don't want to do to the top unless I absolutely have to. It will likely require an elbow or something else. This is a dry sump engine. I am waiting on an oil tank that I ordered. Once I get the oil tank, I will pick a filter and figure out how to make it work.
I am working on the radiator. Steve Henry sold me one that he took of one of his planes, so it was dirty when I got it, but it cleaned up nice. I am placing it in the belly beneath the engine, beside the muffler. I am building a duct that will isolate the cooling airflow from the cowl. It has a smaller inlet and outlet to reduce drag and improve cooling efficiency. I am actively working on this, but I haven't stopped to take pictures. I welded some angle flanges on the radiator that I will support the duct from. The radiator position shown was approximate. I will try to get some better photos of this this weekend. I need to seal up the flanges and seams in this duct work. I will use silicon flanges at the interface of the cowl, but I need a seam sealer for the corners and seams. Does anyone have a seam sealer or something equivalent that works well with aluminum? I was considering proseal, but I hate working with that stuff and it seams like overkill. I also thought about using HVAC tape, but I'm looking for something a little better than that.
Robert
Waiex-B 0022
Yamaha Apex
Building
Waiex-B 0022
Yamaha Apex
Building
- WaiexB22
- Posts: 56
- Joined: Thu Jun 08, 2023 1:56 pm
Re: Waiex-B 0022
![]() by WaiexB22 » Sat Mar 02, 2024 12:34 am
by WaiexB22 » Sat Mar 02, 2024 12:34 am
I also installed the universal stick kit, but once again no photos right now. It is done as far as I can get it until I rig the wings. I'll try to get some pictures this weekend.
Robert
Waiex-B 0022
Yamaha Apex
Building
Waiex-B 0022
Yamaha Apex
Building
- WaiexB22
- Posts: 56
- Joined: Thu Jun 08, 2023 1:56 pm
Re: Waiex-B 0022
![]() by Bryan Cotton » Sat Mar 02, 2024 12:48 am
by Bryan Cotton » Sat Mar 02, 2024 12:48 am
Looks awesome! Here is my air filter setup:
viewtopic.php?f=7&t=687&start=10
Edit: I've also added a shroud for some fresh air induction.
viewtopic.php?f=7&t=687&start=10
Edit: I've also added a shroud for some fresh air induction.
Bryan Cotton
Poplar Grove, IL C77
Waiex 191 N191YX
Taildragger, Aerovee, acro ailerons
dual sticks with sport trainer controls
Prebuilt spars and machined angle kit
Year 2 flying and approaching 200 hours December 23
Poplar Grove, IL C77
Waiex 191 N191YX
Taildragger, Aerovee, acro ailerons
dual sticks with sport trainer controls
Prebuilt spars and machined angle kit
Year 2 flying and approaching 200 hours December 23
-

Bryan Cotton - Posts: 5051
- Joined: Mon Jul 01, 2013 9:54 pm
- Location: C77
Re: Waiex-B 0022
![]() by WaiexB22 » Sat Mar 02, 2024 4:31 pm
by WaiexB22 » Sat Mar 02, 2024 4:31 pm
Thanks Bryan! I like how you did yours and I will definitely think twice about how I secure mine. I was thinking of using one of those flexible elbows just like you did.
Robert
Waiex-B 0022
Yamaha Apex
Building
Waiex-B 0022
Yamaha Apex
Building
- WaiexB22
- Posts: 56
- Joined: Thu Jun 08, 2023 1:56 pm
Re: Waiex-B 0022
![]() by BobDz » Sat Mar 02, 2024 5:54 pm
by BobDz » Sat Mar 02, 2024 5:54 pm
Robert
Any chance you're within 200 miles of OSH? I'd really like to see your engine.
Thanks
Any chance you're within 200 miles of OSH? I'd really like to see your engine.
Thanks
Bob Dz...
Sonex B, Tri-gear
(technically within walking distance of Sonex)
N624DZ (reserved)
Plans exist to eliminate confusion, not create it.
Sonex B, Tri-gear
(technically within walking distance of Sonex)
N624DZ (reserved)
Plans exist to eliminate confusion, not create it.
- BobDz
- Posts: 260
- Joined: Mon Oct 02, 2023 3:44 pm
Re: Waiex-B 0022
![]() by karmarepair » Sun Mar 03, 2024 1:54 pm
by karmarepair » Sun Mar 03, 2024 1:54 pm
WaiexB22 wrote:I have been busy working and I think its time for an update.
I need to seal up the flanges and seams in this duct work. I will use silicon flanges at the interface of the cowl, but I need a seam sealer for the corners and seams. Does anyone have a seam sealer or something equivalent that works well with aluminum? I was considering proseal, but I hate working with that stuff and it seams like overkill. I also thought about using HVAC tape, but I'm looking for something a little better than that.
I've used high temp RTV for sealing my baffles and firewall, in some cases reinforced with fiberglass dry wall tape, and/or overlaid with aluminum foil, or aluminum foil tape. There are SINGLE PART moisture cure urethanes (look for Sika or PU Plus) and SINGLE PART moisture cured polysulfides (Boat Life) that are a little less mess than mixing ProSeal or other two part polysulfides.
My favorite trick is to cut a patch of aluminum foil the size and shape of where I want to seal, use a notched trowel to spread High Temp RTV on it evenly, squish two layers of fiberglass drywall tape at 90 and 45 degrees into the uncured elastomer, then "wet it out" with more RTV. Slap it on sticky side to the surface to seal. The slight stiffness of the foil and the tape holds the "membrane" in place pretty well, but you can also "fixture" it in place with Blue Tape. RTV WILL NOT cure (actually, none of the single part elastomers will....) in thick sections without tricks like adding cornstarch and teeny bit of water to it to carry moisture into the depth of the molding, but I've had no trouble with the technique just described.
Nice work, carry on!
- karmarepair
- Posts: 160
- Joined: Sun Oct 11, 2020 8:13 pm
Re: Waiex-B 0022
![]() by WaiexB22 » Sun Mar 03, 2024 6:31 pm
by WaiexB22 » Sun Mar 03, 2024 6:31 pm
BobDz wrote:Robert
Any chance you're within 200 miles of OSH? I'd really like to see your engine.
Thanks
I am outside of Charlotte, NC. I guess it could be 2 hours if you're flying something really fast.... In all seriousness, I'll have it at OSH when it's done. Until then, you're welcome to see it if you're in the Charlotte area.
Robert
Waiex-B 0022
Yamaha Apex
Building
Waiex-B 0022
Yamaha Apex
Building
- WaiexB22
- Posts: 56
- Joined: Thu Jun 08, 2023 1:56 pm
Re: Waiex-B 0022
![]() by WaiexB22 » Sun Mar 03, 2024 6:33 pm
by WaiexB22 » Sun Mar 03, 2024 6:33 pm
karmarepair wrote:WaiexB22 wrote:I have been busy working and I think its time for an update.
I need to seal up the flanges and seams in this duct work. I will use silicon flanges at the interface of the cowl, but I need a seam sealer for the corners and seams. Does anyone have a seam sealer or something equivalent that works well with aluminum? I was considering proseal, but I hate working with that stuff and it seams like overkill. I also thought about using HVAC tape, but I'm looking for something a little better than that.
I've used high temp RTV for sealing my baffles and firewall, in some cases reinforced with fiberglass dry wall tape, and/or overlaid with aluminum foil, or aluminum foil tape. There are SINGLE PART moisture cure urethanes (look for Sika or PU Plus) and SINGLE PART moisture cured polysulfides (Boat Life) that are a little less mess than mixing ProSeal or other two part polysulfides.
My favorite trick is to cut a patch of aluminum foil the size and shape of where I want to seal, use a notched trowel to spread High Temp RTV on it evenly, squish two layers of fiberglass drywall tape at 90 and 45 degrees into the uncured elastomer, then "wet it out" with more RTV. Slap it on sticky side to the surface to seal. The slight stiffness of the foil and the tape holds the "membrane" in place pretty well, but you can also "fixture" it in place with Blue Tape. RTV WILL NOT cure (actually, none of the single part elastomers will....) in thick sections without tricks like adding cornstarch and teeny bit of water to it to carry moisture into the depth of the molding, but I've had no trouble with the technique just described.
Nice work, carry on!
Thanks for the suggestion! I may give the RTV and foil method a shot on a sample piece this week.
Robert
Waiex-B 0022
Yamaha Apex
Building
Waiex-B 0022
Yamaha Apex
Building
- WaiexB22
- Posts: 56
- Joined: Thu Jun 08, 2023 1:56 pm
Re: Waiex-B 0022
![]() by WaiexB22 » Wed May 01, 2024 8:37 am
by WaiexB22 » Wed May 01, 2024 8:37 am
It's way past time for an update. I have been working steadily when time permits.
I got most of the dual stick conversion done. I need to get the wings mated before I can finish and I am waiting on that for now. I followed the plans here, the only thing I plan to modify is the control stick itself. Sonex supplies a 1 inch OD tube for the stick, I want a 7/8 inch tube for the grips I want to use, so I will be making 2 new ones from 7/8 tubing soon.
The cooling system is nearing completion. The radiator is mounted and I fabricated an outlet duct to dump the air under the belly. I will be building an inlet duct as well that will mate to the cowl with an inlet. There are 2 coolant tanks - an expansion tank and an overflow. They are both mounted on the firewall. I'm not sure I like the mounts I made, but they are strong and the rivets face away from the fuel tank. I also have a coolant based heater for the cockpit that needs to find a home. I am thinking about bolting it to the back of the panel, behind my ipad.
The voltage regulator is up on the firewall near the overflow tank, on the copilot side. The intake side of the engine is refered to as the "cold side" and is where I want all my electronics (the overflow tank only gets an ounce or two of coolant dumped in per flight and is generally cold). The stator and the voltage regulator are basically all that will remain from the original Yamaha electrical. The harness, ECU, engine monitor, and everything else associated with engine electrical is in fabrication by BD turnkey right now and should be delivered in May.
The oil system on the engine is a little bit different in that it is a dry sump with an external oil tank. It also utilizes a coolant to oil heat exchanger that can act as either an oil cooler or an oil warmer, depending on the operating condition. I am also planning on running a small air to oil cooler in front of the radiator. The air to oil cooler will be on a thermostat such that it only operates when the oil is hot. The factory Yamaha oil tank is very thin and oddly shaped for a snowmobile. Skytrax (the gearbox manufacturer) is now making a nice aluminum tank that I have ordered and should be receiving in the next few weeks. The cardboard box in the photos above is the shape and location of the oil tank. Once I get that I can mount the tank, oil cooler, and oil hoses.
For the throttle I have a little bit of a challenge. The factory throttle body is spring closed and the throttle cable pulls a bellcrank from the top of the engine. I ordered a MacFarlane veneer throttle cable. I am going to flip the spring in the throttle body to spring open, then I am going to run the MacFarlane throttle to the underside of the bellcrank, so that it becomes a push-pull that fails open just like a traditional aviation throttle. More on that soon.
to be continued...I can only upload 10 pictures.
Robert
Waiex-B 0022
Yamaha Apex
Building
Waiex-B 0022
Yamaha Apex
Building
- WaiexB22
- Posts: 56
- Joined: Thu Jun 08, 2023 1:56 pm
31 posts
• Page 3 of 4 • 1, 2, 3, 4
Who is online
Users browsing this forum: No registered users and 25 guests


