


random user submitted photo
Ken's Sonex 1243
Re: Ken's Sonex 1243
![]() by DCASonex » Sat Dec 08, 2018 9:42 am
by DCASonex » Sat Dec 08, 2018 9:42 am
If memory serves correct, the problem of cadmium and titanium only occurs at high temperatures. After several failures of the 1/4" stainless bolts, Info from Sonex was to just use the standard aircraft grade cad plated bolts.
David A.
David A.
- DCASonex
- Posts: 904
- Joined: Mon Sep 12, 2011 8:04 pm
- Location: Western NY USA
Re: Ken's Sonex 1243
![]() by Sonex1243 » Sat Dec 08, 2018 5:59 pm
by Sonex1243 » Sat Dec 08, 2018 5:59 pm
Thanks for the clarification everyone, reviewed the plans sheet again and they do say at elevated temps.
Getting ready to move on to the engine mount install. I can see right away there will be some trimming of the lower attach fittings needed as also noted by other builders. Does the plans reference about the "nominal .060 thick shim" referring to that being roughly what it would take in shim thickness at the 4 corners for a good fit in the mount fittings?
Since the mount isn't installed yet, I am thinking about mounting the axle assemblies on the Ti rods first and then set the toe in / gear leg length when I install the legs into the mount using the mount as a guide to locate those bolt holes. Any thing I might be missing doing it that way?
Ken S
SONEX #1243 N424SX (reserved)
Tail complete, wings done
Fuselage on gear
Jab 3300 received!
SONEX #1243 N424SX (reserved)
Tail complete, wings done
Fuselage on gear
Jab 3300 received!
- Sonex1243
- Posts: 310
- Joined: Thu Jan 08, 2015 4:59 pm
Re: Ken's Sonex 1243
![]() by Area 51% » Sun Dec 09, 2018 9:46 am
by Area 51% » Sun Dec 09, 2018 9:46 am
Straight from the for-what-it's-worth department.....It was necessary for me to drill my gear legs as you describe since I have Tracy O'Brian legs and axles. The axle supports come welded to the legs from the factory. The engine mount makes a wonderful drill guide. Just don't break a drill off up in there.
As far as the shims go....depending on the alignment of the mount, you might end up with 030 on one side and 090 on the other (or some other combination). What's more, the shims may have to be tapered if the mount isn't perfectly parallel with the airframe tabs (A good time to commit a crime because you won't have any finger-prints left after tapering a 060 piece of aluminum).
As far as the shims go....depending on the alignment of the mount, you might end up with 030 on one side and 090 on the other (or some other combination). What's more, the shims may have to be tapered if the mount isn't perfectly parallel with the airframe tabs (A good time to commit a crime because you won't have any finger-prints left after tapering a 060 piece of aluminum).
- Area 51%
- Posts: 733
- Joined: Thu Feb 18, 2016 7:57 am
Re: Ken's Sonex 1243
![]() by Sonex1243 » Tue Dec 11, 2018 11:15 pm
by Sonex1243 » Tue Dec 11, 2018 11:15 pm
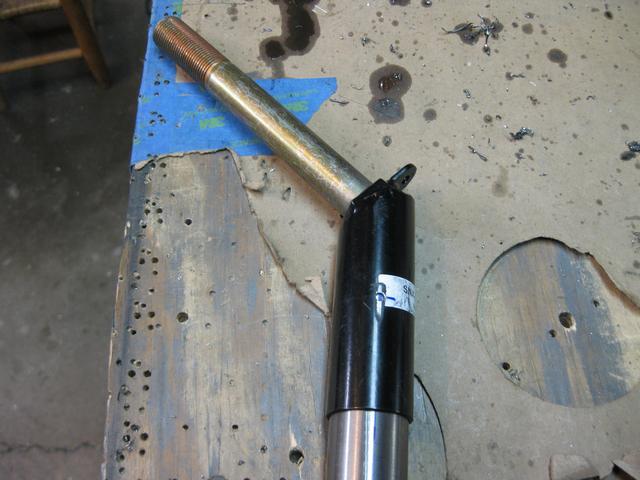
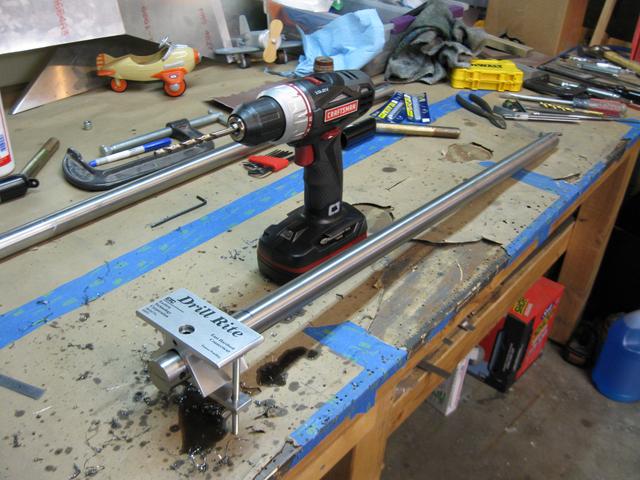
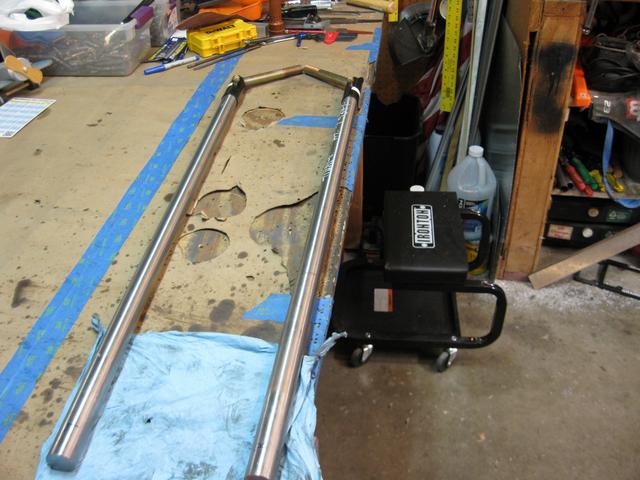
I wasn't quite ready to finish the engine mount fitting, so I finished drilling the gear legs and fit the axles with success this time. I will install them after the mount is fitted and use the mount to start the holes on those ends. I used the drill guide and cordless drill, lots of time and cutting oil. Transferred the 1/8" pilot hole from the axle to the Ti and then mounted it in the drill guide. Used the 3/16" and 1/4" bit and bushings for nice tight hole. Then slipped the axle back on and back drilled the back side using the Ti rod as a drill bushing.
My replacement tail wheel pivot shipped today, I hope to redeem myself on that one.
I won't claim victory on the Ti until the drilling is done!
My replacement tail wheel pivot shipped today, I hope to redeem myself on that one.
I won't claim victory on the Ti until the drilling is done!
Ken S
SONEX #1243 N424SX (reserved)
Tail complete, wings done
Fuselage on gear
Jab 3300 received!
SONEX #1243 N424SX (reserved)
Tail complete, wings done
Fuselage on gear
Jab 3300 received!
- Sonex1243
- Posts: 310
- Joined: Thu Jan 08, 2015 4:59 pm
Re: Ken's Sonex 1243
![]() by Sonex1243 » Wed Dec 12, 2018 9:31 pm
by Sonex1243 » Wed Dec 12, 2018 9:31 pm
Replaced the AN4C hardware on the gear axles with the AN4 steel bolts and hardware.
Resuming with the engine mount, I took some more material off the lower mount fittings and have it pretty close after cleaning it all up.
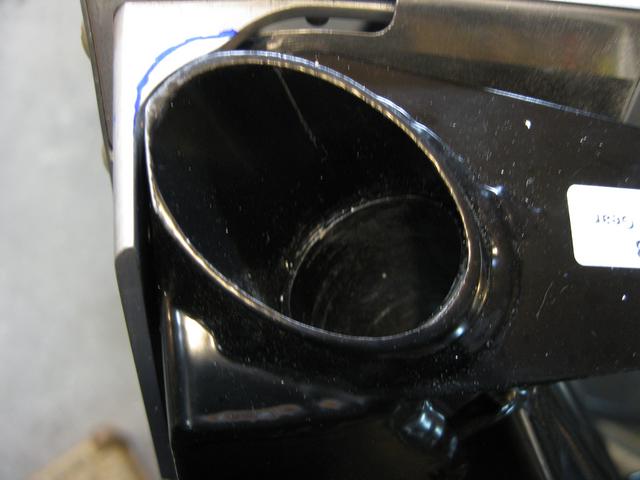
A little more needed.
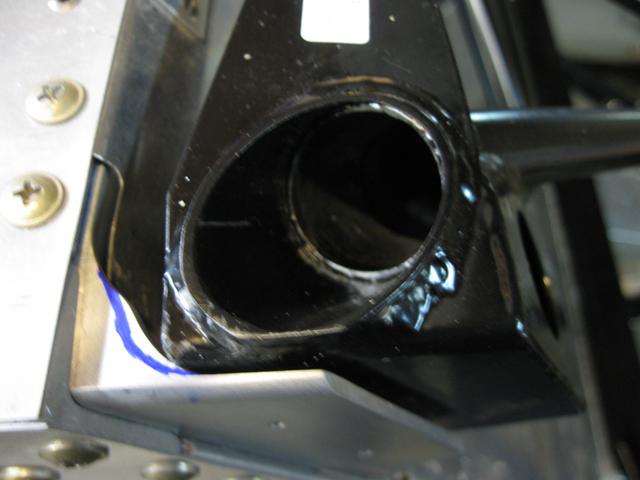
Looks like the bottom left mount / weld area was still hitting the fitting. It is pulled slightly away for the close-up. The gear leg outlet is still below the bottom fuse skin. I believe a little more to clear the mount welds and mount corner will give me the dimension needed as well as the edge distance for the attach bolt in that lower corner.
Resuming with the engine mount, I took some more material off the lower mount fittings and have it pretty close after cleaning it all up.
A little more needed.
Looks like the bottom left mount / weld area was still hitting the fitting. It is pulled slightly away for the close-up. The gear leg outlet is still below the bottom fuse skin. I believe a little more to clear the mount welds and mount corner will give me the dimension needed as well as the edge distance for the attach bolt in that lower corner.
Ken S
SONEX #1243 N424SX (reserved)
Tail complete, wings done
Fuselage on gear
Jab 3300 received!
SONEX #1243 N424SX (reserved)
Tail complete, wings done
Fuselage on gear
Jab 3300 received!
- Sonex1243
- Posts: 310
- Joined: Thu Jan 08, 2015 4:59 pm
Re: Ken's Sonex 1243
![]() by Sonex1243 » Mon Dec 24, 2018 9:17 pm
by Sonex1243 » Mon Dec 24, 2018 9:17 pm
Finally got back into the engine mount after a few other distractions like drilling a new Ti rod and lots of sanding down the inside of the new tail wheel pivot with a rod and sandpaper in the drill press to fit the new rod.
I removed some more material from the lower mounts and have it pretty close. Fabricated shims and now have .063 and .025 in all four corners. Clamped everything up with the gear leg cutout flush with the bottom skin. Still need to verify the other dimensions before transferring pilot holes into the shims and mount.
I am starting to struggle with how to verify the measurements per the plans with some kind of measuring contraption and squares. Good point to ponder on how to do it before messing something up! The fuselage is upside down and leveled to start with.
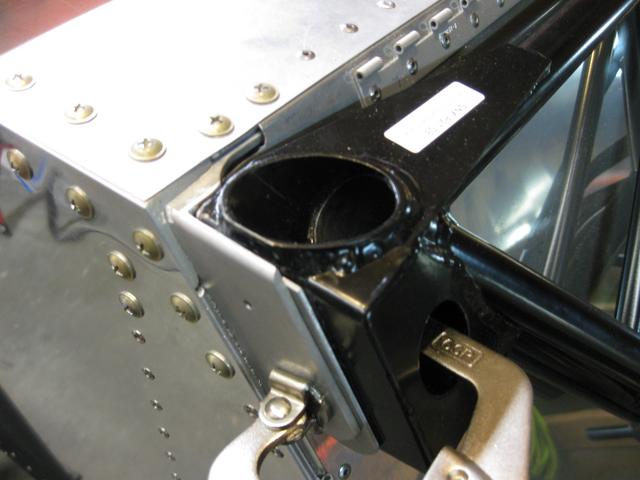
Lower left mount clamped and shimmed
Upper right mount clamped and shimmed
Happy holidays everyone!
I removed some more material from the lower mounts and have it pretty close. Fabricated shims and now have .063 and .025 in all four corners. Clamped everything up with the gear leg cutout flush with the bottom skin. Still need to verify the other dimensions before transferring pilot holes into the shims and mount.
I am starting to struggle with how to verify the measurements per the plans with some kind of measuring contraption and squares. Good point to ponder on how to do it before messing something up! The fuselage is upside down and leveled to start with.
Lower left mount clamped and shimmed
Upper right mount clamped and shimmed
Happy holidays everyone!
Ken S
SONEX #1243 N424SX (reserved)
Tail complete, wings done
Fuselage on gear
Jab 3300 received!
SONEX #1243 N424SX (reserved)
Tail complete, wings done
Fuselage on gear
Jab 3300 received!
- Sonex1243
- Posts: 310
- Joined: Thu Jan 08, 2015 4:59 pm
Re: Ken's Sonex 1243
![]() by Bryan Cotton » Mon Dec 24, 2018 10:59 pm
by Bryan Cotton » Mon Dec 24, 2018 10:59 pm
Ken,
Shoot me an email and I'll reply with some alignment pictures. I have to find them on my PC as that was a few years ago. My Gmail address is my first name and last name and serial number jammed together.
Shoot me an email and I'll reply with some alignment pictures. I have to find them on my PC as that was a few years ago. My Gmail address is my first name and last name and serial number jammed together.
Bryan Cotton
Poplar Grove, IL C77
Waiex 191 N191YX
Taildragger, Aerovee, acro ailerons
dual sticks with sport trainer controls
Prebuilt spars and machined angle kit
Year 2 flying and approaching 200 hours December 23
Poplar Grove, IL C77
Waiex 191 N191YX
Taildragger, Aerovee, acro ailerons
dual sticks with sport trainer controls
Prebuilt spars and machined angle kit
Year 2 flying and approaching 200 hours December 23
-

Bryan Cotton - Posts: 5035
- Joined: Mon Jul 01, 2013 9:54 pm
- Location: C77
Re: Ken's Sonex 1243
![]() by Sonex1243 » Thu May 21, 2020 1:35 pm
by Sonex1243 » Thu May 21, 2020 1:35 pm
So, after a fall injury due to an icy aircraft ramp at work and ensuing rotator cup surgery healing, I am back!!!!
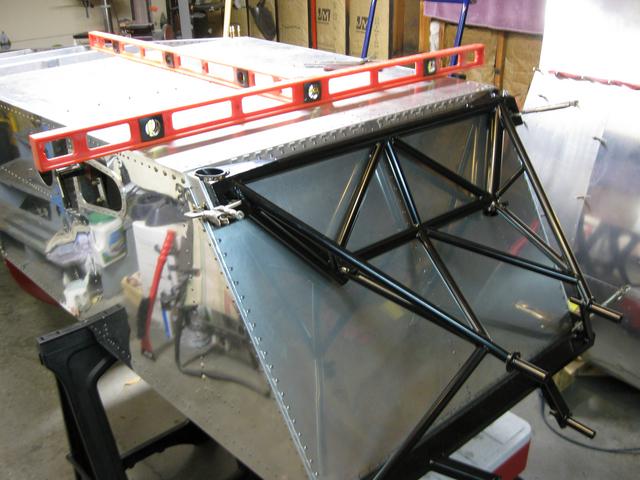
Thanks to Brian's help with the engine mount rigging suggestions, I got it in place. I'll need to redo the lower shims as i tapered the back edges and am concerned about the edge distance once the mount holes are upsized for bolting. Current stack up is a .063 and .025 in all four corners.
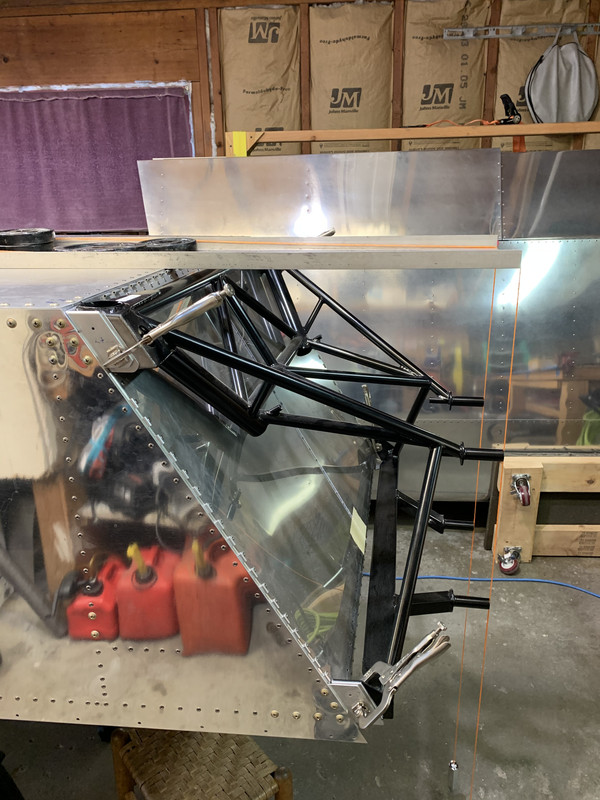
Mount alignment contraption
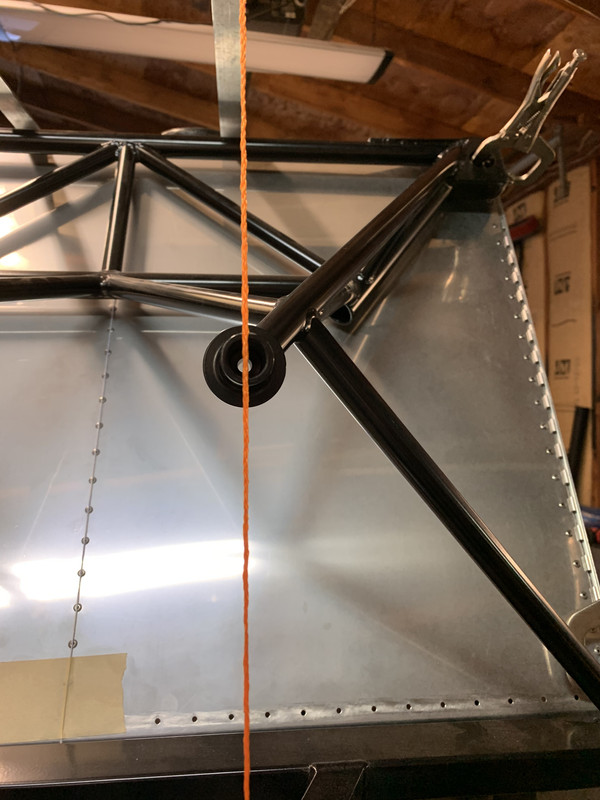
Pretty close on all 4 pins

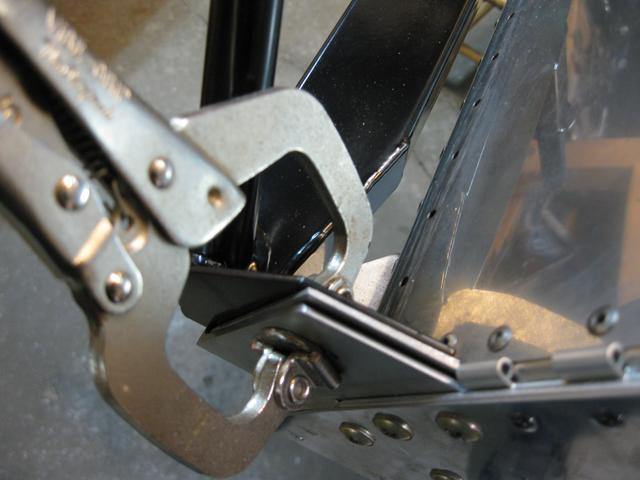
Back of shims that were erroneously tapered
Thanks to Brian's help with the engine mount rigging suggestions, I got it in place. I'll need to redo the lower shims as i tapered the back edges and am concerned about the edge distance once the mount holes are upsized for bolting. Current stack up is a .063 and .025 in all four corners.
Mount alignment contraption
Pretty close on all 4 pins
Back of shims that were erroneously tapered
Ken S
SONEX #1243 N424SX (reserved)
Tail complete, wings done
Fuselage on gear
Jab 3300 received!
SONEX #1243 N424SX (reserved)
Tail complete, wings done
Fuselage on gear
Jab 3300 received!
- Sonex1243
- Posts: 310
- Joined: Thu Jan 08, 2015 4:59 pm
Re: Ken's Sonex 1243
![]() by Bryan Cotton » Thu May 21, 2020 3:35 pm
by Bryan Cotton » Thu May 21, 2020 3:35 pm
A thing of beauty! Well done.
Bryan Cotton
Poplar Grove, IL C77
Waiex 191 N191YX
Taildragger, Aerovee, acro ailerons
dual sticks with sport trainer controls
Prebuilt spars and machined angle kit
Year 2 flying and approaching 200 hours December 23
Poplar Grove, IL C77
Waiex 191 N191YX
Taildragger, Aerovee, acro ailerons
dual sticks with sport trainer controls
Prebuilt spars and machined angle kit
Year 2 flying and approaching 200 hours December 23
-
Bryan Cotton - Posts: 5035
- Joined: Mon Jul 01, 2013 9:54 pm
- Location: C77
Re: Ken's Sonex 1243
![]() by sonex1566 » Thu May 21, 2020 11:31 pm
by sonex1566 » Thu May 21, 2020 11:31 pm
Hello Ken,
We all seem to go through so much worry and effort with our various degrees of OCD ishness to get the engine and airframe alignment as perfect as possible. I'd love a brave 'Myth Busters' approach to go in the opposite direction to find out just how wrong you can build and it still fly all right. I'm know I'm gonna be sent straight to hell for suggesting poor workmanship, but I'm one of those annoying fools who always asks 'why'. Maybe to settle a bar room bet John Monnet will let me loose with one of his UAV's to experiment with! (Please don't, I'm only joking).
We all seem to go through so much worry and effort with our various degrees of OCD ishness to get the engine and airframe alignment as perfect as possible. I'd love a brave 'Myth Busters' approach to go in the opposite direction to find out just how wrong you can build and it still fly all right. I'm know I'm gonna be sent straight to hell for suggesting poor workmanship, but I'm one of those annoying fools who always asks 'why'. Maybe to settle a bar room bet John Monnet will let me loose with one of his UAV's to experiment with! (Please don't, I'm only joking).
Richard
Scratch build Sonex
Std gear, dual control
Jabiru 3300, Sensenich prop
19-8776
1st Flight 25th June 2019. 170 hrs so far.....
http://www.sonex1566.com
Scratch build Sonex
Std gear, dual control
Jabiru 3300, Sensenich prop
19-8776
1st Flight 25th June 2019. 170 hrs so far.....
http://www.sonex1566.com
- sonex1566
- Posts: 94
- Joined: Thu Jun 21, 2018 6:11 am
Who is online
Users browsing this forum: No registered users and 33 guests


