


random user submitted photo
Nuvite polishing
42 posts
• Page 3 of 5 • 1, 2, 3, 4, 5
Re: Nuvite polishing
![]() by WesRagle » Sat May 12, 2018 10:33 pm
by WesRagle » Sat May 12, 2018 10:33 pm
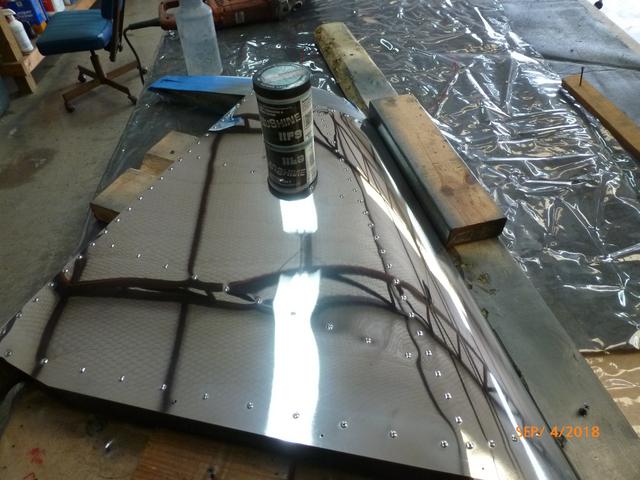
I just got through with the first "polishing fit". The job was to rough polish the Onex fuse skins flat on the table. I used wool pads on the cheap harbor freight circular buffer.
Forward fuse on table.
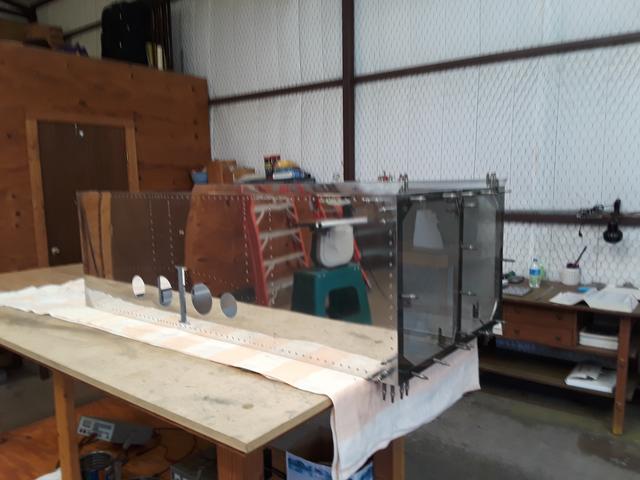
Compare the skin on the left vs. the one on the right.
Good enough for now. Should be an easy to polish it off after it's all together. It took three 8 hour days to get the eight skins to this stage.
I go after polishing with a "get'er done" attitude. Usually about 4 to 6 square feet per polish application. Goes like this:
1) Stick my finger tip in the polish and dab dab dab ... the polish over the area to be polished.
2) Stand back (and above) with a mist bottle full of mineral spirits and give it about 1/2 a trigger of mist.
3) With the buffer on low speed swipe the entire polish area. This will spread the polish over the area.
4) Once the polish is spread roll in some speed on the buffer. Keep it moving. Back and forth, up and down, .... Usually up a little on the edge of the pad.
5) Keep going with this application until the polish is removed by the pad. As the polish starts to be removed I speed up the buffer and lay it flat.
6) Repeat as necessary to get desired results. It takes about 6 passes of F9 to get the grain down to an acceptable level.
It seems to me that polishing happens fastest when you can feel the buffer pulling. It may take a few applications before the pad has enough polish and mineral spirits for the method to start working.
P.S. If it does remove some material. I have had the black stuff that it produces analyzed and it does contain trace amounts of 6061-T6 ;-)
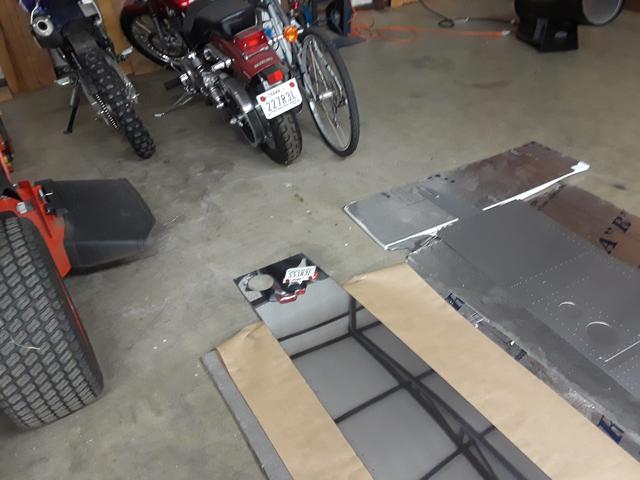
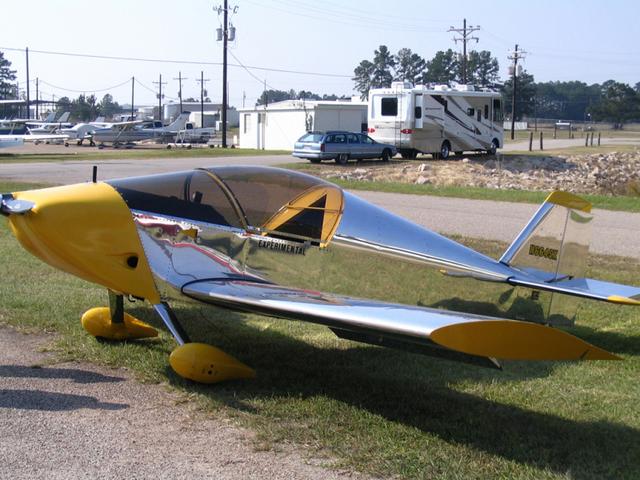
As a final note, if the F9 doesn't brighten the metal in a couple of passes, No. 7 Heavy Duty rubbing compound will get things started. I used it on #664 (Pic Below) but didn't seem to need it this time.
Best of Luck,
Forward fuse on table.
Compare the skin on the left vs. the one on the right.
Good enough for now. Should be an easy to polish it off after it's all together. It took three 8 hour days to get the eight skins to this stage.
I go after polishing with a "get'er done" attitude. Usually about 4 to 6 square feet per polish application. Goes like this:
1) Stick my finger tip in the polish and dab dab dab ... the polish over the area to be polished.
2) Stand back (and above) with a mist bottle full of mineral spirits and give it about 1/2 a trigger of mist.
3) With the buffer on low speed swipe the entire polish area. This will spread the polish over the area.
4) Once the polish is spread roll in some speed on the buffer. Keep it moving. Back and forth, up and down, .... Usually up a little on the edge of the pad.
5) Keep going with this application until the polish is removed by the pad. As the polish starts to be removed I speed up the buffer and lay it flat.
6) Repeat as necessary to get desired results. It takes about 6 passes of F9 to get the grain down to an acceptable level.
It seems to me that polishing happens fastest when you can feel the buffer pulling. It may take a few applications before the pad has enough polish and mineral spirits for the method to start working.
P.S. If it does remove some material. I have had the black stuff that it produces analyzed and it does contain trace amounts of 6061-T6 ;-)
As a final note, if the F9 doesn't brighten the metal in a couple of passes, No. 7 Heavy Duty rubbing compound will get things started. I used it on #664 (Pic Below) but didn't seem to need it this time.
Best of Luck,
Wes Ragle
Onex #89
Conventional Gear
Long Tips
Hummel 2400 w/Zenith Carb
Prince P Tip 54x50
First Flight 06/23/2020
42.8 Hrs. as of 10/30/21
Onex #89
Conventional Gear
Long Tips
Hummel 2400 w/Zenith Carb
Prince P Tip 54x50
First Flight 06/23/2020
42.8 Hrs. as of 10/30/21
- WesRagle
- Posts: 841
- Joined: Fri Jan 05, 2018 12:35 pm
- Location: Weatherford, Tx
Re: Nuvite polishing
![]() by pfhoeycfi » Mon May 14, 2018 4:30 pm
by pfhoeycfi » Mon May 14, 2018 4:30 pm
Curious if there is anything that can be done around the rivets and in tight spots? There is a small strip for example along the lower spar of the vert stab that seems impossible to effect in any way...
My stab is looking better...more mirror like w swirls after 7 passes. The F9 did clean up most of the the grey scotch bright marks, we'll see what the final looks like....
I'll def polish the sheets flat for the rest of it...
thanks,
peter
SNB0021
My stab is looking better...more mirror like w swirls after 7 passes. The F9 did clean up most of the the grey scotch bright marks, we'll see what the final looks like....
I'll def polish the sheets flat for the rest of it...
thanks,
peter
SNB0021
Peter Hoey
SEL Pvt, Comm Glider, CFIG, Pawnee & L19 Towpilot
Philadelphia Glider Council
Sonex B SNB0021, N561PH, Taildragger, Aerovee Turbo, MGL MX1, First flight Dec 18, 2022
Also built Sonerai IIL N86PH
SEL Pvt, Comm Glider, CFIG, Pawnee & L19 Towpilot
Philadelphia Glider Council
Sonex B SNB0021, N561PH, Taildragger, Aerovee Turbo, MGL MX1, First flight Dec 18, 2022
Also built Sonerai IIL N86PH
- pfhoeycfi
- Posts: 378
- Joined: Wed Jun 28, 2017 3:45 pm
Re: Nuvite polishing
![]() by GordonT » Sat May 19, 2018 3:42 pm
by GordonT » Sat May 19, 2018 3:42 pm
wlarson861 wrote:For removing scratches I would contact Nuvite, they have a method to remove even deep scratches. They use several grades of Micro Mesh abrasives, the same stuff used to repair Plexiglas.
When polishing I do the final finish with grade S. I use a 7" Wen car wax polisher and Micro fiber towel I get at Sam's Club. The smaller polisher is easier to control and will fit on the towel in 4 places on each side yielding 8, 18 inch square polish areas. The towels can be soaked in TSP and run through the washing machine and re-used.
I contacted Nuvite to get information on their "method" and this is what I received: "In response to your query regarding subject, since our NuShine F9 is not doing the job, you may have to sand them out using a sanding disk or the like. Any other questions, let me know. Thanks!"
I copied your post and sent it to the rep who did not respond back....yet!
Do you have any information about this method you can share?
Thanks for any help you can provide.
Gordon Threlkeld
DeLand, FL
Building Sonex 082 (80% done 90% to go!)
Tri-Gear Aerovee
DeLand, FL
Building Sonex 082 (80% done 90% to go!)
Tri-Gear Aerovee
- GordonT
- Posts: 1
- Joined: Sun May 24, 2015 7:38 pm
Re: Nuvite polishing
![]() by WesRagle » Tue Sep 04, 2018 10:09 pm
by WesRagle » Tue Sep 04, 2018 10:09 pm
HI guys,
I'm taking a break from building this week and having a "Polishing Fit". Seems every time I have one of the fits, polishing wasn't as easy as I remembered :-)
However, after a bit I got going again and finished the tail pieces to the point that I can install them and final polish after the plane is together. I'll have company tomorrow, but should be able to get the outside wing panels by weeks end.
Anyone have any success or horror stories to share.
Thanks,
Wes
Wes Ragle
Onex #89
Conventional Gear
Long Tips
Hummel 2400 w/Zenith Carb
Prince P Tip 54x50
First Flight 06/23/2020
42.8 Hrs. as of 10/30/21
Onex #89
Conventional Gear
Long Tips
Hummel 2400 w/Zenith Carb
Prince P Tip 54x50
First Flight 06/23/2020
42.8 Hrs. as of 10/30/21
- WesRagle
- Posts: 841
- Joined: Fri Jan 05, 2018 12:35 pm
- Location: Weatherford, Tx
Re: Nuvite polishing
![]() by XenosN42 » Wed Sep 05, 2018 9:45 am
by XenosN42 » Wed Sep 05, 2018 9:45 am
WesRagle wrote:HI guys,
I'm taking a break from building this week and having a "Polishing Fit". Seems every time I have one of the fits, polishing wasn't as easy as I remembered :-)
However, after a bit I got going again and finished the tail pieces to the point that I can install them and final polish after the plane is together. I'll have company tomorrow, but should be able to get the outside wing panels by weeks end.
Anyone have any success or horror stories to share.
Thanks,
Wes
I found the secret was to play my favorate music while polishing. Takes your mind off the work, and before you know it you're making progress.
-- Michael
-- Michael
OneX N169XE
author of the 'Flight Data Viewer'
OneX N169XE
author of the 'Flight Data Viewer'
- XenosN42
- Posts: 412
- Joined: Thu Jul 24, 2014 4:45 pm
- Location: PA, USA
Re: Nuvite polishing
![]() by WesRagle » Wed Sep 05, 2018 5:37 pm
by WesRagle » Wed Sep 05, 2018 5:37 pm
Hi Michael,
I agree. Anything you can do to take your mind off of the task at hand. For instance, become a polishing super hero:
Ladies and Gentlemen ..., watch in amazement as I, Silvatron, by applying only a small amount of Nuvitoninum (found only on my home planet), transform this seemingly ordinary piece of aluminum into the near invisible Alumanimum. Some may proclaim this to be alchemy, but don't be fooled, ...
Ok, maybe a bit over the edge, but you get the idea.
BTW, even Silvatron might lose hope at the sight of a Xenos wing.
Wes
Wes Ragle
Onex #89
Conventional Gear
Long Tips
Hummel 2400 w/Zenith Carb
Prince P Tip 54x50
First Flight 06/23/2020
42.8 Hrs. as of 10/30/21
Onex #89
Conventional Gear
Long Tips
Hummel 2400 w/Zenith Carb
Prince P Tip 54x50
First Flight 06/23/2020
42.8 Hrs. as of 10/30/21
- WesRagle
- Posts: 841
- Joined: Fri Jan 05, 2018 12:35 pm
- Location: Weatherford, Tx
Re: Nuvite polishing
![]() by WesRagle » Thu Sep 06, 2018 9:41 pm
by WesRagle » Thu Sep 06, 2018 9:41 pm
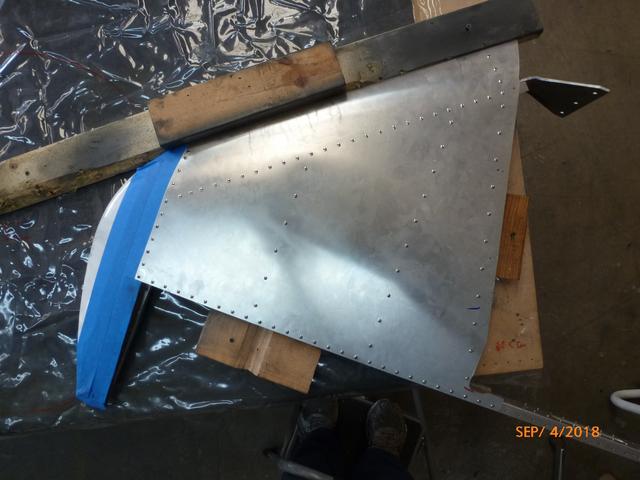
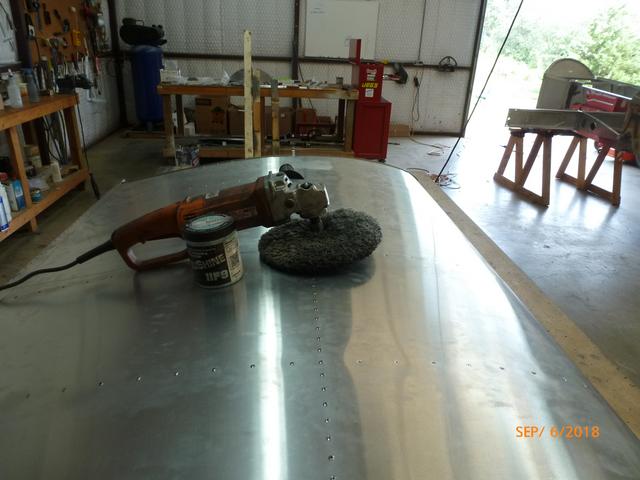
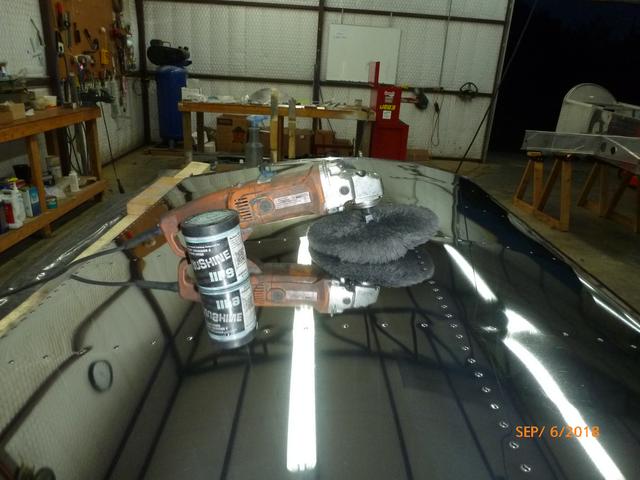
One down, one to go.
Represents one full day of polishing.
Wes
Represents one full day of polishing.
Wes
Wes Ragle
Onex #89
Conventional Gear
Long Tips
Hummel 2400 w/Zenith Carb
Prince P Tip 54x50
First Flight 06/23/2020
42.8 Hrs. as of 10/30/21
Onex #89
Conventional Gear
Long Tips
Hummel 2400 w/Zenith Carb
Prince P Tip 54x50
First Flight 06/23/2020
42.8 Hrs. as of 10/30/21
- WesRagle
- Posts: 841
- Joined: Fri Jan 05, 2018 12:35 pm
- Location: Weatherford, Tx
Re: Nuvite polishing
![]() by WesRagle » Sat Sep 08, 2018 3:34 pm
by WesRagle » Sat Sep 08, 2018 3:34 pm
JimP wrote:Like a mirror! Beautiful
Thanks Jim. I do have to admit that the camera makes it look a bit better than it is. Still pretty good though.
Wes
Wes Ragle
Onex #89
Conventional Gear
Long Tips
Hummel 2400 w/Zenith Carb
Prince P Tip 54x50
First Flight 06/23/2020
42.8 Hrs. as of 10/30/21
Onex #89
Conventional Gear
Long Tips
Hummel 2400 w/Zenith Carb
Prince P Tip 54x50
First Flight 06/23/2020
42.8 Hrs. as of 10/30/21
- WesRagle
- Posts: 841
- Joined: Fri Jan 05, 2018 12:35 pm
- Location: Weatherford, Tx
Re: Nuvite polishing
![]() by WesRagle » Sat Sep 08, 2018 5:36 pm
by WesRagle » Sat Sep 08, 2018 5:36 pm
Hi Guys,
First, I would like to apologize for one of my previous posts.
Most of you, and certainly any trained therapist, will notice immediately that one of my more dominant alter egos, "The Wizard of Odd", was trying to usurp the powers of Sivertron. If you've spent any time with a true Super Hero you'll know they never boast.
Ok, maybe I'm a little wacked, but I'm fresh off of a 30 hour polishing fit so perhaps you'll understand.
While it's fresh on my mind I'll make a few observations. First, I re-read the thread and picked out some of the statements that resonated with me.
1) No "one" technique is "the" technique. You will get other opinions on the above, and they will likely work as well. These ones have worked for me.
2) It seems to me that the best polishing is actually had when the polish is just starting to dry up and pick itself up... i.e. when you're polishing at the point where it's just starting to look clear as you move across the surface. If you stop and reapply before that point you're missing out.
3) Do yourself a favor and polish the bottom well before assembly. Trust me, you do not want to polish laying on the ground holding that polisher above you. Ask me how I know!! Ditto.
4) No one said this was a clean job.
5) It gets to a point of diminishing returns. Each pass still takes just as long, but the improvement starts to become VERY small. At some point you'll cry uncle, and that's the point to switch to Nuvite C.
Note: On #5, it is hard to know when enough is enough. The whole point of polishing is to play tricks on the eye. The game is to have the eyes automatically adjust focal length to see the reflection and not the surface. After hours of polishing I tend to lose objectivity. I found an objective way to judge. I used 1200 grit sand paper to scuff up a spot in the middle of the area being polished. Then I polish that spot the same as the rest of the area. Polish until the spot looked the same as the surrounding area. YMMV.
Here is what I reported after "Polishing Fit #1"
1) Stick my finger tip in the polish and dab dab dab ... the polish over the area to be polished.
2) Stand back (and above) with a mist bottle full of mineral spirits and give it about 1/2 a trigger of mist.
3) With the buffer on low speed swipe the entire polish area. This will spread the polish over the area.
4) Once the polish is spread roll in some speed on the buffer. Keep it moving. Back and forth, up and down, .... Usually up a little on the edge of the pad.
5) Keep going with this application until the polish is removed by the pad. As the polish starts to be removed I speed up the buffer and lay it flat.
6) Repeat as necessary to get desired results. It takes about 6 passes of F9 to get the grain down to an acceptable level.
Here are some comments after "Polishing Fit #2"
Note on #0: Add step 0. Clean entire area with laquer thinner to remove all printing, sharpie marks, bug poop, etc off of the surface.
Note on #1: It is hard to over emphasize that it is way too easy to get too much polish on the surface. The large can of F9 that I showed in the previous posts should be enough to polish two or three airplanes.
Note on #2: There is a perfect amount that will come with experience. Just enough and you can easily spread the polish over the area. Too much and you will sling "stuff" all over. Not enough and you will have just a splotch of polish where the finger prints of polish were. As I got tired (lazy) I used more mineral spirits and didn't even spin the pad while spreading the polish. It was messier but used less effort.
Note on #3: If there is no polish on part of the surface I don't think you're going to do much good. After spreading, the entire area should be covered/coated.
Note on #4: During fit #2 I didn't add speed to the polisher for the first few seconds of the application. I quickly moved the polisher side to side over the entire area with no pressure and the pad flat on the surface. Within a few seconds the entire area (1/4 of the surface of the outer wing panel) would reach the "magical point" that Ryan pointed out, "when the polish is just starting to dry up and pick itself up". The surface looks dull gray. Sometimes it looks a little like gun bluing <sp>. At that point I would roll in just a touch of speed and get up on the edge just a little (maybe 10 deg.), apply a little pressure, and start moving forward and backward going a little farther forward with each stroke.
Also, for the first 2 or 3 passes don't get up on the edge at all. Just leave the pad flat on the surface at low speed, no pressure, keep it moving, and let it pull. If the F9 is doing it's job the metal will heat up some. The metal might expand, pop and complain some. Don't worry about it. After three passes the metal will be getting bright. You can start adding shine/reflection at that point.
Note on #6: Probably a gross under estimate of the number of passes.
I don't do small areas. For the vertical stab the entire side is my polish area. For the outer wing panel 1/4 of the surface is my polish area.
I am now about 7 full days in. The only areas that haven't been hit are the wing stub skins, flaps and ailerons, and the leading edge of the tail surfaces. I will still have to do the C and S after the plane is assembled. That shouldn't be too hard. The F9 is definitely the "heavy lifting" part of the job.
I do have to say that polishing is a hard and nasty job. If you are doing this in your garage, cover the entire floor with plastic before starting. Find yourself a pair of shoes that are about ready for the trash and use those for the job. Never, and I mean never, wear those shoes into the house. Burn the shoes after polishing. After a polishing session remove your shoes, ask someone else to open the door for you, pull up your paints legs and tiptoe directly to the shower. Undress in the shower, turn your cloths wrong side out and hand them out for a trip directly to the washer. Apply lava soap (repeat as necessary).
Anyway, if you really really want a polished airplane and have problems getting started don't feel alone. I think most folks are stumped at first. If you are having problems, get yourself a mister bottle full of mineral spirits and experiment some. You will probably find a combination that works for you.
Best of Luck,
Wes
First, I would like to apologize for one of my previous posts.
WesRagle wrote:Hi Michael,
Ladies and Gentlemen ..., watch in amazement as I, Silvatron, by applying only a small amount of Nuvitoninum (found only on my home planet), transform this seemingly ordinary piece of aluminum into the near invisible Alumanimum. Some may proclaim this to be alchemy, but don't be fooled, ...
Wes
Most of you, and certainly any trained therapist, will notice immediately that one of my more dominant alter egos, "The Wizard of Odd", was trying to usurp the powers of Sivertron. If you've spent any time with a true Super Hero you'll know they never boast.
Ok, maybe I'm a little wacked, but I'm fresh off of a 30 hour polishing fit so perhaps you'll understand.
While it's fresh on my mind I'll make a few observations. First, I re-read the thread and picked out some of the statements that resonated with me.
1) No "one" technique is "the" technique. You will get other opinions on the above, and they will likely work as well. These ones have worked for me.
2) It seems to me that the best polishing is actually had when the polish is just starting to dry up and pick itself up... i.e. when you're polishing at the point where it's just starting to look clear as you move across the surface. If you stop and reapply before that point you're missing out.
3) Do yourself a favor and polish the bottom well before assembly. Trust me, you do not want to polish laying on the ground holding that polisher above you. Ask me how I know!! Ditto.
4) No one said this was a clean job.
5) It gets to a point of diminishing returns. Each pass still takes just as long, but the improvement starts to become VERY small. At some point you'll cry uncle, and that's the point to switch to Nuvite C.
Note: On #5, it is hard to know when enough is enough. The whole point of polishing is to play tricks on the eye. The game is to have the eyes automatically adjust focal length to see the reflection and not the surface. After hours of polishing I tend to lose objectivity. I found an objective way to judge. I used 1200 grit sand paper to scuff up a spot in the middle of the area being polished. Then I polish that spot the same as the rest of the area. Polish until the spot looked the same as the surrounding area. YMMV.
Here is what I reported after "Polishing Fit #1"
1) Stick my finger tip in the polish and dab dab dab ... the polish over the area to be polished.
2) Stand back (and above) with a mist bottle full of mineral spirits and give it about 1/2 a trigger of mist.
3) With the buffer on low speed swipe the entire polish area. This will spread the polish over the area.
4) Once the polish is spread roll in some speed on the buffer. Keep it moving. Back and forth, up and down, .... Usually up a little on the edge of the pad.
5) Keep going with this application until the polish is removed by the pad. As the polish starts to be removed I speed up the buffer and lay it flat.
6) Repeat as necessary to get desired results. It takes about 6 passes of F9 to get the grain down to an acceptable level.
Here are some comments after "Polishing Fit #2"
Note on #0: Add step 0. Clean entire area with laquer thinner to remove all printing, sharpie marks, bug poop, etc off of the surface.
Note on #1: It is hard to over emphasize that it is way too easy to get too much polish on the surface. The large can of F9 that I showed in the previous posts should be enough to polish two or three airplanes.
Note on #2: There is a perfect amount that will come with experience. Just enough and you can easily spread the polish over the area. Too much and you will sling "stuff" all over. Not enough and you will have just a splotch of polish where the finger prints of polish were. As I got tired (lazy) I used more mineral spirits and didn't even spin the pad while spreading the polish. It was messier but used less effort.
Note on #3: If there is no polish on part of the surface I don't think you're going to do much good. After spreading, the entire area should be covered/coated.
Note on #4: During fit #2 I didn't add speed to the polisher for the first few seconds of the application. I quickly moved the polisher side to side over the entire area with no pressure and the pad flat on the surface. Within a few seconds the entire area (1/4 of the surface of the outer wing panel) would reach the "magical point" that Ryan pointed out, "when the polish is just starting to dry up and pick itself up". The surface looks dull gray. Sometimes it looks a little like gun bluing <sp>. At that point I would roll in just a touch of speed and get up on the edge just a little (maybe 10 deg.), apply a little pressure, and start moving forward and backward going a little farther forward with each stroke.
Also, for the first 2 or 3 passes don't get up on the edge at all. Just leave the pad flat on the surface at low speed, no pressure, keep it moving, and let it pull. If the F9 is doing it's job the metal will heat up some. The metal might expand, pop and complain some. Don't worry about it. After three passes the metal will be getting bright. You can start adding shine/reflection at that point.
Note on #6: Probably a gross under estimate of the number of passes.
I don't do small areas. For the vertical stab the entire side is my polish area. For the outer wing panel 1/4 of the surface is my polish area.
I am now about 7 full days in. The only areas that haven't been hit are the wing stub skins, flaps and ailerons, and the leading edge of the tail surfaces. I will still have to do the C and S after the plane is assembled. That shouldn't be too hard. The F9 is definitely the "heavy lifting" part of the job.
I do have to say that polishing is a hard and nasty job. If you are doing this in your garage, cover the entire floor with plastic before starting. Find yourself a pair of shoes that are about ready for the trash and use those for the job. Never, and I mean never, wear those shoes into the house. Burn the shoes after polishing. After a polishing session remove your shoes, ask someone else to open the door for you, pull up your paints legs and tiptoe directly to the shower. Undress in the shower, turn your cloths wrong side out and hand them out for a trip directly to the washer. Apply lava soap (repeat as necessary).
Anyway, if you really really want a polished airplane and have problems getting started don't feel alone. I think most folks are stumped at first. If you are having problems, get yourself a mister bottle full of mineral spirits and experiment some. You will probably find a combination that works for you.
Best of Luck,
Wes
Last edited by WesRagle on Sun Sep 23, 2018 11:09 am, edited 3 times in total.
Wes Ragle
Onex #89
Conventional Gear
Long Tips
Hummel 2400 w/Zenith Carb
Prince P Tip 54x50
First Flight 06/23/2020
42.8 Hrs. as of 10/30/21
Onex #89
Conventional Gear
Long Tips
Hummel 2400 w/Zenith Carb
Prince P Tip 54x50
First Flight 06/23/2020
42.8 Hrs. as of 10/30/21
- WesRagle
- Posts: 841
- Joined: Fri Jan 05, 2018 12:35 pm
- Location: Weatherford, Tx
42 posts
• Page 3 of 5 • 1, 2, 3, 4, 5
Who is online
Users browsing this forum: No registered users and 3 guests


