Page 3 of 5

Re: Panel Images

PostPosted: Mon Feb 13, 2017 11:09 am
by vwglenn
sonex892. wrote:Glen.
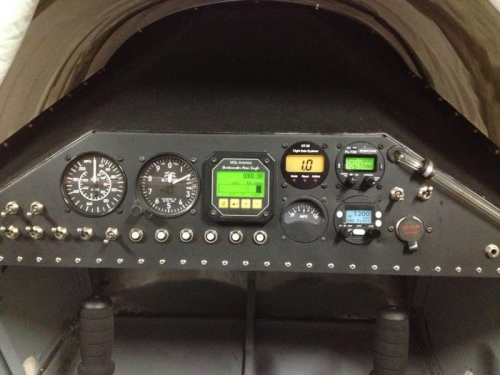
What is the bar LED next to the ASI?

Ray Allen trim indicator. The toggle to the left of it is the electric trim.

Switches from left to right...
Lower left- Master, left mag, right mag, red start button.
Top right- Avionics master, radio, xpndr
Bottom right- nav lights, landing light, taxi light, strobe

Re: Panel Images

PostPosted: Mon Feb 13, 2017 5:49 pm
by rizzz
My panel on a budget:
Image
Image
Old-school...

Re: Panel Images

PostPosted: Tue Feb 14, 2017 12:34 am
by Waiex 49
Nicely done!
Clean looking installation!

Re: Panel Images

PostPosted: Tue Feb 14, 2017 5:29 am
by rizzz
Waiex 49 wrote:Nicely done!
Clean looking installation!


Thanks Don :-)

How is the Waiex coming along?
I see you've moved on to upgrading the brakes. Is the Viking installation pretty much completed now? Surely you must be close to getting her flying again?

Re: Panel Images

PostPosted: Tue Feb 14, 2017 1:26 pm
by Waiex 49
The Viking installation is finished, but I'm held up due to rainy weather.

The FAA has inspected my Waiex and assigned a 5hr Phase 1 program for the major modifications.
Rainstorms have been my delay. After 4 years of drought we are getting slammed with heavy rainstorms.
This slowed down my flight training, but I was able to get my BFR signoff in late December.
With all the rain storms I could not fly the plane, so I decided to upgrade to the Sonex hydraulic disc brakes.
This has taken much longer than I anticipated and has not been much fun.
The Sonex brakes are pretty good, but the "kit" could stand a "Reality Check".
Sonex tech support seemed pretty clueless about this when I called them.
It will probably take a couple more weeks for me to finish it up.

The Viking engine runs quite nicely, and I look forward to flying my plane once the weather clears and I have the brakes working.

I'll be at Oshkosh 2017 with my Viking Waiex.

Don

Re: Panel Images

PostPosted: Tue Feb 14, 2017 9:29 pm
by mike.smith
Some pics from my Kitlog. EIFS is MGL Xtreme Mini. VERY happy with it.

http://www.mykitlog.com/users/display_l ... 7932&row=2
http://www.mykitlog.com/users/display_l ... 8901&row=6
http://www.mykitlog.com/users/display_l ... 458&row=18

http://www.mykitlog.com/users/display_l ... 809&row=19
Left to right:
.. Light for smoke
.. Smoke on/off
.. Master switch
.. Primary ignition
..... (Push to start above)
.. Secondary ignition
..... (not in this photo. Added later adjacent to primary)
.. MGL V6 radio
.. MGL Xtreme Mini
..... AHARS & magnetometer
..... monitors all 4 cylinders (CHT/EGT)
.. Fuel on/off knob under EIFS
.. Combination switch/breakers (Ztron; not made anymore)
..... Starter
..... EFIS
..... Radios (including trasponder)
..... ADSB (pending)
..... Aux & Smoke
..... Position Lights
..... Strobe Lights
..... Landing Light
.. GPS on tablet above switches
.. Transponder (Sandia STX-165)
.. Cabin heat on/off
.. Sight tube for fuel
..... Calibrated for ground and in flight

Center section of panel is removable by pulling hinge pins. Have used that MANY times! Don't build a panel that is not removable!

Re: Panel Images

PostPosted: Wed Feb 15, 2017 1:03 pm
by Darick
Panel is finished. A combination of old school and MGL gauges. The two rectangular reddish covers on the subpanel are recessed fuse boxes. If a self illuminating fuse blows, it will shine through the translucent red cover.

If I rivet the panel in place, it of course will not be easily removable. Any thoughts on using stainless sheet metal screws?

Image
Image
Image

Re: Panel Images

PostPosted: Wed Feb 15, 2017 3:26 pm
by Bryan Cotton
Looks good Darick! What big tasks are left? Besides pulling/disassembling the engine so you can get that paint off the case, of course.

Re: Panel Images

PostPosted: Wed Feb 15, 2017 3:35 pm
by jjbardell
Darick wrote:.
If I rivet the panel in place, it of course will not be easily removable. Any thoughts on using stainless sheet metal screws?


As I understand it, the panel is part of the structural design, so I would not use sheet metal screws. But, If I were to do it all over again, I would use nut plates. I recognize it is a lot of nut plates, but you could easily remove it with a drill/Philips head.

The other option is to create a larger rectangular panel plate using nut plates on the face of your panel.

It looks great though! I like your layout and design.

Re: Panel Images

PostPosted: Thu Feb 16, 2017 10:36 am
by vwglenn
Darick. You might want to plan to put a small "shelf" under that touch GPS. I have an ifly 520 in my plane and trying to use that touchscreen without any support was a near impossibility even in the small bumps. I originally had it suctioned to the front of my panel but moved it so it's over the panel. It's much easier to use when I can rest my hand on the edge of the panel.

I like the "gauge pod" (black trim) around your instruments. Gives the panel a nice finish.