


random user submitted photo
Waiex Build Status and Completion Photos
Re: Waiex Build Status and Completion Photos
![]() by N111YX » Mon Jan 16, 2012 2:38 pm
by N111YX » Mon Jan 16, 2012 2:38 pm
That sounds like a good plan, Mike. I doubt that you will regret having that position as an option. I also recommend that you have the little "keeper" tabs to hold the handle in place. It looks like yours may not have those but it's hard to tell in the pic...
Also, look closely and you will see my "parking brake" detent next to the "up" position... :)
Also, look closely and you will see my "parking brake" detent next to the "up" position... :)
- Attachments
-
- FlapDetentSmall.JPG (151.37 KiB) Viewed 17891 times
Kip
2010 Waiex 0082 (first flight May 2010)
Jabiru 3300 #1637 and #3035
Dynon D-180
Becker radios
Garmin GDL 82 ADS-B
1050 hours
48 states visited
Based near Atlanta
Also flying a...
2000 Kolb Firestar II, Rotax 503, 575 hours
2010 Waiex 0082 (first flight May 2010)
Jabiru 3300 #1637 and #3035
Dynon D-180
Becker radios
Garmin GDL 82 ADS-B
1050 hours
48 states visited
Based near Atlanta
Also flying a...
2000 Kolb Firestar II, Rotax 503, 575 hours
- N111YX
- Posts: 705
- Joined: Fri Jun 03, 2011 9:43 am
- Location: Atlanta, GA USA
Re: Waiex Build Status and Completion Photos
![]() by MichaelFarley56 » Mon Jan 23, 2012 4:00 pm
by MichaelFarley56 » Mon Jan 23, 2012 4:00 pm
I was finally able to get N569KM weighed this morning.
Left: 298 lbs
Right: 306 lbs
Tail: 40 lbs
Total: 644 lbs
I was hoping for less than 650, so even when I paint the 30% I'm planning on, I should still be at my goal.
Yesterday was about 200' and 1/4 mile visibility, so I thought a quick picture would be cool
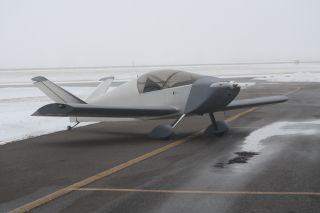
Inspection will hopefully be soon!!
Left: 298 lbs
Right: 306 lbs
Tail: 40 lbs
Total: 644 lbs
I was hoping for less than 650, so even when I paint the 30% I'm planning on, I should still be at my goal.
Yesterday was about 200' and 1/4 mile visibility, so I thought a quick picture would be cool
Inspection will hopefully be soon!!
Mike Farley
Waiex #0056 - N569KM
Jabiru 3300A #1706
MGL Panel
Waiex #0056 - N569KM
Jabiru 3300A #1706
MGL Panel
- MichaelFarley56
- Posts: 1473
- Joined: Thu Jun 02, 2011 11:38 pm
- Location: Columbus, Ohio
Re: Waiex Build Status and Completion Photos
![]() by Andy Walker » Mon Jan 23, 2012 5:23 pm
by Andy Walker » Mon Jan 23, 2012 5:23 pm
Is there a template or pattern out there for the three detent flap bracket, along with some decent instructions? I have the normal two detent one made by Sonex as part of the machined angle kit, and I'm not sure how to go about making one that doesn't look like a total hack job. It looks like those shapes would be very hard to make well and uniformly...
-

Andy Walker - Posts: 375
- Joined: Sat Jul 02, 2011 10:27 pm
Re: Waiex Build Status and Completion Photos
![]() by MichaelFarley56 » Mon Jan 23, 2012 7:29 pm
by MichaelFarley56 » Mon Jan 23, 2012 7:29 pm
As far as I'm aware, the three position flap bracket is something you basically do on your own. I'm still debating on doing this, but I think that when I decide to I'll probably use a Dremel cutoff wheel and lots of filing to make it look square. My bracket is a Sonex stock item I ordered and I think the good news is that, if carefully done, I can modify the stock one and add the third detent.
Mike Farley
Waiex #0056 - N569KM
Jabiru 3300A #1706
MGL Panel
Waiex #0056 - N569KM
Jabiru 3300A #1706
MGL Panel
- MichaelFarley56
- Posts: 1473
- Joined: Thu Jun 02, 2011 11:38 pm
- Location: Columbus, Ohio
Re: Waiex Build Status and Completion Photos
![]() by Andy Walker » Mon Jan 23, 2012 8:16 pm
by Andy Walker » Mon Jan 23, 2012 8:16 pm
MichaelFarley56 wrote:As far as I'm aware, the three position flap bracket is something you basically do on your own. I'm still debating on doing this, but I think that when I decide to I'll probably use a Dremel cutoff wheel and lots of filing to make it look square. My bracket is a Sonex stock item I ordered and I think the good news is that, if carefully done, I can modify the stock one and add the third detent.
How?? The third element goes between the other two, unless you mount the bracket in a non-plans position, the flap handle travel of adding it at the front would make the flap travel less than the normal "one notch" position, and if you put it in back the travel would be more than the plans 30 degrees! :o
-
Andy Walker - Posts: 375
- Joined: Sat Jul 02, 2011 10:27 pm
Re: Waiex Build Status and Completion Photos
![]() by MichaelFarley56 » Mon Jan 23, 2012 10:20 pm
by MichaelFarley56 » Mon Jan 23, 2012 10:20 pm
No Andy you got it. The plan is to put a third notch between the two existing ones. Basically, you're adding a 20 degree notch to the already existing 10 & 30 degree notches.
Mike Farley
Waiex #0056 - N569KM
Jabiru 3300A #1706
MGL Panel
Waiex #0056 - N569KM
Jabiru 3300A #1706
MGL Panel
- MichaelFarley56
- Posts: 1473
- Joined: Thu Jun 02, 2011 11:38 pm
- Location: Columbus, Ohio
Re: Waiex Build Status and Completion Photos
![]() by N111YX » Tue Jan 24, 2012 1:23 am
by N111YX » Tue Jan 24, 2012 1:23 am
Looking good, Mike!
Andy, after making 400 angle pieces, the detent bracket was not too difficult to fabricate. If one has the "pre-made" angles, it may be more of a challenge but after an hour and some creative filing, you'll likely have a nice piece. If it takes more than one attempt, the 1X1 is pretty cheap by the foot...
Andy, after making 400 angle pieces, the detent bracket was not too difficult to fabricate. If one has the "pre-made" angles, it may be more of a challenge but after an hour and some creative filing, you'll likely have a nice piece. If it takes more than one attempt, the 1X1 is pretty cheap by the foot...
Andy Walker wrote:Is there a template or pattern out there for the three detent flap bracket, along with some decent instructions? I have the normal two detent one made by Sonex as part of the machined angle kit, and I'm not sure how to go about making one that doesn't look like a total hack job. It looks like those shapes would be very hard to make well and uniformly...
Kip
2010 Waiex 0082 (first flight May 2010)
Jabiru 3300 #1637 and #3035
Dynon D-180
Becker radios
Garmin GDL 82 ADS-B
1050 hours
48 states visited
Based near Atlanta
Also flying a...
2000 Kolb Firestar II, Rotax 503, 575 hours
2010 Waiex 0082 (first flight May 2010)
Jabiru 3300 #1637 and #3035
Dynon D-180
Becker radios
Garmin GDL 82 ADS-B
1050 hours
48 states visited
Based near Atlanta
Also flying a...
2000 Kolb Firestar II, Rotax 503, 575 hours
- N111YX
- Posts: 705
- Joined: Fri Jun 03, 2011 9:43 am
- Location: Atlanta, GA USA
Re: Waiex Build Status and Completion Photos
![]() by rizzz » Tue Jan 24, 2012 2:21 am
by rizzz » Tue Jan 24, 2012 2:21 am
Andy Walker wrote:Is there a template or pattern out there for the three detent flap bracket, along with some decent instructions? I have the normal two detent one made by Sonex as part of the machined angle kit, and I'm not sure how to go about making one that doesn't look like a total hack job. It looks like those shapes would be very hard to make well and uniformly...
I have CAD drawing I'd be happy to share. With this, it's just a matter of printing the CAD drawing true size, sticking it on the angle with some spray glue, and cutting the angle.
Sonex normally does not allow us to share CAD drawings copied from their plans, but as this drawing is not copied from the plan but own design I believe there is no copyright issue doing this.
Here's some snapshots on my builders log:
http://www.mykitlog.com/users/display_l ... 55&row=183
http://www.mykitlog.com/users/display_l ... 57&row=182
Michael
Sonex #145 from scratch (mostly)
Taildragger, 2.4L VW engine, AeroInjector, Prince 54x48 P-Tip
VH-MND, CofA issued 2nd of November 2015
First flight 7th of November 2015
Phase I Completed, 11th of February 2016
http://www.mykitlog.com/rizzz/
Sonex #145 from scratch (mostly)
Taildragger, 2.4L VW engine, AeroInjector, Prince 54x48 P-Tip
VH-MND, CofA issued 2nd of November 2015
First flight 7th of November 2015
Phase I Completed, 11th of February 2016
http://www.mykitlog.com/rizzz/
- rizzz
- Posts: 869
- Joined: Tue Jun 21, 2011 2:07 am
- Location: Wollongong, NSW, Australia
Re: Waiex Build Status and Completion Photos
![]() by Andy Walker » Tue Jan 24, 2012 10:57 am
by Andy Walker » Tue Jan 24, 2012 10:57 am
MichaelFarley56 wrote:No Andy you got it. The plan is to put a third notch between the two existing ones. Basically, you're adding a 20 degree notch to the already existing 10 & 30 degree notches.
I looked again at the detent piece last night. I thought there was not enough room to put a third detent between the existing two, but I was wrong (occasionally that happens ;) )... Looks like I'll be modifying that piece instead of going from scratch. How do you plan to do it? I can use the bandsaw to put in the perpendicular cuts, but the longitudinal cut is more problematic. I might take Kip's "drill a lot of holes close together" method.
-
Andy Walker - Posts: 375
- Joined: Sat Jul 02, 2011 10:27 pm
Re: Waiex Build Status and Completion Photos
![]() by Andy Walker » Tue Jan 24, 2012 11:01 am
by Andy Walker » Tue Jan 24, 2012 11:01 am
N111YX wrote: If it takes more than one attempt, the 1X1 is pretty cheap by the foot...
I'm way ahead of you Kip, I already have 8 feet of 1x1 and a one foot square sheet of 1/8" plate from ACS for just these kinds of needs. :lol:
-
Andy Walker - Posts: 375
- Joined: Sat Jul 02, 2011 10:27 pm
Who is online
Users browsing this forum: No registered users and 10 guests


